|
1-3-1 ZONE DEFENSE AND HALF COURT TRAP
Thanks to the success of West Virginia and Michigan in recent seasons, the 1-3-1
zone defense is making a comeback in basketball. Originally designed by
basketball coaching legend Clair Bee, this zone defense has the ability
Advantages of the 1-3-1 Zone Defense
The best advantage of the 1-3-1 zone defense is the ability to take away the
middle of the floor. The 1-3-1 zone defense forces the defense to one side
of the floor or the other and has the ability to front both the high and low
post areas. The zone can also provide help in the post when the ball is
swung to the corner.
Another advantage of the 1-3-1 zone defense is that it can keep the center close
to the basket. Like the 2-3 or 2-1-2 zone defense, the 1-3-1 zone defense
is effective in keeping a dominant center close to the basket and in position to
front the post and to rebound.
Finally, the 1-3-1 zone defense is versatile with the ability to trap and
extend. In addition to the slides that are shown in this article, this
article will also detail the ways that the zone can be used to trap and extend
in an effort to create more turnovers and attack with this defense.
Disadvantages of the 1-3-1 Zone Defense
Since the 1-3-1 zone is a strong defense in taking away the middle of the floor,
the perimeter is compromised, especially in the corners. A player who can
hit shots from the corner, especially three-point shots, can be a headache for
this defense.
Also, two other weaknesses of all straight zones arise from the 1-3-1 zone.
The first of these is the difficulties rebounding the basketball. Because
the zone has the players guarding area, it is difficult for zone defenders to
block out effectively. Because zones force long shots, they will also
force long rebounds which could play to the advantage of the offense.
The other weakness is with match-ups. Because the zone guards area, the
offense can dictate the match-up with the defense. The four outside
defenders (X1, X2, X3, and X4) must all be competent and capable on-ball
defenders and X5 must be a force in the middle for this defense to be effective.
Setting Up the Defense
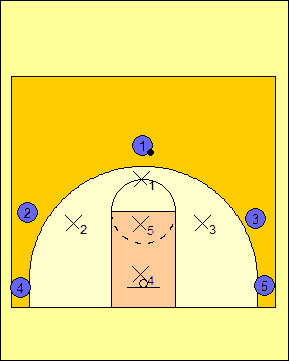
In putting the defense together, we want to set up X1 at the point, X2 and X3 at
the wings, X4 just in front of the basket and X5 just below the middle of the
free throw line (Diagram 1). X1 is the best on-ball defended while X2 is
the second-best on-ball defender. X5 is the best big man and X4 is the
next best big man.
Diagram
1 |
Basic Slides
Once the players are in position to set up the zone, the players are taught how
to move and get into the right spots in the zone. For this defense or any
other straight zone defense to be effective, the players must be quick and jump
to the pass.
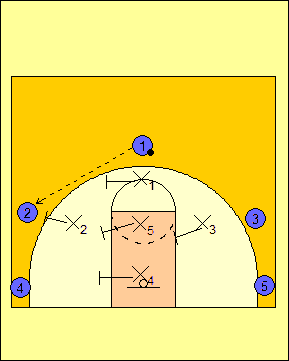
The ball is passed from the point to the wing in Diagram 2. X2 will point
the ball while X4 and X5 cover the low and high posts respectively. X3
slides to an area just below the help-side elbow and X1 will move to where the
lane line-extended and the top of the circle-extended meet in an effort to keep
the ball on the same side of the floor.
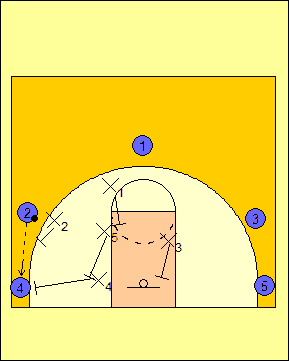
In Diagram 3, the ball is passed to the corner from the wing. Here, we
want X4 to point the ball with X5 fronting the low post. X2 will look to
deny the pass back to the corner while X1 will cover the high post area and X3
protects the help-side low post just inside the lane.
Diagram 4 shows the end result of where the defensive players should be when the
ball is passed into the corner. From here, we should be able to keep them
in the corner with the right pressure. This will then force them into
shooting low percentage shots from the corner or making an errant pass that can
be intercepted by the defense.
Diagram
2 |
Diagram
3 |
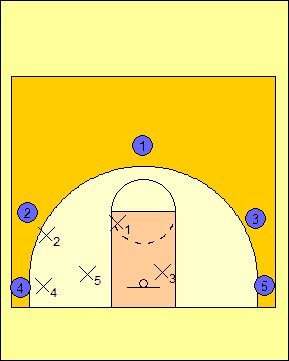
Diagram 4 |
Zone Slides Against Skip Passes
If the offense attempts a skip pass, we have a
variation as to how we want to play against the zone. The
slides differ because of the ability and proximity of the players
getting to each type of skip pass.
In Diagram 5, we find a pass from the point to the
corner. Here, X2 will point the ball and X1 and X5 playing
their normal responsibilities. X3 will protect the high post
area while X4 will stay underneath the basket.

Diagram
5 |
In Diagrams 6 and 7, we see variations of skip
passes to the wings. Diagram 6 shows a pass from the corner to
the opposite wing. We will get into the 1-3-1 alignment with
X3 pointing the ball, X1 on top, X5 covering the high post, X4
covering the low post, and X2 as the help-side wing.
Diagram 7 shows the 1-3-1 alignment shifting from
one side of the floor to the other. The alignments stay the
same and the spots are relatively unchanged except for which side
the ball is located.

Diagram
6 |

Diagram
7 |
Trapping from the 1-3-1 Zone
One popular variation of the 1-3-1 zone defense is
the trap in the corner. This is used when a team is accustomed
to facing the straight zone and has been taking their time with the
ball in the corner. In Diagrams 8 and 9, the trap is shown
with X4 on his normal slide to the corner and X2 following the pass
to set the trap in the corner. X5 will front the low post
because we do not want to get burned for the lay-up while X1 will
play halfway between the wing and the high post so that we can
intercept either pass. X3 is responsible for any skip pass
that comes out of the trap and plays to intercept if he can and
closeout if he must.

Diagram
8 |

Diagram 9 |
1-3-1 Half Court Trap
While the 1-3-1 zone itself is passive in nature, we
can use the zone in a more aggressive fashion by extending it to
half court and trapping from it.
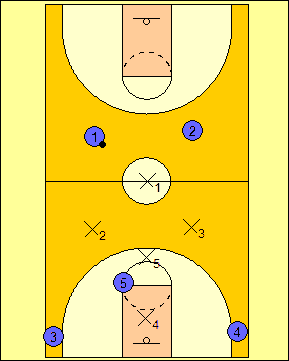
In the 1-3-1 half court trap, we want X1 to force
the ball to go to one side of the floor or the other and to trap
with the ball-side wing (either X2 or X3). Meanwhile, X4 will
be halfway between the free throw line and the basket while X5 will
be at the top of the free throw circle (Diagram 10).
Once the ball crosses half court as illustrated in
Diagram 11, we want the ball-side wing and X1 to set the first trap.
X4 and the help-side wing must be prepared to intercept passes and
to set possible traps in their nearest respective corners. The
job of X5 is to prevent the ball from being entered into the high
post area by fronting any possible receivers.
Diagram
10 |

Diagram
11 |
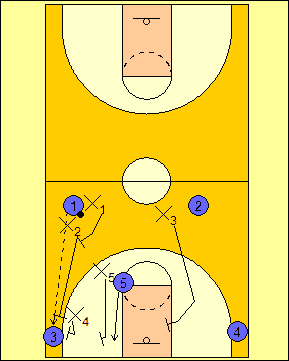
When the trap is set, the rotation based on where
the ball goes varies. If the pass is made from guard to guard
as in Diagram 12, X1 will follow the pass and set the trap with X3.
X2 will become an interceptor and X4 will change sides of the floor.
X5 will stay in front of the high post to deny the ball from being
entered.
If the pass is made to the corner as is shown in
Diagram 13, X2 will follow the pass and trap with X4. X1 will
become the interceptors and X3 will be responsible for the help-side
low post. X5's job will be to front the post man. If he
stays high, he will stay high. If he goes to the low post as
shown in Diagram 13, he will go with him.
We never expect a pass to be made from #1 to #4 in
Diagrams 10-13. The pass is too risky and is usually
overthrown or intercepted on an underthrown pass.

Diagram
12 |
Diagram
13 |
Teaching the 1-3-1 Zone Defense
When we teach any zone defense, we will always do it with all five defensive
players. The first part is to teach the defense against ball movement and
a gap offense. With the 1-3-1 zone, we situate our five offensive players
at the five spots where the 1-3-1 zone is aligned before the offense is
initiated. It is important that we not
start with skip passes initially so that our players can understand the basics
of the zone defense.
Next, we teach the zone slides on skip passes. We teach the passes to the
corner from the point and from the corner to the point. Then, we will
teach the skip passes from wing to wing as well as from wing to corner and
corner to wing. Finally, we will teach the responsibilities as to how to
defend the pass to the high post area against the zone.
Once we have taken these steps, we will scrimmage
using the zone defense. During the scrimmage as well as during the time in
which we are teaching the zone defense, we will make corrections as needed and
adjustments to the zone as we go.
RETURN TO MEMBERSHIP AREA
© 2010-2017 Alan Peel Enterprises
|