|
THE 1-4 HIGH OFFENSE
While I was at William Jewell College with Larry Holley, our teams always ran a
1-4 high offense designed to take advantage of pressure and sagging man-to-man
defenses. We felt more comfortable with our personnel running a set
offense and the 1-4 high worked well against either a pressure or sagging man-to-man defense
and it also had its advantages against certain types of zone defenses depending
on how we utilized the offense.
Advantages of the 1-4 High Offense
The 1-4 high offense works great when you have two post players who are
complimentary and three players who can play on the perimeter. This is a
double-post offense and your post players will be working in and around the free
throw lane and free throw circle. Your perimeter players will only go into
the post on rare occasions, but they will mostly stay on the perimeter.
Limiting the area where they have to play can make the offense more simplified
for your players.
Second, the 1-4 high offense is set up in such a way that the point guard has
four near receivers to pass to as a way to start the offense. This allows
the point guard more options as to how he can start the offense. He can
enter with the dribble or the pass to either one of the four players at the
free-throw line extended. This helps especially when the point guard is
facing a pressure man-to-man defense.
Third, the high alignment allows for great backdoor and post-up opportunities.
The posts being brought high allows for post passes to turn into quick hitters
with wing players cutting to the basket. The posts are also set up so that
if there is a dead front of the post, a lob play can become an automatic.
Also, when the ball gets entered to the wing on the dribble or the pass, the
posts can situate themselves in such a way that they can post up high or low to
receive the basketball.
Fourth, the 1-4 high offense works well against zone defenses in that the four
high players can permit entry into the offense either with an entry into either
one of the post players or either one of the perimeter players. The 1-4
high set can be used to get your team into your zone offense.
Finally, the 1-4 high offense, like many other set offenses, is easy to teach
and it can be installed in a matter of days. Unlike motion offense, the
1-4 high offense allows players to learn the system quickly and there is such a
diversity of options that you can take advantage of what your players can do
well.
Disadvantages of the 1-4 High Offense
Like all patterned offenses, the 1-4 high offense has the tendency to be easily
scouted. Actions are all predetermined by what happens based on ball
movement and player movement. Being predictable can get you beat if you
are playing a team that can successfully scout out everything you want to do.
Second, the 1-4 high offense requires three-out/two-in personnel. Very
rarely can you run this offense if you don't have this type of personnel on the
court. Adjustments are necessary and it can put players in a
disadvantageous position if you don't adjust.
Finally, unless you put specific elements of two-man games and three-man games
into your offense, your defense will suffer. Being able to put certain
elements in your 1-4 high offense should help, but you may need to take away
from practice time to work on elements that are not incorporated in your
offense.
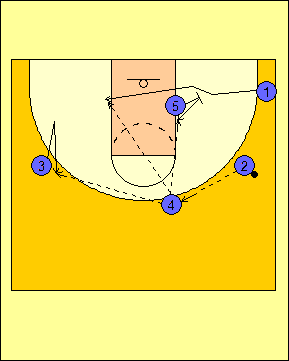
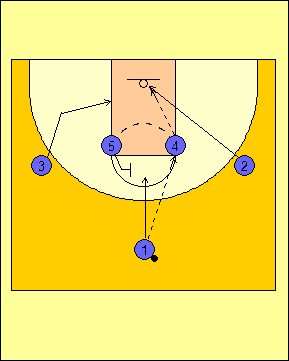
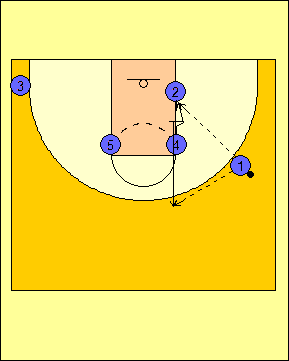
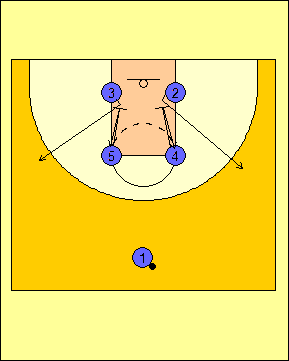
Post Option
On our post option play, #1 passes in to either #4 or #5 in the high post (#4 in
illustration). Once ball-side and help-side have been established by the
pass into the post, the ball-side wing will cut to the basket and look for the
backdoor. The help-side post steps out in anticipation of setting a flare
screen for the point guard. The help-side wing will start down the
sideline and go to just above the help-side low block getting ready to set up
for the point guard's decision. From here, the point guard will make a
decision as to which way he goes.
The first option for the point guard is to pop to the
ball-side wing and look for the ball from the post player with the ball.
If the point guard gets the ball, the post who passed it to him is going
to slide down to the ball-side low block and #2 is going to come off of
a stagger double set on the help-side lane line by #3 and #5. The
options for the point guard are as follows: #4, #2, #5 on the slip
to the basket if the screen is switched and #3 on the slip to the
corner. If #1 cannot get the ball, #4 stays put and waits for the
stagger double to develop. In that case, #4 can pass to #2, #5
going to the basket or #3.
|
Post Option (Point guard uses two-man game with #4 to set up the
stagger double for #2). |
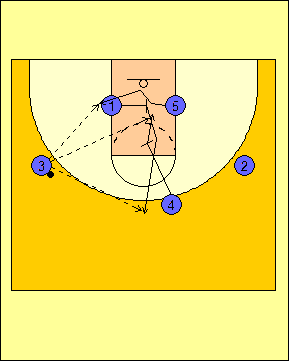
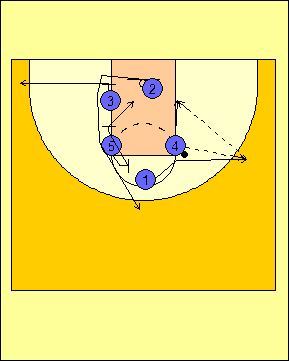
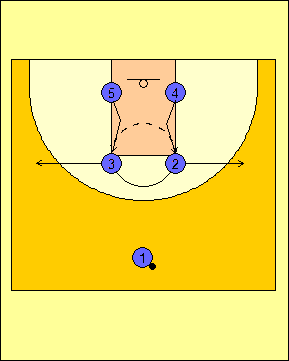
If the point guard decides to use the flare screen set by #5 and not follow his
pass, #2 will clear out to the ball-side corner and #3 will put his head under
the basket. #4 will look to pass to #1 to set up the double down for #3.
Here, #4 and #5 will set a double down screen for #3 after #1 has received the
ball. Our #3 will come off of the help-side shoulder of #4 and go straight
to the point where he will receive the ball from #1.
|
Post Option (Point guard uses the flare screen to set up the
double down screen by #4 and #5). |
When the plays are completed and a shot not be taken at the end of
these plays, we can do one of three things:
-
Reset the offense and run the 1-4 high again.
-
Enter into our motion offense.
-
Get into the pick-and-roll with the nearest big screening the
ball and everyone else spotting up accordingly.
-
Back out and run a different set offense.
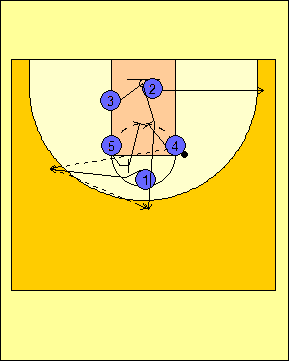
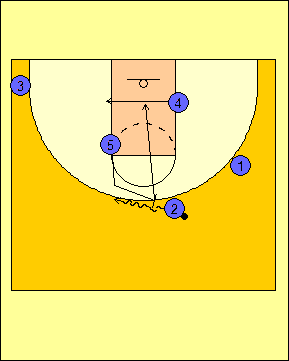
Wing Option
Like our post option, we have two options whenever we enter the ball to the
wing. Whenever the ball is entered to the wing, we run a UCLA cut for our
point guard. From here, he can either go to the ball-side corner or to the
help-side corner. His cut will determine what play we will run.
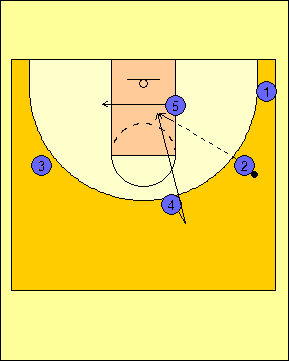
Let's say that our point guard decides to cut to the ball-side corner. If
this happens, #5, who starts as the weak-side post, will flash to the ball-side
low post in anticipation of #2 passing him the ball once #1's man clears.
Meanwhile, #4 will pop to the perimeter off of the screen to get open.
Should the ball go to #4, #1 will make a flex cut off of #5. If there is a
switch, #5 will seal the defender and flash to the ball. Meanwhile, #3
will v-cut and replace himself so as to get open. When #4 has the ball,
his passing options are #1, #5 and #3.
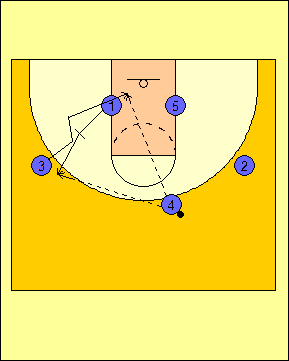
Once the ball is entered to #3, #1 will set a cross screen for #5 to bring #5 to
the same side as #3. After #5 goes to the low-side block, #4 will down
screen for #1 and bring him back to the point. Should there be a switch on
the down screen, #4 will slip to the basket for a possible pass from #3.
So, #3's options are #5, #1 and #4.
|
 
Wing Option (Strong side cut by point guard) |
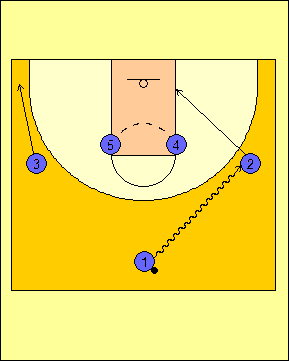
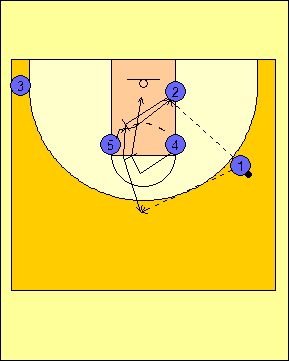
The point guard also has the option of cutting through
to the weak-side block off of the UCLA cut. Here, as he goes
through, #5 will drop to the low block as soon as #1 clears and #3 will
spot up behind the three-point arc halfway between the free-throw
line-extended and the lane line-extended. #4 will set a ball
screen for #2 and roll to the basket once #2 clears. From here,
the options for #2 are as follows:
-
Drive to the basket if your defender chases over the
top of the ball screen.
-
Shoot if your defender goes under the ball screen.
-
Pass to #5 on the help-side low block.
-
Pass to #3 for an open jump shot.
-
Pass to #1 for an open jump shot.
-
Pass to #4 on the roll to the basket.
|

Wing Option (Weak-side cut by point guard) |
Again, when the plays are completed and a shot not be taken, we can
reset the offense and run the 1-4 high again, enter into our motion
offense, get into the pick-and-roll with the nearest big screening the
ball and everyone else spotting up accordingly or back out and run a
different set offense.
Dribble Option
While I am not a big fan of using the dribble to enter into the offense, the
dribble can be an effective weapon in the 1-4 high offense in that you can get a
back cut off of the dribble to the wing. If that doesn't work, we have a
couple of plays that can be used to get the ball into the post or to get the
ball on top. Understand that we will only go to a dribble option play if
we cannot enter the ball into either post or either wing.
|
Entry into dribble option plays. |
The first option for the wing is to set a back screen for the ball-side post, or
to create a Utah cut for our ball-side big man. The point guard keeps his
dribble alive until he's totally committed to the pass. The pass options
with the Utah cut are to hit the big man in the low post or to hit the wing on
top if the low post is not open. If the ball goes back to the top, we will
run a middle pick-and-roll with the weak-side post setting the ball screen.
|
Option for the wing to screen the ball-side post player and run
the middle pick-and-roll. |
The wing can also set a back screen for the help-side post. When this
happens we have three options off of the play: the pass into the low post to the
weak-side low post coming off of the wing's screen, the wing coming off of the
down screen set by the ball-side big man or the ball-side big man slipping to
the basket on a possible switch.
|
Option for the wing to screen the help-side post player and
receive a down screen. |
Should none of the options become available off of either of the choices made by
the wing, we can either reset and run the 1-4 high again, enter into our motion offense,
get into the pick-and-roll with our nearest big screening the ball and everyone
else spotting up or back out and run a different set offense.
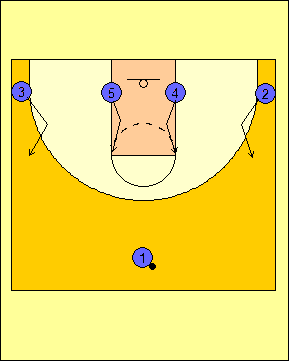
1-4 High Offense Pre-sets
There are two main pre-sets that I like to use to illustrate the 1-4 high
offense and both allow us to teach the offense and present it
with four available receivers. The first is the basic 1-4 high alignment
which is the regular alignment for running this offense. With this
alignment, it is important that the post players start below the free-throw
line-extended and the wings start above the free-throw line extended. This
way, we have a better chance of getting the backdoor if we throw to the post
players. By starting the wings closer to the half court line than the
posts, we can create enough separation between the wing and the wing's defender
to get the backdoor.
The second is the
1-4 flat formation. From the 1-4 flat, we have the bigs and the wings come
up to the elbows and the free-throw line-extended respectively. We have
the wings break the three-point arc twice while we have the bigs break the lane
line twice.

Standard 1-4 High Formation |
1-4 Low into 1-4 High Formation |
There are times where we want to get the ball to the wing so that we can attack
from the side. Usually, we do this against a sagging defense and it can
pay off with the screening action off of our wing option plays. The
pre-sets that we use are "Down" and "Kentucky". With these two pre-sets we
start with the wings on the low blocks and the posts at the elbows. "Down"
has both bigs setting down screens for our wings while our wings rub off of our
bigs from the inside and over the top. When "Down" or "Kentucky" is
called, the wings are the first options and the posts are the second options.
The dribble option is used only as an option of last resort.
"Down" Pre-set |

"Kentucky" Pre-set |
Likewise, there are times where we want to get the ball into the post either to
take advantage of overplay at the wings or just to get the ball into the post
area to start a possession. The best of these pre-sets are what we call
"Albertson" and "Cross". "Albertson" allows our bigs to come high to the
elbow to replace the wings who started there. Meanwhile, "Cross" has our
wings crossing from one side to the other with the intent of clearing the
defensive players off of our posts so that we can attack inside. With all
of these pre-sets, we start our reads with our bigs then work our way to the
wings and dribble option as the option of last resort.
"Albertson" Pre-set |

"Cross" Pre-set |
Teaching the 1-4 High Offense
In introducing the 1-4 high offense, I will always start out by teaching the
offense during offensive script. I will start with either the post entry
first because I want to emphasize entering the ball into the post whenever
possible. Second, I go into wing option because I want that to be the
second option for the point guard. Finally, I teach the dribble option as
the option of last resort. Until we have completely installed the plays,
we will not teach any of the presets, which we will teach during offensive
script.
The offense can be taught 3-on-0 in our breakdown work. To do this, you
need to have one point guard, one wing and one post player. You can have
the post player set up on the side opposite of the wing or on the same side as
the wing. In teaching the wing option plays, you need the post and the
wing on the same side, though I believe you could have him start on the weak
side to teach the flash cut on the strong-side corner cut by the point guard.
To teach our post entry, we only use the post and the wing on the same side so
that we can teach the backdoor off of post entry. As for our dribble
entry, we will work on the back screen by the wing with the post setting up on
either elbow so that we can work on the Utah cut from both elbows since the wing
has the option to screen for one or the other.
When we face a zone, we can use the 1-4 high as a pre-set against certain types
of zone. A post entry is perfect against a 1-3-1 zone or a 3-2 zone.
The wing option is always available to us against a 1-2-2, 2-1-2 or 2-3 zone.
I should also mention that if you are uncomfortable in giving options to your
players as to how they cut/screen in the offense, you can replace the options
with calls for certain set plays. A younger and more inexperienced team
would benefit more from this than in having cutting/screening options for
certain players.
RETURN TO MEMBERSHIP AREA
© 2010-2017 Alan Peel Enterprises
|