|
2-3 (2-1-2) ZONE DEFENSE
With the recent success of teams like Syracuse and Baylor in their use of the
2-3 zone defense, coaches and teams are interested in finding out more about
this scheme that has produced national champions and stifled offenses at various
levels of the game. Here is a look at this defense that has caused many an
offensive coach, such as myself, many sleepless nights.
Advantages of the 2-3 (2-1-2) Zone Defense
The zone has several advantages that should be taken into consideration when a
coach wishes to utilize the 2-3 zone. They include, but are not limited
to:
-
The defense allows you to protect your center.
Because the two guards and the two forwards are responsible for
covering the perimeter, the center is essentially protected on the
inside. He will be allowed to cover the low post area and can
cause problems for penetration into the post area whether it is on
the dribble or by the use of the pass.
-
Versatility the defense. This defense
has the ability to be used as a straight zone, a point zone or as a
match-up zone as illustrated in my piece on match-up zone defenses.
With the 2-3 zone defense, there are several applications that can
be used to give your team a multiple defense.
-
Ability to dictate where your players will
defend. If you have defensive players you do not want
guarding near your basket, the 1-2-2 zone allows you to hide them
from playing post defense. All you have to do is put your
players where you feel they are best suited to play defense instead
of having to determine a defensive match-up for each player.
-
The zone is an attractive defense to start the
fast break. Because of the alignment of a point and two
wings at the top of the zone, the formation of the defense is a
great way to get players into their lanes and attack the basket with
a three-man fast break and both posts trailing.
Disadvantages of the 2-3 (2-1-2) Zone Defense
However, there are also some disadvantages that need to be considered before
deciding to use the 2-3 zone defense. They include, but are not limited
to:
-
Inability to cover the point and the wings.
Because of the positioning of the guards, forwards and center in the
zone, the areas at the top of the three-point arc and the area just
below the free-throw line extended are vulnerable. We also
have some vulnerability in the short corners if we go to a 2-3 look.
However, we can cover the low blocks with a 2-1-2 look in lieu of a
2-3 look.
-
Like all zones, the offense can dictate the
match-ups. The offense can create mismatches by putting
relatively weak defensive players against relatively strong
offensive players. Also, the offense can dictate where
particular personnel can be set up against the defense. When
this happens, the zone really cannot adjust and the defense is
caught in a bind.
-
Like all zones, your players must either be quick
or long with a preference for both. Slow and short teams
typically do not play great zone defense because they are not able
to cover ground quickly. Zones are advantageous for long and
quick teams because they can shrink the size of the gaps in the zone
better than shorter and slower players. Because of this, teams
with length and quickness prosper more in running a zone defense
than those that are not.
-
Zone defenses are relatively passive in nature.
Because the zone is designed to be packed inside the three-point
arc, the defense is not looking to actively steal perimeter passes.
While some passes might be intercepted, the zone is not a great way
to force turnovers. Instead, the zone is designed to control
the action from inside the three-point line and force several long
shots.
Setting Up the Defense
The first two players placed in the zone are X1 and X2, the guards. X1 and
X2 will cover the area inside the top half of the three-point arc and will guard
the basketball when it is at the top of the zone.
The back row of the 2-3 zone are X3, X4 and X5. X3 and X4 are the forwards
while X5 is the center. X3 and X4 will have the responsibility of covering
the corner when the ball is on their side and the area from the basket to the
low post on their side when they are help side. X5 will be required to
dead front any ball-side post player when the ball is below the free-throw line
extended.
Diagram 1 shows the defense as diagrammed and Diagram 2 shows the defense when
the ball is brought across half court. We will not go into the defensive
adjustments until the ball is entered to or below the wing area.
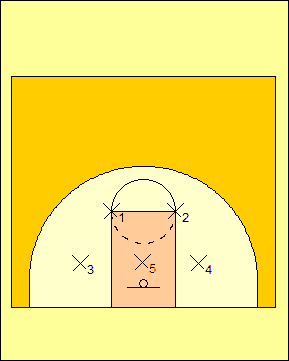
Diagram 1 |
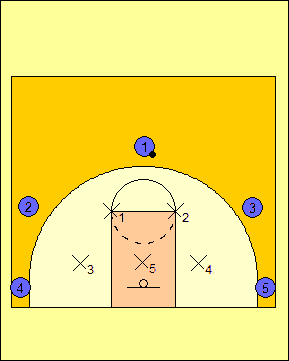
Diagram 2 |
Slides of the 2-3 (2-1-2) Zone
We start the defense with our normal alignment as was
illustrated in Diagrams 1 and 2. If the ball is passed from the
point to the wing, we want X1 to cover the receiver if this is the first
pass. We will shift the rest of the players in the zone
accordingly (Diagram 3). If the ball is passed from the point to
the wing and this was not the first pass, we will have the forward cover
the receiver of the pass until a guard is able to replace him with what
we call a bump.
Diagram 4 illustrates what we want when the ball is
passed from the wing to the corner. The real movement is not with
X1 and X3 as is shown in the illustration, but with the backside three
players. We will have the backside guard cover the ball side high
post, the center fronting in the low post and the backside forward
covering the basket area.
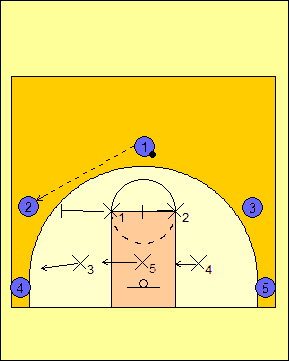
Diagram 3 |
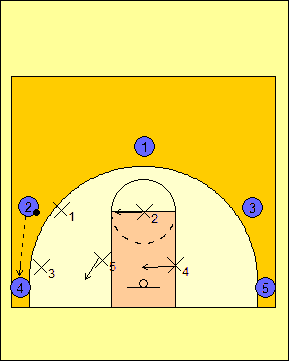
Diagram 4 |
In Diagram 5, we see the skip pass from the corner to the point. When this
happens, we want the help-side guard to point the ball and the help-side forward
to be ready to guard either the wing or the corner depending on where the ball
is passed. In the illustration, X5 will set up in front of the basket, X1
will set up at the nearest elbow and X3 assumes is original starting position.
In Diagram 6, we see the skip pass from the point to the corner. Whenever
this happens, we want the forward on that side to point the ball and the center
to dead front the ball-side low post. In the illustration, X2 covers the
wing area while X1 covers the high post. X3 has the responsibility for the
basket.
In Diagram 7, we see a wing-to-wing skip pass. The help-side guard becomes
the ball-side guard and points the basketball. The ball-side guard who was
guarding the basketball now has responsibilities for the high post area.
X5 goes from block to block while X3 and X4, the forwards trade responsibilities
from before the skip pass was made.
|
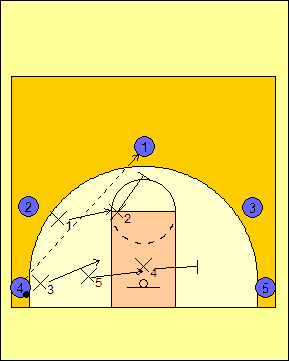
Diagram 5 |
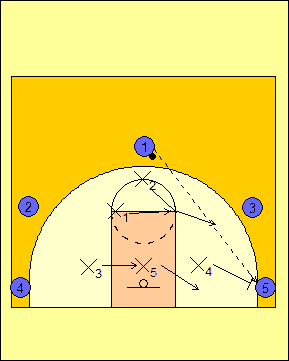
Diagram 6 |
|
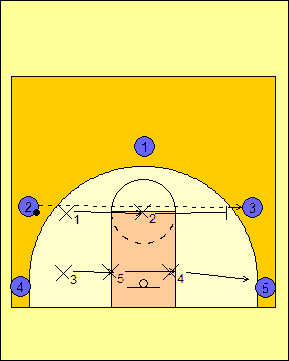
Diagram 7 |
If the ball is entered into the high post area, we will have X5 cover the ball
if the receiver is at the middle of the free throw line (Diagram 8). If
this takes place, we want to contest the basketball and get ready to defend the
ball on the perimeter with our other zone defenders.
|
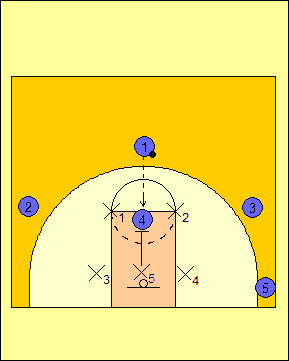
Diagram 8 |
The 2-3 (2-1-2) Point Zone
On of the variations of our 2-3 zone defense is the point zone. Even
though we run this defense with a 1-3-1 look from the ball, we can start the
defense with a even-guard front alignment.

Diagram 9: One of the alignments we use for our point
zone defense is the 2-1-2 alignment. We place X1 and
X2 on the elbows, X3 and X4 just off the low blocks and X5
in the middle. |
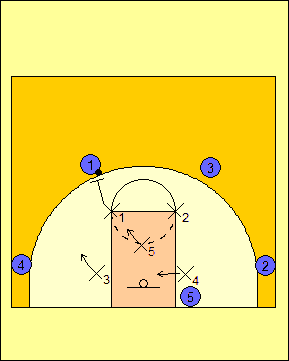
Diagram 10: If the offense shows us an even-guard front,
either X1 or X2 will point the ball. X4 is X1's
partner and X3 is X2's partner. If X1 points, X4 is
near the basket while X2 and X3 play the wing positions.
X5 will be halfway between the ball and the basket. |
Typically, the offense will attack an even-guard front defense with an odd-guard
front zone offense (Diagram 11). When this happens, we make the adjustment
by shifting into a 1-3-1 alignment with X1 starting as the point man in the
point zone. X2 and X3 play the wing positions and X4 moves under the
basket. X5 will then move to a spot halfway between the ball and the
basket (Diagram 12).
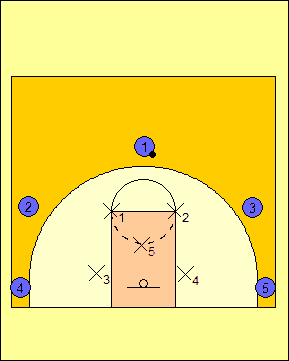
Diagram 11 |
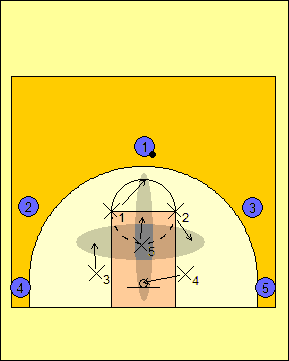
Diagram 12 |
Teaching the 2-3 (2-1-2) Zone Defense
When we teach any zone defense, we will always do it with all five defensive
players. The first part is to teach the defense against ball movement and
a gap offense. With the 2-3 zone, we situate our five offensive players at
the point, both wings, and the corners. It is important that we not start
with skip passes initially so that our players can understand the basics of the
zone defense.
Next, we teach the zone slides on skip passes. We teach the passes to the
corner from the point and from the corner to the point. Then, we will
teach the skip passes from wing to wing as well as from wing to corner and
corner to wing. Finally, we will teach the responsibilities as to how to
defend the pass to the high post area against the zone.
Once we have taken these steps, we will scrimmage
using the zone defense. During the scrimmage as well as during the time in
which we are teaching the zone defense, we will make corrections as needed and
adjustments to the zone as we go.
RETURN TO MEMBERSHIP AREA
© 2010-2017 Alan Peel Enterprises
|