Diagram
1 |
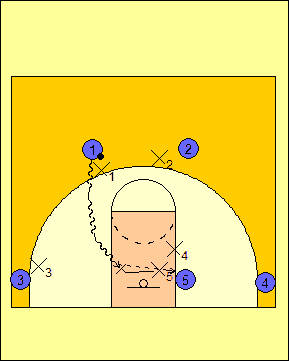
Diagrams 2 and 3 introduce the concepts of help stepping in and the problems
that it poses. Diagram 2 shows #5's defender leaving his man to stop the
dribble penetration. When this happens, the lob pass is open for #5 and
can result in a devastating dunk.
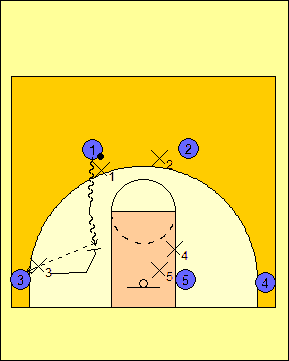
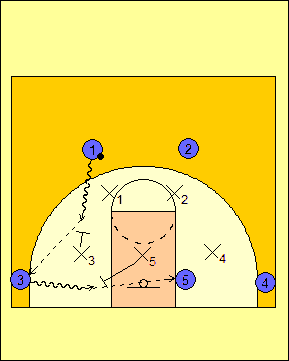
Diagram 3 shows help from a perimeter defender on the drive. #3's man
leaves to stop penetration. Because he started almost in the corner
against #3, X3 goes too far a distance and cannot recover in time to stop the
three-point try by #3. Also, #3 has the option to drive if X3 closes out
poorly.
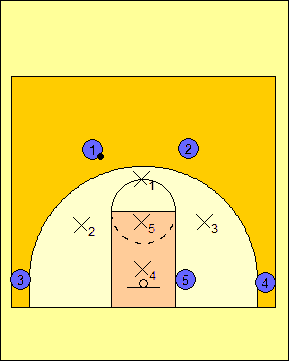
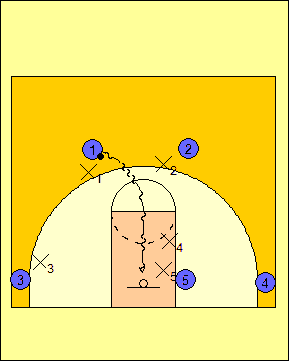
Zone defense are also hurt by the dribble drive motion offense.
Diagram 4 shows that the dribble drive motion offense is in its natural
gaps against a 1-3-1 zone defense. This would also be true if the
dribble drive motion offense faced a 1-2-2 or a 3-2 defense.
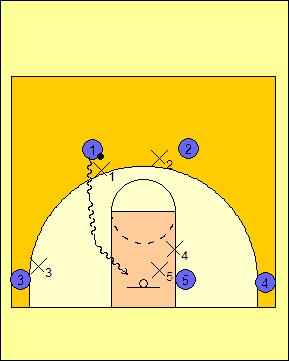
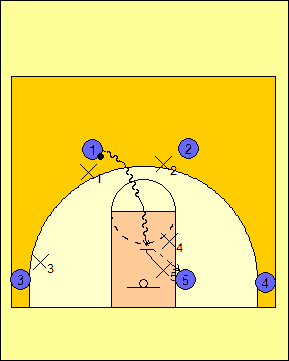
Diagram 5 shows a dribble at the wing defender in the 1-3-1 zone
defense. The wing is playing with his back to #3 and is focused on
defending his area and not #3. Because of this, #3 can sneak in
behind and get the ball from #1 with the choice to attack the rim or get
into a 2-on-1 situation with #5 against X4.
Diagram
4 |
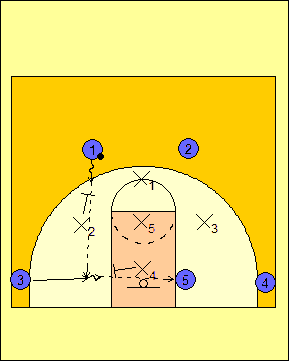
Diagram 5 |
Despite being an even-guard front offense, an
even-guard front defense can still have trouble against the dribble
drive motion offense. In Diagram 6, #1 attacks X3 and looks to
get the ball to #3. When this happens, #3 can attack the rim
and get X5 into a two-on-one situation against #'s 3 and 5.
Diagram
6 |
Defenses might also play to allow the defense to
attack the middle of the floor as shown in Diagrams 7, 8 and 9.
This is suicidal because it allows for the driver to attack the rim
(Diagram 7) or take advantage of help defense.
Diagram
7 |
Against help defense, the defense playing to funnel
everything to the middle is in deep trouble already. In Diagram 8,
the center's defender steps in to stop the drive which results in a play
to #5 for a possible dunk or lay-in. In Diagram 9, #4's defender
steps in to help against the drive which results in an open look for #4
for either a drive or an open shot from three-point range.
|
Diagram
8 |

Diagram 9 |
|
Adjustments to Make
The biggest adjustment to make is to play more
on-the-line/up-the-line defense while limiting ball reversals. In
Diagram 10, X3 plays on-the-line/up-the-line while X2 looks to deny the
guard-to-guard pass. X1 is guarding the ball in such a way to
force the ball to X3. This set-up allows X4 and X5 to be protected
from dribble penetration.
Diagram 11 shows what happens when the ball is in the
corner. X1 denies the pass back out while X2, X4, and X5 are all
help side. X3 guards the ball and looks to force the ball to a
spot on the baseline between the three-point line and the lane-line.
This allows the on-ball defender to use the sideline as an extra
defender and allowing the help-side defenders to be protected against
dribble penetration.
Playing on-the-line/up-the-line allows for ball-side
defenders one pass away to have a shorter path to stopping dribble
penetration and gives a better chance to that same defender to close out
on the ball and preventing the three-point shot.

Diagram 10 |

Diagram 11 |
Conclusions
The teams that have had the most success against the dribble drive
motion offense are those that can cut of drives and still be able to
get out on shooters. This allows for teams to protect their
help-side defense and to keep them from getting burned by the
offense. As this offense gets more exposure, more teams will
find other ways to take away the things this offense wants to do.
In the coming years, this offense, like many others, will get
figured out and will become easier to defend.