|
FAST BREAK OFFENSE
In the modern game of basketball, virtually every team on the high school,
college and professional levels runs some sort of fast break offense that is
designed to increase scoring, take advantage of turnovers and missed shots,
Advantages of the Fast Break Offense
In running the fast break offense, there are several advantages that give a
coach the rationale to run this type of offense. They include, but are not
limited to:
-
It is the best offense to take advantage of
quick, athletic players. Basketball is a game based on the
team with the best quick players. The most successful teams
are typically those who can play at a quick pace and who can get
their players up and down the floor faster than the other team.
-
The offense typically results in high-percentage
shots. The fast break offense usually leads to lay-ups and
unguarded three-point jumpers. When running the fast break
offense, you will find that your players are most successful when
they are able to get high-percentage shots and at a high volume.
Teams that run the fast break can be among the best in field goal
percentage offense and scoring offense per game.
-
It encourages your players to play harder on
defense. When you give your players the incentive to play hard
on defense by rewarding them with fast break opportunities, they
will respond. The best opportunities are on steals that are
caused by defensive pressure which results from players playing hard
on defense.
Disadvantages of the Fast Break Offense
However, there are disadvantages to running a fast break offense which include
the following:
-
The fast break requires a large amount of
practice time. If you are going to be a good running team,
you have to commit to it all the way or you will fail.
Sometimes, you will need at least 40 minutes per practice to perfect
your fast break offense. This is needed to make all of the
necessary corrections and to have your team ready to play at a fast
tempo every time you play.
-
Your players must be proficient in playing at a
fast tempo. If you have players who get sloppy with the
basketball playing at a normal pace, you should probably consider
not running. Turnovers and missed shots happen more frequently
when you play at a faster pace. If you already have problems
with relatively sloppy play on offense in the half court, the fast
break will most likely not be something that would work well for
your team.
-
The coach has to give up some level of control
over his/her basketball team. Coaches, if you have a
problem giving your players a degree of control over how they play
the game, you should probably not run. Players are going to
make bad decisions, but they have the tendency to make more bad
decisions if you entertain the idea of a running game. If you
believe that your having more control over the team means more
success, it would be best not to fast break.
Despite all of these disadvantages, a number of my teams
have had great success in running the fast break and I encourage coaches
at all levels to work on situations where you can take advantage of easy
shots and work at getting more of those easy shots than your opponents.
Primary Break
In running the primary break, we want to run it in situations where we have two
or fewer defenders and a numbers advantage. In every instance, we want to
attack the basket and get a lay-up. We also want to take advantage of
possible defensive breakdowns.
When we attack in a two-on-one situation, we want to get the ball in the hands
of our best ballhandler and have him attack the basket. If the defender
decides to retreat, we want the ballhandler to go in for the lay-up (Diagram 1).
If the defensive player decides to stop the dribble drive of our best
ballhandler, we want the ballhandler to pass the ball to the other player
running the fast break. That player will then shoot the lay-up (Diagram
2).
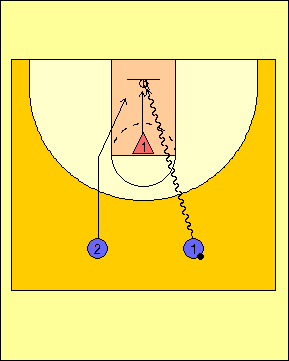
Diagram 1 |
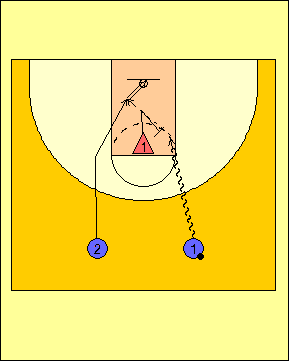
Diagram 2 |
In running our three-on-one break, we want to make the defensive player guard
against three possible shooters. Again, our goal is lay-ups so all three
players will attempt to shoot lay-ups if they get the basketball.
The read is made by the point guard as to what the defensive player does.
If the defender retreats, we want the point guard to attack the basket (Diagram
3). If the defender decides to engage the point guard, he has two pass
options and whoever gets the ball will shoot the lay-up (Diagram 4).
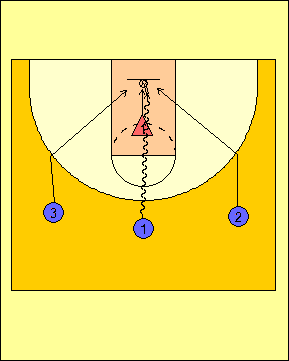
Diagram 3 |
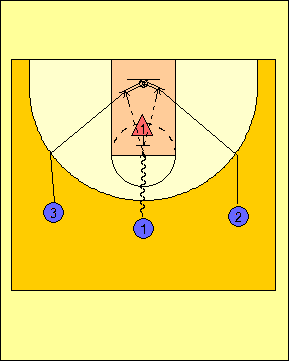
Diagram 4 |
Unless the defense totally breaks down and the wings draw the attention of both
defenders, the point guard will be making a pass in the three-on-two fast break
as illustrated below. The point guard should have his choice as to which
wing will receive his/her pass. The wing receiving the pass should attack
the rim and get the lay-up (Diagram 5).
If the wing with the ball draws the defender, the other wing will receive a
second pass and score the lay-up (Diagram 6). It is important that the
wing come to a jump stop and make the pass before picking up a charging foul.

Diagram 5 |
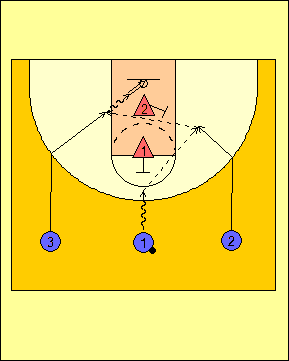
Diagram 6 |
Secondary Break
When we run our fast break offense, we play off of situations as much as
possible. If we get a steal, block a shot or get a long rebound, we want
to attack the basket as quickly as possible. We call these "jailbreak"
situations. Our only objective is to get the ball up the court as quickly
as possible for the lay-up. In many cases, our "jailbreak" situations
result in 2-on-1, 3-on-1 or 3-on-2 fast breaks.
However, if we get a short rebound or we give up a basket, we want to run our
secondary break offense. What we want out of our secondary break is to get
the ball from one side of the floor to the other (baseline to baseline) and
attack inside.
In advancing the basketball, we want to get the ball in the hands of our point
guard as quickly as possible. Either #4 or #5 will take the ball out of
bounds on a made shot because they are the ones who are the nearest to the
basket. The help-side wing breaks at the wing and goes to the basket and
the first player between #4 and #5 down the floor runs to the front of the rim
and steps to just above the ball-side low block. The ball-side wing wants
to spot up behind the three-point arc halfway between the free-throw line
extended and the baseline. The post player inbounding the ball will run to
the help-side slot while the point guard will advance to the slot on his side.
On a normal inbounds, we will inbound the ball directly to #1 and he has four
options: advance pass to the help-side wing, advance pass to the ball-side wing,
advance pass to the post area or push the ball up the floor using the dribble
(Diagram 7).
However, if #1 is being denied the ball, whoever is not inbounding the ball
between #4 and #5 will act as a safety release and will receive the inbounds
pass. In Diagram 8, #4 receives the inbounds pass and passes to #1 who
then dribbles up the floor with the options available to him. The wings
and the posts will then run to their normal spots.

Diagram 7 |
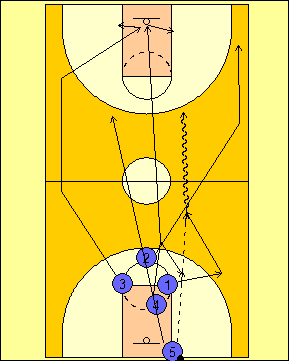
Diagram 8 |
If we are unsuccessful in getting a score off of our "jailbreak" offense or our
secondary break, we have three options as to what we want to do:
-
Get into a predetermined type of motion offense
(open post, four-out/one-in or three-out/two-in).
-
Go into an automatic set play by getting into a
formation and running the play.
-
Back out the ball and call a set play.
I highly recommend the first two choices because it
keeps the defense on their heels constantly. The third is not
something I would recommend, but it is possible if you can make a quick
call and the ball does not get immediately pressured by the nearest
defender.
I should also note that some of the positions can be
interchanged. With our post players, #4 and #5 are interchangeable
and that will be illustrated in a number of examples below. With
our wings, #2 and #3 can run either side and are interchangeable.
In some situations, we could make #1, #2 and #3 interchangeable or make
all five positions interchangeable.
I also want to state that if you are going to run
secondary break, you do not need to attempt to run all of these plays.
I am showing some examples of plays that should help your offense.
You will need to adjust your offense to your personnel based on what
they are capable of running based on their knowledge and understanding
of the game and their own skills.
Our basic secondary break play is "Swing". Here, #2 will skip pass to the
trailer who then completes the baseline-to-baseline reversal to #3. #5
will follow the basketball and must be honored by whoever has the ball on the
perimeter. Once #3 has the ball, #2 will set a back screen for #4 who
looks to receive the ball on a lob pass from #3. If #3 cannot throw the
ball to #4 or #5, he will then get the ball to #2 and we will run our half court
offense.
Diagram 9 |
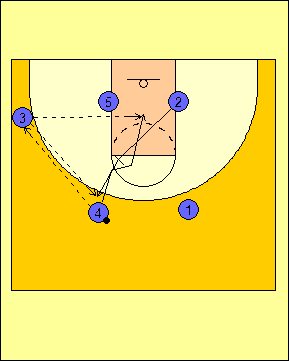
Diagram 10 |
One variation of "Swing" is called "Away". At the end of the
break, we will have the trailer set a back screen for the post if we
have a specific trailer we want to bring to the ball-side low post
(Diagrams 11 and 12).

Diagram 11 |
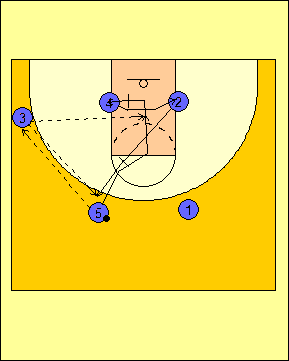
Diagram 12 |
If we are running "Swing" or "Away" and we cannot complete the pass from the
trailer to the wing, we will run one of two plays. The first of these is
"Kickback". Here, the trailer will ball fake to the wing and throw the
ball to the point guard. Once this pass is completed, the wing on the
point guard's side will back screen for the trailer and we will look to get him
the ball off of the cut (Diagram 13).
If we are unsuccessful, we can go one of two ways:
-
If the point guard is able to reverse the ball, the
trailer will set a cross screen for the post and we will look to
enter the ball into either players (Diagram 14).
-
If the point guard cannot pass the ball, he will
dribble below the free-throw line extended and get into a two-man
game with the trailer. If this happens, the post and the
player who set the back screen for the trailer will set a stagger
double screen for the help-side wing (Diagram 15).
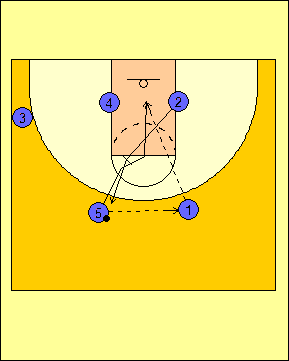
Diagram 13 |
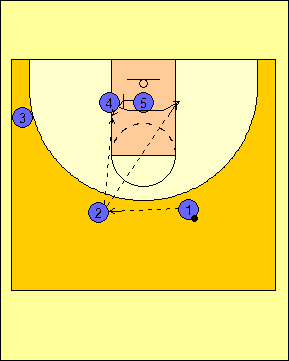
Diagram 14 |
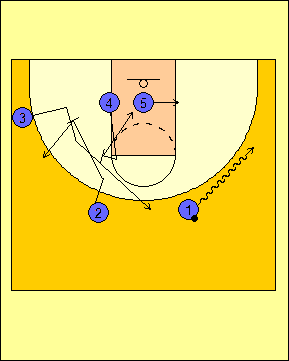
Diagram 15 |
The other play that we can run is called "Get". Here, the trailer has the
ball and runs a dribble handoff with the player who started as the help-side
wing. The point guard will spot up on the wing on his side as the player
who started as the help-side wing dribbles to the point. Meanwhile, the
player who started as the ball-side wing will set a cross screen for the post
and receive a down screen from the trailer (Diagram 16). The player who
started as the help-side wing (#3 in the diagram) will have the choice of
passing to the point guard or to the player who started as the ball-side wing.
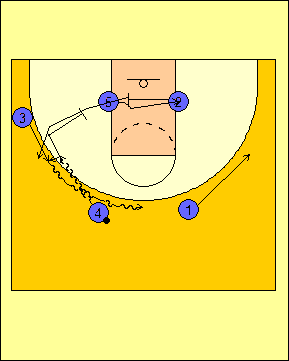
Diagram 16 |
There are also several instances where the point guard
gets the ball back from the wing or is unable to pass the ball ahead to
the wing. When this happens, we have several plays at our
disposal.
The first of these is what we call "Dive Fist".
"Fist" means that we are running a side pick-and-roll with a
big-on-little ball screen. To initiate the play, #1 dribbles at
the trailer and the the trailer dives to the basket. As this is
happening, the help-side wing pops out to receive the pass from the
point guard (Diagram 17). The pick-and-roll is initiated by the
post as the trailer replaces him and #1 spots up in the slot on the side
opposite of the pick-and-roll (Diagram 18).
We can also run the secondary break into a set-up for
zone defenses. Diagram 20 shows a play called "Dive Post" that
gets us into our "2-Down" zone offense while Diagram 21 shows the same
play, but we are getting into our "2-Up" zone offense.
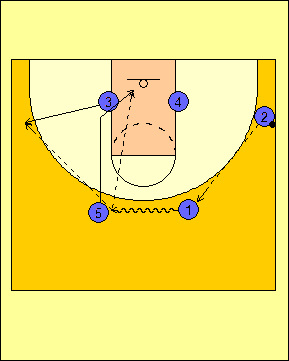
Diagram 17 |

Diagram 18 |

Diagram 19 |

Diagram 20 |
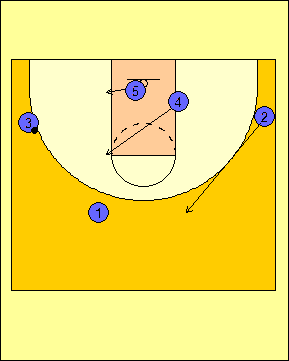
Diagram 21 |
We also have another play that we can run instead of "Dive Fist" or "Dive Post"
called "Drag". "Drag" has the trailer coming over to set a ball screen for
the point guard as he uses it to penetrate the defense. The help-side wing
pops out and the post rolls over to the other low block. While this is
happening, the player who started as the ball-side wing will set a back screen
for the trailer as we look for a possible lob pass (Diagram 22).
The fourth pass option for the point guard is to pass the ball back to the
player who started the play as the ball-side wing. When this happens, the
ball is dribbled below the free-throw line extended and the players nearest the
ball screen away for each other. The trailer will screen away for the post
and the point guard will screen away for the help-side wing (Diagram 23).
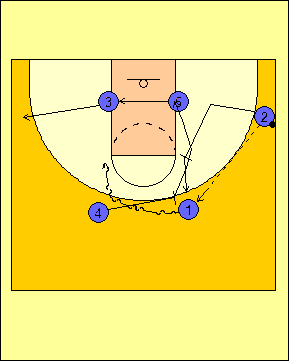
Diagram 22 |
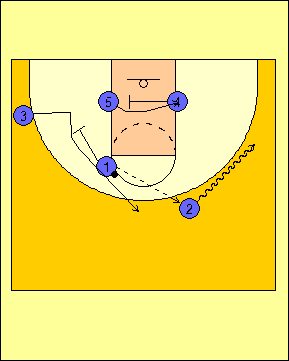
Diagram 23 |
If #1 passes to the trailer we run a play called "Flex". Flex has the post
setting a back screen for the ball-side wing as the help-side wing cuts to the
perimeter (Diagram 24).
The options for the trailer are to hit either the cutter or the screener off of
the flex cut. If neither one of them are open, the trailer can pass to the
help-side wing and we can run a pick-the-picker play with #2 screening #5 and #4
screening for #2 (Diagram 25).
If none of those three options are available, we will ball fake the wing and
pass back to the point guard. When this happens, the point guard dribbles
the basketball below the free-throw line extended to set up a two-man game with
the post. Meanwhile, the player who started as the ball-side wing and the
trailer will set a stagger double for the help-side wing (Diagram 26).

Diagram 24 |
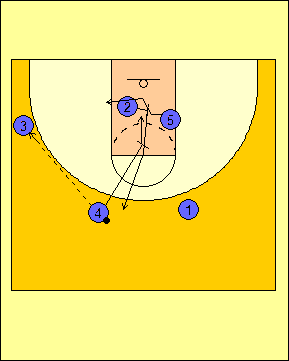
Diagram 25 |
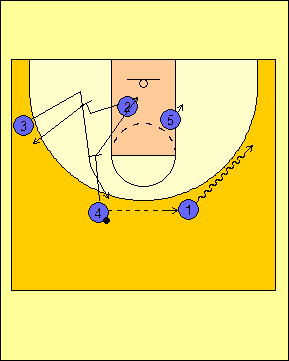
Diagram 26 |
We can even run secondary break if we don't have a player posted up when we make
the pass up the the wing. The play that we run is called "Quick" (Diagram
27). #1 passes up to #2 and sees that the post is vacant and he is ahead
of both #4 and #5. Seeing this, #1 cuts through to the help-side corner
and forces #3 to a spot behind the three-point arc and between the free-throw
line extended and the lane line extended. The first post man down the
floor continues his normal path to the front of the rim looking for a pass, then
will step to the ball-side block as #2 honors him in the low post. The
second big will set a ball screen to run the pick-and-roll.
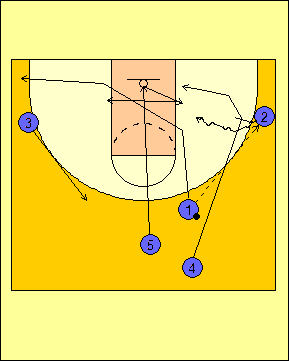
Diagram 27 |
Teaching the Fast Break Offense
Everyday, we start practice with form running to get our players warmed up.
Once we have finished that segment, we go into our transition part-method
drills. These drills are Two-Man Lay-Ups, Three-Lane Fly, Three-Man Weave,
Four-Man Break, and Five-Man Break.
In each of these drills, we want to make a set number of made lay-ups in a row
without the ball touching the floor. With the exception of our Three-Man
Weave drill, all drills require us to make 20 lay-ups in a row without the ball
touching the floor. The players will struggle with this initially, but
they will get better the more and more you run these drills.
The first drill that we do is called Two-Man Lay-Ups. This drill requires
two balls and three lines (a first pass line, a second pass line, and a lay-up
line).
The players in this drill will rotate lines in that the player making the first
pass will go to the line of players who will make the second pass. The
player who makes the second pass will get the rebound and give the ball to the
next person without the ball before going to the lay-up line. The player
shooting the lay-up will go to the end of the first pass line. Once the
team has made 20 lay-ups in a row without the ball touching the floor, we will
move to the other side and shoot lay-ups from the other side.
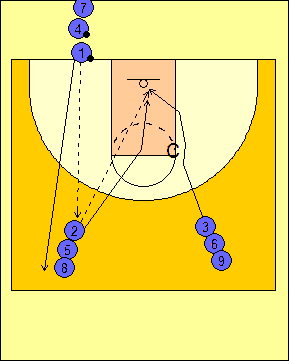
Diagram 28 |
The next drill that we will do is called Three-Lane Fly (Diagrams 29-30).
This drill will have #3 throw the ball off of the backboard and outlet to either
wing (#1 or #2). Whoever receives the outlet pass will throw the ball up
the floor to the other wing and the other wing will shoot the lay-up off of that
pass. The player receiving the outlet pass will run to the top of the free
throw circle and sprint out the other way. #3 will get the ball out of the
basket and throw an inbounds pass to the player who shot the lay-up who will
then throw the ball up the floor for a lay-up.
The players will rotate lines going from left to middle, middle to right, and
right to left. Once we make 20 lay-ups in a row without the ball touching
the floor, we will move on to the next drill.
Diagram 29 |
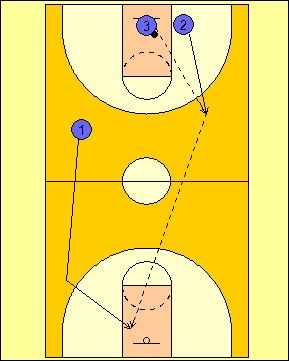
Diagram 30 |
When running Three-Man Weave, we will have our players run the drill with five
passes, four passes and three passes. To move from one segment to the
next, the players must make 16 lay-ups in a row without the ball touching the
floor. Once the goal has been met, for five passes (Diagram 31), you will
then go to four passes (Diagram 32), then to three passes (Diagram 33) once
you've met the goal for four passes. The players will rotate lines going
from left to middle, middle to right, and right to left.
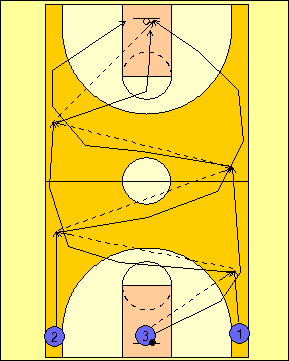
Diagram 31 |

Diagram 32 |

Diagram 33 |
Once we complete Three-Man Weave, we move on to a drill called Four-Man Break
(Diagram 34). Here, we are going to simulate a four-man fast break with #4
inbounding the ball to #1. #2 and #3 run the outside lanes and #1 will
pass to the ball-side wing. That pass is followed by a cross court pass
for the lay-up. The wings will cross underneath and will need to cross in
the space between the backboard and the baseline so that the big man doesn't
have to work too hard.
Here, we run with four lines. We move from left to left center to right
center to right.

Diagram 34 |
The last of our part-method transition offense drills is Five-Man Break
illustrated in Diagram 35. Here, we will inbound the ball from
post-to-post to simulate the pressure release. The post receiving the
inbounds pass will pass to the point guard. The point guard will pass to
the help-side wing who then passes to the other wing for the lay-up. The
post who received the inbounds pass will take the ball out of the basket and
inbound it to the point guard as the process repeats itself. The post who
inbounded the ball will switch places with the post who received the inbounds
pass. The wings will cross underneath and will need to cross in the space
between the backboard and the baseline so that the big men don't have to work
too hard.
Here, we will use five lines and move from left to left center to center to
right center to right.
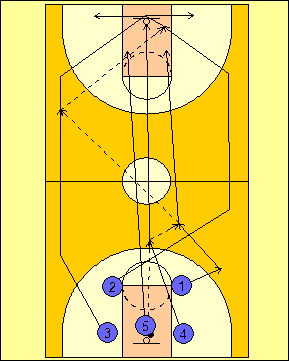
Diagram 35 |
Primary Break Games can be played over a 10-minute period in the first three
days of practice to teach transition defense and how to run a particular primary
break. We will play each segment for three minutes without stopping (even
for out of bounds) and keep score with one point for each basket. On the
first day, we will briefly cover what to do on transition defense so that we can
teach that situation to our players. The segments, in order, are as
follows:
-
Two-on-one continuous. We start by
playing two-on-two with a center jump and putting one line on each
sideline at half court. After the first shot, the player
furthest from the basket drops back on defense and the two defenders
attack on a two-on-one break. Once both offensive players
cross half-court, one of the defender's teammates runs to the center
jump circle and touches the center of the circle with his foot
before sprinting to the defensive end of the floor. Whichever
team has the most points at the end of the drill receives a win for
the round (Diagram 36).
-
Three-on-two continuous. We start by
playing three-on-three with a center jump and putting one line on
each sideline at half court. After the first shot, the two
players furthest from the basket drops back on defense and the three
defenders attack on a three-on-two break. Once all three
offensive players cross half-court, one of the defenders' teammates
runs to the center jump circle and touches the center of the circle
with his foot before sprinting to the defensive end of the floor.
Whichever team has the most points at the end of the drill receives
a win for the round (Diagram 37).
-
Three-on-one continuous. We start by
playing three-on-three with a center jump and putting two lines on
each sideline at each of the free-throw lines extended. After
the first shot, the player furthest from the basket drops back on
defense and the three defenders attack on a three-on-one break.
Once all three offensive players cross half-court, two of the
defender's teammates (one from each sideline sprints directly to the
defensive end of the floor). Whichever team has the most
points at the end of the drill receives a win for the round (Diagram
38).
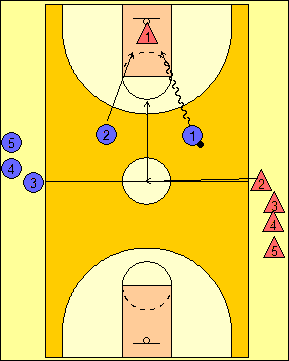
Diagram 36 |
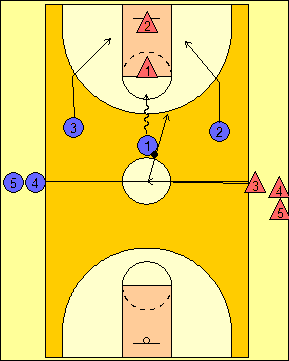
Diagram 37 |
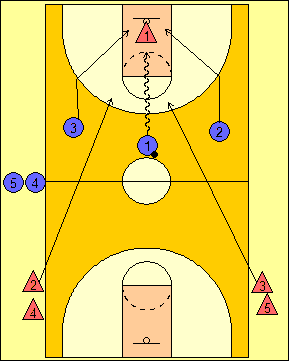
Diagram 38 |
At the end of the drills, the team that won the most rounds will be declared the
winner of Primary Break Games while the losing team runs penalty sprints.
If a team has lost the first two rounds, you can offer them a reduced penalty or
allow them to wipe out all of their sprints if they win the third round to keep
Primary Break Games more competitive.
When we initially teach secondary break or we want to refine some aspects of our
secondary break, we will do a drill called Secondary Script. When we work
on this drill, we are in the half court and we will either use it to teach the
plays in the offense.
Six Trips is a type of drill that we run to allow our team to run our secondary
break offense in a more competitive way. We will split the squad into
groups of five and they will run six trips of our secondary break. Each
player must score at least once in the first five trips as we go through the
scoring options for our players and we will not allow the offense to go to the
other end of the floor until a basket has been made. On the sixth trip, we
want to go from our secondary break into our half-court offense and run the
offense for at least six passes before we score. The groups of five are
competing for the best time and the group that has the best time will be
declared the winner of the drill while the other group(s) run penalty sprints.
When we run our secondary break, we can use a drill we call Circle Break.
We start with the ball in the middle of the free-throw line while we have our
players running in a circle using the ball in the middle of the circle and use
the free throw circle as a guide. From here, I will call out the name of
any one of our offensive players to initiate our secondary break against a live
defense. If our point guard is called out, he will take the ball and
dribble it up the floor. If I call our a player other than our point
guard, that player will pick up the ball and throw an outlet pass to our point
guard so that he can run the secondary break. Meanwhile, the players on
the other team will sprint back on defense as quick as they can while the
offense runs to their spots.
RETURN TO MEMBERSHIP AREA
© 2010-2017 Alan Peel Enterprises
|