|
HORNS OFFENSE
Many professional, collegiate, and European teams are looking to take advantage
of big men who are much more skilled than they were just a few short years ago.
The offense of choice has become the Horns offense. This offense relies on
having two big men who can execute basic offensive fundamentals effectively and
a point guard who can run the team on the floor. It also has been a help
to coaches who look to take advantage of player abilities while retaining some
degree of control.
Advantages of the Horns Offense
The primary advantage of the Horns offense or any set play offense is that it
can be used to set up entries into any other offense. For example, say a
team wanted to run the Flex offense and needed a way to get into the offense in
a half-court setting. The Horns offense allows for multiple looks and
plays. Later in this piece, you will be able to see how you can get into
an offense like the Flex offense.
The second advantage of this offense is that it allows the team to take
advantage of skilled big men. For this offense to succeed, bigs have to be
capable of playing away from the basket and having a skill set not unlike that
of a perimeter player. He needs to be a threat to face up to the basket
and shoot the mid- or long-range jumper and put the basketball on the floor.
The final advantage presented is that the Horns offense can effectively utilize
a point guard if he is the best player on the team. For example, many NBA
teams have been running the Horns offense to take advantage of great point
guards. The best example is the Phoenix Suns who have been running this
offense for Steve Nash. Nash is able to take advantage of his playmaking
skills within the framework of the system.
Disadvantages of the Horns Offense
In some respects, the Horns offense is similar to the 1-4 High offense.
However, as opposed to the 1-4 High offense, this offense has fewer entry
options. This is because the wings are located in the corners and not at
the free throw line-extended. This prevents certain entries from taking
place that would normally take place in a 1-4 High offense.
As mentioned earlier, this offense requires skilled big men. If your team
has a big man who struggles with jump shots or with the dribble, this may not be
the offense for you. Bigs need to be capable of shooting from distances
greater than most other offenses allow and be good ballhandlers.
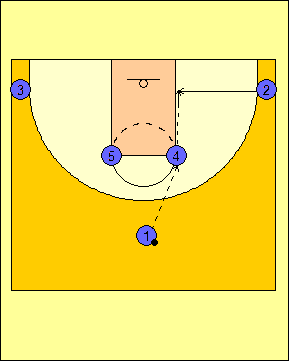
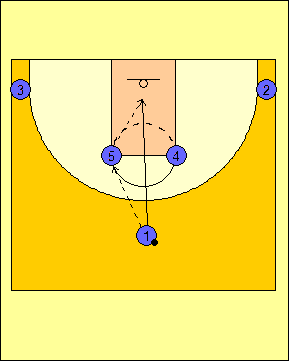
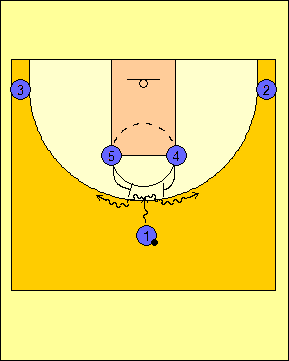
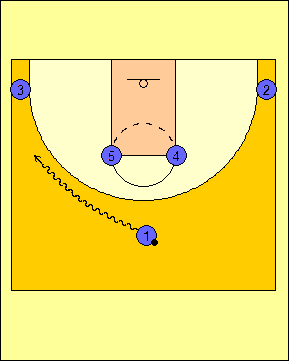
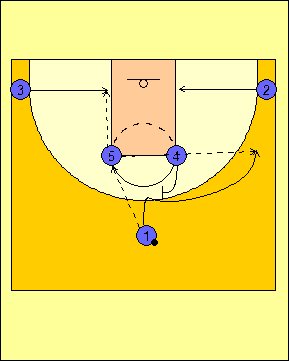
Pinch Post Series
Each of the series presented have a basic maneuver that has to be
executed for the basic play to work. The first series is the Pinch
Post Series. Here, the point guard is going to enter the
basketball to the high post and the ball-side wing will cut backdoor as
shown in Diagram 1. This is used to clear the side to set up the
handoff between the post and the point guard as it will be shown in the
remaining diagrams related to this series.
Diagram
1 |
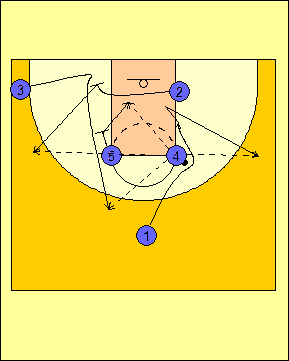
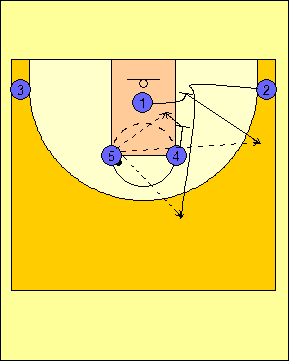
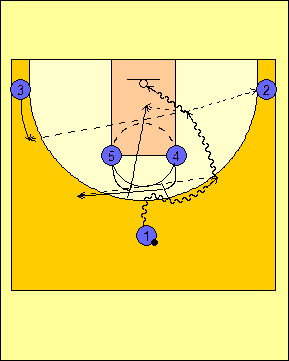
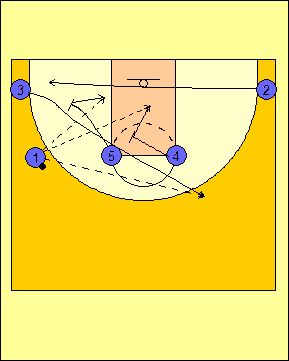
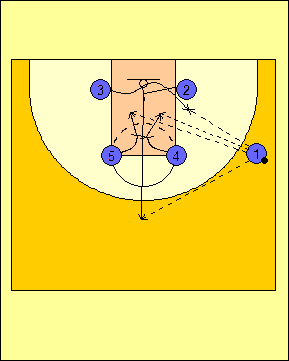
From the Pinch Post Series, there are three plays that can be run
from it. The first is the help-side stagger double shown in
Diagram 2. Here, #2 will set the first screen of the stagger
double for #3 if he does not get the ball on the backdoor.
As with any pinch post entry, If #1 does not get the handoff, he will
cut back to the wing on his side.
Diagram
2 |
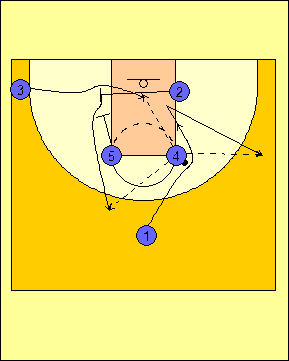
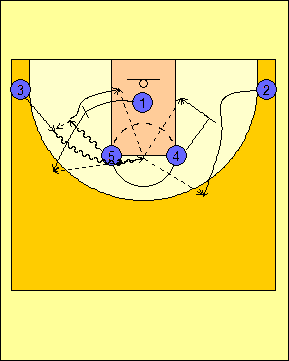
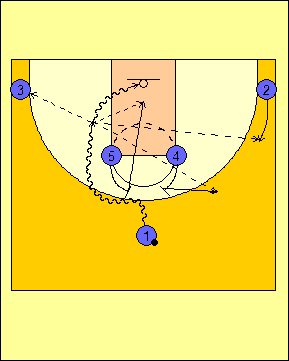
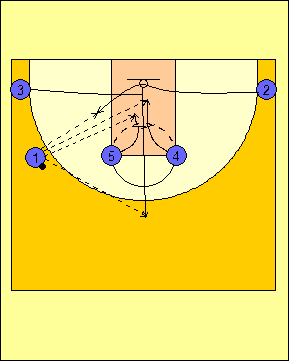
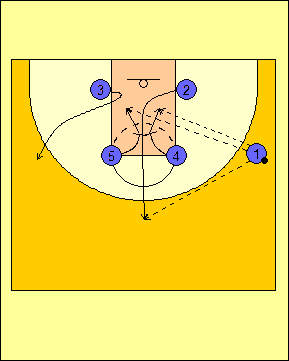
The next play is a help-side flex play (Diagram 3). Here, #2 will set the
back screen for #3 who will make the baseline cut. After this, #5 will set
a down screen for #2.
Diagram
3 |
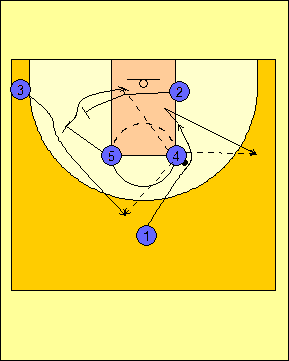
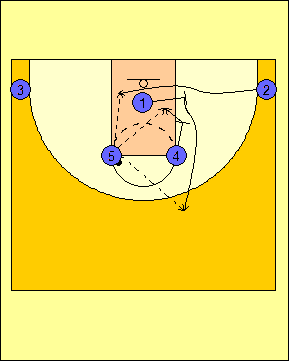
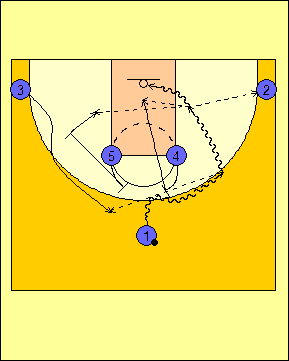
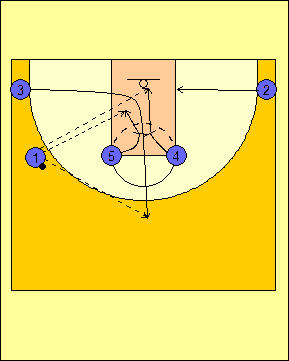
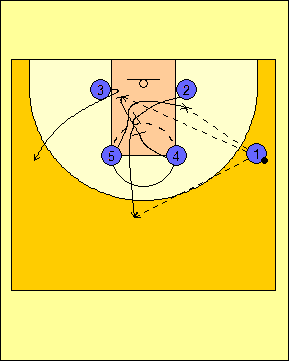
The last play shown in Diagram 4 is a
screen-the-screener play. On the pass to the post, the
help-side post (in this case, #5) will set a down screen for the
help-side wing (#3 in the diagram). The post will then receive
a back screen from the wing who cut backdoor.
Diagram
4 |
Dive Series
The second series presented is the Dive Series. Here, the point
guard will pass to either post and cut through the nail to receive the
pass back on the give and go (Diagram 5). If the point guard does
not get the ball, we will run the play.
Diagram
5 |
The first of these plays is a help-side stagger
double shown in Diagram 6. If #1 does not get the basketball
back from #5, he will be the first screener in the stagger double.
The help-side post will be the second and the help-side wing will
come off of the stagger double.
Diagram
6 |
Diagram 7 puts to use the ball-handling skills of
our post player. Here, #5 runs a dribble handoff with the
ball-side wing. As that unfolds, the help-side post sets a
down screen for the help-side wing. After the handoff is made,
#1 will set a back screen for #5 to set up a lob pass.
Diagram
7 |
The last play in the dive series is our flex pattern
(Diagram 8). Here, after the entry to #5, #1 sets the back
screen for #2 then receives the down screen from #4. If the
ball were to be entered to #4 in this instance, #1 would set the
back screen for #3 then receive the down screen from #5.
Diagram
8 |
Pick-and-Roll Series
The third series is the pick-and-roll series. With the Horns
offense, there is a great deal of versatility that can be shown with the
pick-and-roll. The screen is set so that the point guard can go
either way (Diagram 9). What we do from here has some versatility
as well.
Diagram
9 |
The first of these ways is shown in Diagram 10. Here, the point
guard will go to his right (he can also go left). This time, the
post player who does not ultimately set the screen on the ball will roll
to the basket. The ball screener will pop and the help-side wing
will move up the three point line and look to get open.
Diagram
10 |
The ball screen can also become a roll with the opposite post popping
back as is the case in Diagram 11. #5 will set the ball screen for
#1 and #4 will pop back and look for the ball. Just as in the
previous diagram, the help-side wing (#2 in this instance) will move up
the three-point line and get in the sights of the point guard.
Diagram
11 |
We can also set up a down screen by the player on the other side of the
ball screen. In Diagram 12, #4 sets the ball screen for #1 and
rolls to the basket. Meanwhile, #5 sets the down screen for the
help-side wing. This down screen gives up a possible open look for
a three-point shot from the help-side.
Diagram
12 |
Dribble Series
The fourth series from the Horns offense is the Dribble Series.
This series has the point guard making a dribble entry to the wing
(Diagram 13). From here, the called plays are run by the offense.
Diagram
13 |
The first play is off of an Iverson cut used as a way to set up a great
one-on-one wing player who has the option to shoot off of a stagger
double or drive to the basket (Diagram 14). The ball-side wing
will come off of the stagger double set by both post players while the
help-side wing comes across and replaces his counterpart. We want
to get the ball to the ball-side wing off of the Iverson cut so that he
can break down the defense in a one-on-one situation.
Diagram
14 |
Diagram 15 shows a screen-the-screener play. The ball-side wing
will screen away for the opposite wing for a possible post-up
opportunity. From there, the first screener comes off of a double
down screen set by the post players. The point guard's pass
options are the post-up, the cutter off of the double down, or either
big slipping on the double down screen.
Diagram
15 |
The last play out of this series is a double down
screen for the ball-side wing shown in Diagram 16. The first
look for #3 is on the backdoor. If that isn't there, he will
come up though the elevator screen set by both post players.
We will look to get him the ball on the elevator screen or to the
bigs slipping off of the double down.
Diagram
16 |
Flare Series
The last series utilizes the flare screen on an entry to the post
player. The post player who does not catch the ball is the one who
will set the flare screen for the point guard as shown in Diagram 17.
Both wings bolt for the low block with the ball-side wing being the
target of a backdoor pass.
Diagram
17 |
The first of these plays is in Diagram 18 with a screen-the-screener
play to post up a wing and to bring another wing off of a double down
screen. The wing on the side the point guard catches the ball will
set a cross screen for the opposite wing before coming off of the double
down screen set by the post players.
Diagram
18 |
The second play is a double down screen for the ball-side wing as shown
in Diagram 19. Once the pass is made off of the flare screen, both
post players set a double down screen for the ball-side wing.
Before any of this occurs, #3 will pop out to the help-side wing to
clear the area and remove the help defense.
Diagram
19 |
The last play from this series is the screen-the-screener play (Diagram
20). The wing on the same side of the point guard sets the screen
to bring the help-side post from the help-side elbow to the ball-side
low post. The first screener gets a second screen from the
ball-side post. Once again, before any of this occurs, #3 will pop
out to the help-side wing to clear the area and remove the help defense.
Diagram
20 |
Teaching the Horns Offense
When teaching the Horns Offense, it is usually best to
do so in a five-on-zero setting. The best drill for this is called
offensive script. Here, you can teach the plays and the reads that
go with every play. When teaching the offense, it should be taught
as series and the plays in each series. It should also be noted
that not every series or every play in every series needs to be
implemented as a part of the team's offense. Most times, the best
thing to do is to find out what your players do best and what they can
absorb mentally and run just that.
Along those lines, the breakdowns of the fundamentals
required to make the offense work should also be put into place.
If you are working with your bigs on their shooting from the outside and
their dribbling skills, they will improve and become effective post
players within the framework of this offense.
RETURN TO MEMBERSHIP AREA
© 2010-2017 Alan Peel Enterprises
|