 |
INBOUNDS OFFENSE AND PLAYS
A great inbounds offense can give your team the opportunity to get
quick scores due to the great execution of these situations. They
can also be run to set up other situations whether it is a half-court
play or to set up another inbounds play off of a time out. I
cannot begin to tell you how many more games your team will win by
executing these special situations, but I can tell you that your team
will be well prepared to be in a position to win more games.
This article will present baseline and sideline inbounds plays that
can be run to give your team a chance to be successful. I will
also cover some special situations to get the ball inbounds and even
some plays at the end of the clock that you can use to win games late.
Baseline Out of Bounds
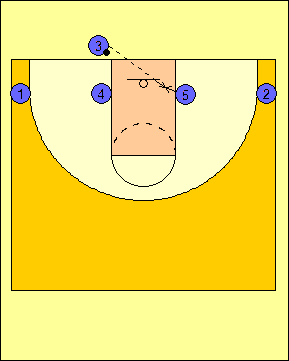
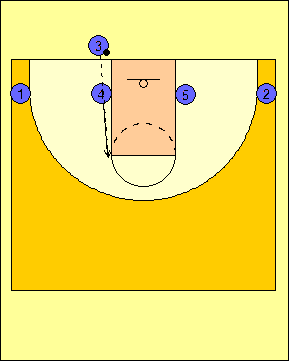
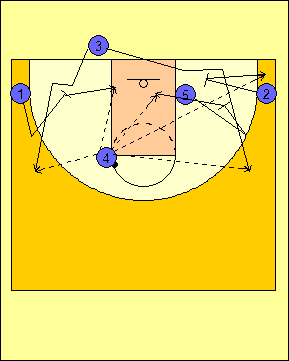
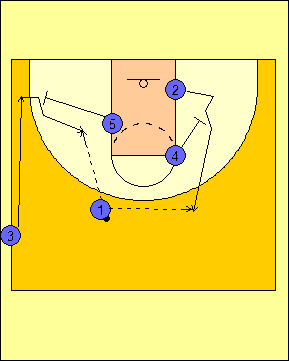
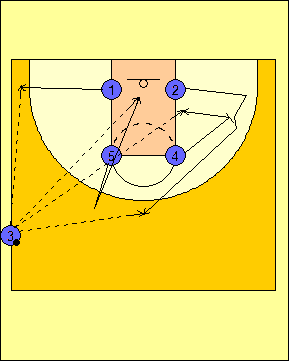
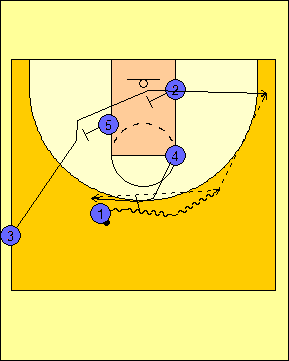
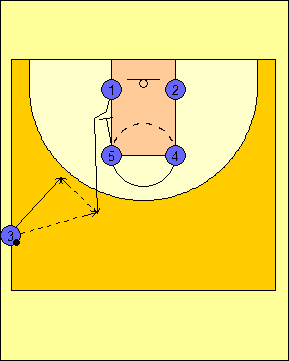
In the baseline out of bounds plays presented in this diagram, all
the plays will be from a 1-4 low set. #3 is the inbounds passer
with #4 as the ball-side post and #5 as the help-side post. #1 is
the pressure release in the ball-side corner and #2 as a receiver in the
help-side corner.
All of the inbounds plays have reads that are automatics based on the
way the defense defends the formation. #5 will step in to the ball
and present himself as a receiver before every play. If the
defense does not respect this, the ball will be inbounded to him and he
scores (Diagram 1).
Diagram
1 |
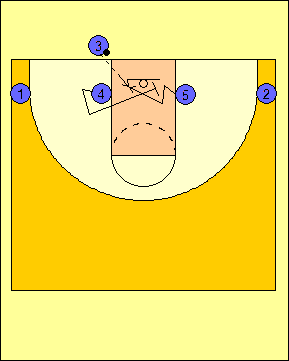
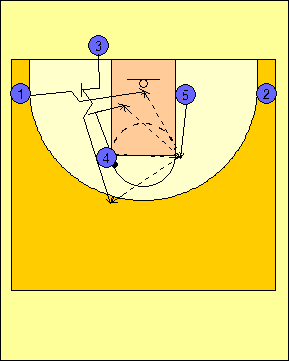
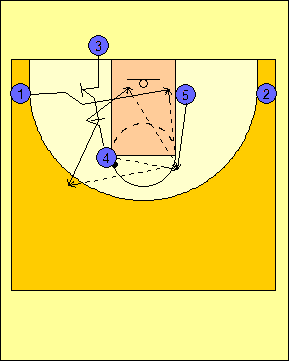
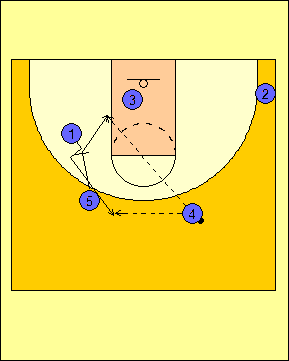
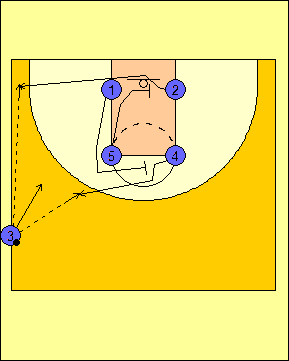
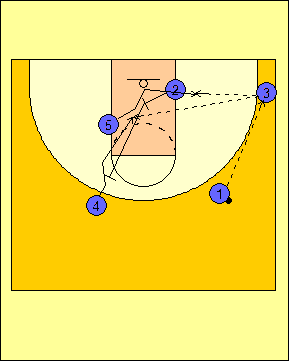
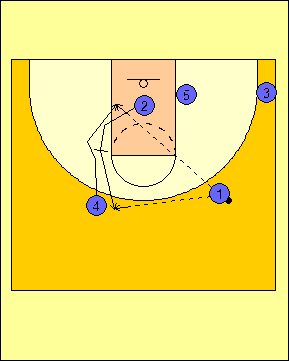
Once the defense respects this, we look to #4 to
make the next move. If #4 is being denied but not fronted, he
will step to the ball-side corner before turning and screening for
#5. The ball can be passed to #5 for the lay-up (Diagram 2) or
to #4 on the slip to the basket (Diagram 3).
Diagram
2 |

Diagram
3 |
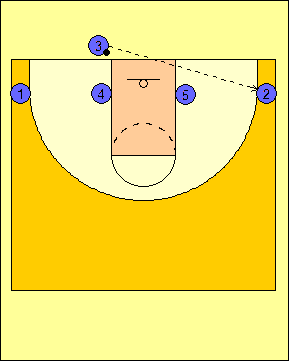
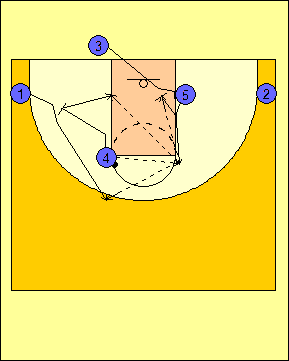
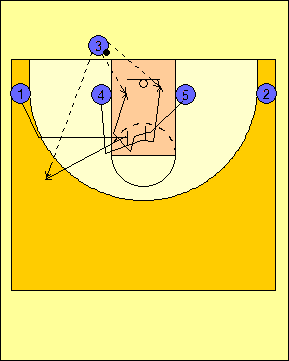
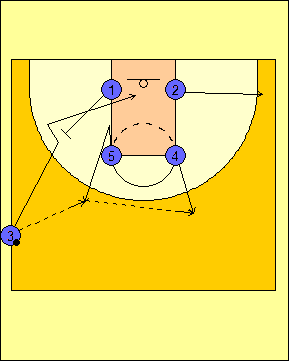
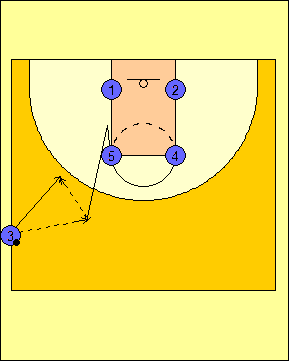
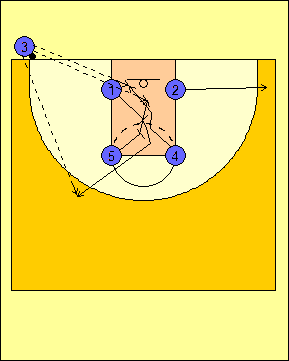
If at any moment a passing lane is open to the
help-side corner, we will pass the ball to #2 (Diagram 4).
This is a high-risk pass that requires an absolutely open passing
lane and an open for a three-point shot.
Diagram
4 |
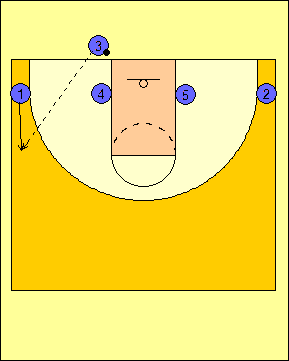
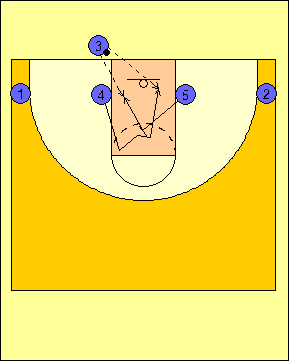
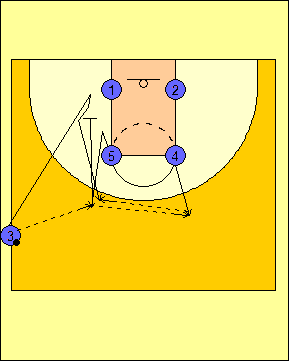
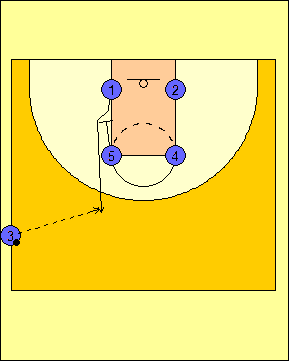
If at anytime the ball cannot be inbounded to #2,
#4, or #5, we will look to throw the ball to #1 on a pressure
release (Diagram 5). We want to get the ball up to #1 around
the ball-side wing and have him run a set half-court play.
Diagram
5 |
If at any time the ball-side post is being fronted,
we look to throw him the ball and run the set play (Diagram 6).
We have many set plays that get called and the previously-mentioned
audibles are reads against the defense.
Diagram
6 |
The first baseline inbounds play presented in this
article is "Flex" (Diagram 7). #4 catches the lob and makes
the reverse pass to #5. #3 will step in and set a back screen
for #1 before coming off of the down screen set by #4.
Diagram
7 |
The next play is in Diagram 8 and is called "Jayhawk".
This is a variation of the Flex play that sets up a lob play for the
ball-side post. After #4 receives the lob pass, #5 steps out
and receives the reversal. #1 comes on baseline cut off of the
screen set by #3. Unlike "Flex", "Jayhawk" has #3 set a back
screen to set up the lob
for #4.
Diagram
8 |
The inbounds play illustrated in Diagram 9 is called
"Me". After #4 catches the lob pass entry from #3, #5 sets a
down screen for #3 to come off of. If #3 catches the pass from
#4 off of the screen, his first look is an immediate entry to #5 in
the low post. #4 will screen away to give #3 another option
other than entering the ball to #5.
Diagram
9 |
"Choice" is a play that is run for an inbounds
passer who is an outstanding three-point shooter (Diagram 10).
#4 catches the lob pass and #3 has his choice as to which side he
will use to get open for the shot. He can come off of the
single down screen set by #1 on the ball side or the stagger double
screen set by #2 and #5 on the help side.
Diagram
10 |
Diagram 11 shows a play called "Help". Instead
of making a lob pass to #4, #4 will step high and look to come off
of a screen set by #5. Once #4 clears, #1 will set a screen
for #5 as he cuts to the basket. #1 will step out to the
ball-side wing to receive the pass if #4 and #5 are unable to get
the ball.
Diagram
11 |
The last baseline inbounds play presented is called
"Clear" (Diagram 12). Instead of running to get the lob pass,
#4 will clear high and come off of a screen set by #5. #3 can
pass to either #4 coming off of the screen or #5 slipping to the
basket.
Diagram
12 |
Sideline Inbounds Plays
Like the baseline inbounds offense, we will run
plays from the same look. Unlike the baseline inbounds plays,
we will set up from a box set with a zipper cut by #1 off of #5
(Diagram 13).
Diagram
13 |
The first play is called "Down" (Diagram 14).
Off of the inbounds pass, #3 goes to the ball-side corner and gets
ready to receive a back screen from #5. Meanwhile, #4 sets a
down screen for #2.
Diagram
14 |
The next play is called "Flex" (Diagrams 15 and 16).
#5 fakes the set up of the zipper for #1 and steps out to get the
ball from #3 on the inbounds pass. #4 then will step back and
look to get the reverse pass and #2 will step to the corner on his
side.
Once this takes place, the Flex action in Diagrams
15 and 16 take place. #1 sets the back screen for #3 before
receiving the down screen from #5.
Diagram
15 |
Diagram
16 |
The play in Diagram 17 is called "Cheat". #5
fakes the set-up of the zipper for #1 before he steps out and
receives the ball from the inbounds passer. #4 then steps out
and gets the reverse pass. Once #4 gets the reverse pass, #5
will set a down screen for #3 who steps in after making the inbounds
pass.
Diagram
17 |
If we are running any type of play that has #5 as
the receiver of the inbounds pass from #3, we want to set up a
possible counter. If we cannot get #5 on the step out, we will
look to get him the ball on the back door as shown in Diagram 18.
While this occurs, #1 and #2 step out to the ball-side and help-side
corners respectively to draw their defenders away. #4 will
then set a down screen for #2 to get a possible shot from the top of
the key.
Diagram
18 |
Diagrams 19 and 20 show a play called "Rocket" that
I got from Jeff Van Gundy at a coaches clinic. #5 and #1 will
set screens for #2 and #4 respectively. #4 will come off of
the screen set by #1 and step to the ball while #2 will cut to the
corner. We want #3 to see if he can hit either one of them for
a three-point shot.
If neither of those options are available, we want
#5 to step to the ball and catch on the ball-side low block (Diagram
20). #1 will pop to the help-side wing and #4 will set a back
screen for the inbounds passer. #5 can either look to score or
pass depending on the situation.
Diagram
19 |
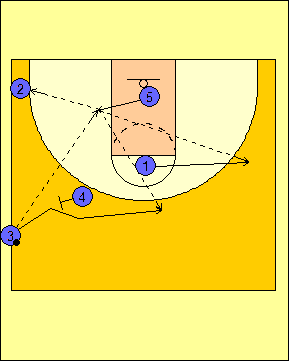
Diagram 20 |
Another play that can be run out of the zipper is a
high ball screen play. In Diagram 21, #3 passes the ball to #1
who comes off of a zipper. #4 then will step out and set a
middle ball screen while #5 and #2 will set a stagger screen as #3
cuts to the corner (Diagram 22).
Diagram
21 |
Diagram
22 |
Diagrams 23 and 24 show different ways to end the play. In Diagram 23, #2
will set a screen to bring #5 to the ball side low block if the ball is passed
to the corner. After that, #2 will set a back screen for #4 to set up the
lob pass.
In Diagram 24, the ball is not passed to the corner and #1 needs to make a pass.
Here, #2 will set a back screen for #4 after having screened for #5. #1
can either pass to #4 for the lob or pass it back to #2.
Diagram
23 |
Diagram
24 |
If the defense does not cover the inbounds passer,
we will run an audible called "Purdue". When this happens we
will pass the ball back to the inbounds passer. Diagram 25
shows the pop out by #5 who then passes back to the inbounds passer.
Meanwhile, Diagram 26 shows the "Purdue" audible off of the zipper.
Diagram
25 |
Diagram
26 |
Inbounds from the Corner
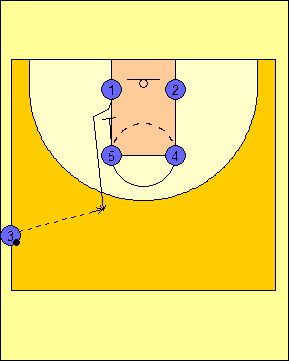
Sometimes, the ball will be in the corner and be in
such a spot where a sideline inbounds or a baseline inbounds play is
not possible. The play in Diagram 27 is such an example with
#1 setting a screen to bring #4 to the ball before receiving one
from #5 to step out. #2 will clear to the help-side corner.
Diagram
27 |
Full Court Inbounds Plays
The play in Diagram 28 is an end-of-clock play to
run to score. The play is similar to the one that Duke ran
against Kentucky in the 1992 NCAA East Regional Final. #3 is
the inbounds passer and he can pass to #2 going to the basket, #4
flashing to the middle, or #1 coming off of #5's screen. If
the ball goes to #4, he can turn and take the shot or pass to either
#2 or #5.
Diagram
28 |
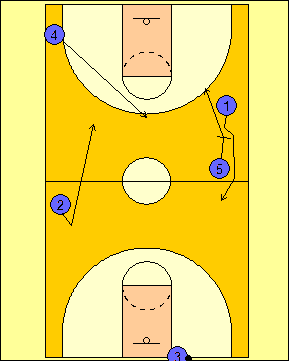
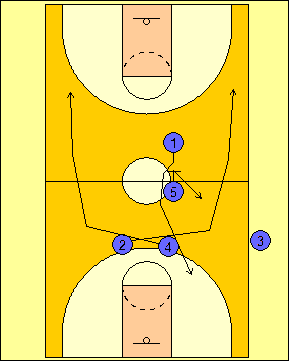
Diagram 29 shows a possible inbounds play against
pressure late in the game. Here, #2 and #4 are on the elbows
with #5 setting a back screen for #1 who can go either direction.
Meanwhile, #2 and #4 cross in front and go up the sidelines opposite
their starting side.
Diagram
29 |
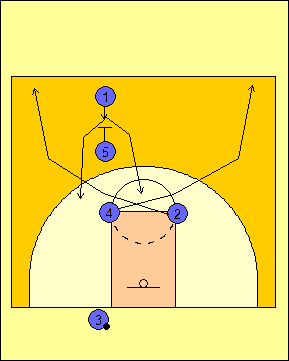
From the side against a press, #2 and #4 set up on
the lane line-extended on the three-point line with #5 setting a
back screen for #1 (Diagram 30). #2 and #4 will cross and run
up the sidelines opposite the side of their starting point.
Diagram
30 |
RETURN TO MEMBERSHIP AREA
© 2010-2017 Alan Peel Enterprises
|
|