The biggest and most important job of any coach is
player development. Coaches are constantly required to make their
players better in the off-season with the right player development
drills. As I have long believed, games are won and lost during the
off-season. The better your players develop, the better your team
becomes and the more games your team will win.
However, there are some things that have to be taken
into consideration when it comes to putting together the right drills
for a player development program. The biggest of these is
understanding the skill sets of your players and getting them to improve
existing skill sets and developing new ones.
One final note should be made before moving to the drills: between each of the
five drills after the warm up, we want the players to shoot ten free throws.
This will allow to not only develop their free throw shooting abilities, it will
also help them develop a shot that has so much repetition that it almost
becomes automated.
When getting players warmed up, we want them to develop
confidence in their ability to shoot the basketball. The way in
which we do this is to have our players start by shooting set shots
along the free throw lane using each marker and block on the lane lines,
two shots at each elbow and a free throw to boost their confidence.
Diagram 1 shows the rotation in which the shots will be
taken. We do not want any of the shots to hit the rim and we do
not allow the players to move to the next spot until they make the shot.
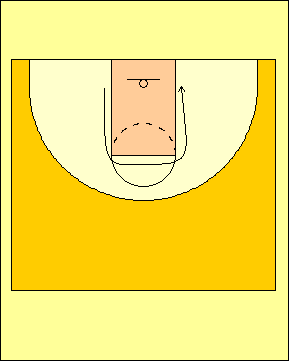
Diagram 1 |
|
After having gone through the first part of the
warm-up, we have the players take a step back from the spots from
where they shot the basketball. We want to teach our players
to try hard to not hit the rim when shooting these shots.
Whereas the first group of shots were set shots along the free throw
lane, these shots are a step back so as to help players get
comfortable shooting mid-range jump shots.
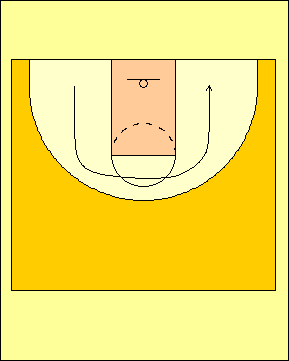
Diagram 2 |
|
Once the players are warmed up, the drills will
commence. It is after the ensuing five drills that each player
will shoot 10 free throws.
3's, 2's and 1's
The first drill that we do after the warm-up is
called "3's, 2's and 1's". This drill is done in four rounds
and we will keep score on three different types of shots. If a
player hits a jump shot from one of the nine spots behind the
three-point line (Diagram 3), he will score three points. If a
player uses a pump fake and scores off of one dribble, that will be
worth two points. If a player attacks the rim off of one
dribble without the pump fake, that is worth one point.
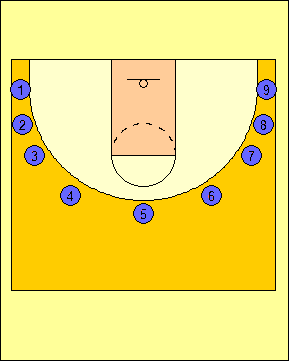
Diagram 3 |
|
From each of the nine spots, the offensive player
will either take a three, pump fake and score off of one dribble, or
put the ball on the floor for one dribble and score. This will
be based on what the offensive player's partner (as the defender)
gives the offensive player. There will be a total of nine
shots taken during each round and the defense will give the offense
one of the three shots available.
If the offensive player can score a lay-up off of
one dribble without traveling, that will be just fine. If that
player cannot do that, we want him to come to a jump stop off of the
dribble and shoot a jump shot.
Each player will take turns on offense and defense.
The drill starts with the offensive player receiving a pass from his
partner which is then followed up by the offensive player's partner
closing out on defense and dictating what happens (Diagram 4).
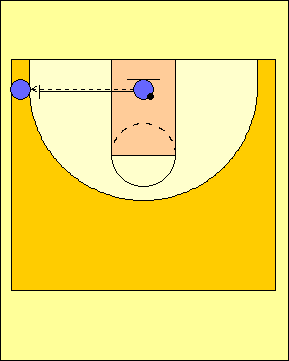
Diagram 4 |
|
Each player will keep score for each of the four
rounds and total their score. Whoever has the most points will
win the drill.
Box Drills
The second set of drills are called Box Drills. These drills are designed
to work on perimeter moves. We want each player to have five offensive
possessions on each side per type of box drill.
To clarify, it will not be until after this set of drills that each player will
shoot ten free throws. We consider this to be one set of drills and not
individual drills since we have variations.
All of the box drills require that the two players start on the low blocks and
one of them have a basketball. The player with the basketball will dribble
to the opposite slot while the other player will fill the block vacated by the
dribbler and make a cut based on the type of box drill.
The first type of box drill is the give-and-go. The player without the
basketball will fill the slot opposite the dribbler after he has crossed the
lane (Diagram 5). The dribbler will pass the basketball and receive it
back on the give-and-go cut.
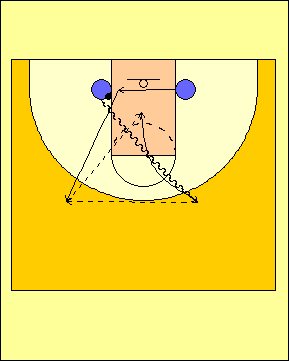
Diagram 5 |
|
The second type of box drill is the first of two
types of drills that involves a closeout. The partner of the
dribbler will close out and force the offensive player into a
decision. The offensive player can attack the rim over the top
of the defender or shoot the three-point shot (Diagram 6).
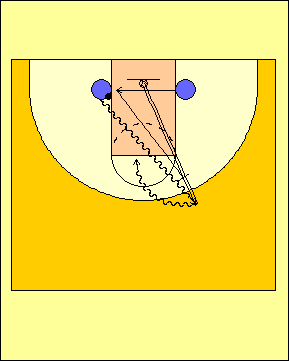
Diagram 6 |
|
The third type of box drill starts the same as the
previous box drill except that the offensive player will have one of
two choices based on what the defense does. One is to shoot
the three-point shot and the other is to rip through and attack the
rim off the dribble (Diagram 7).
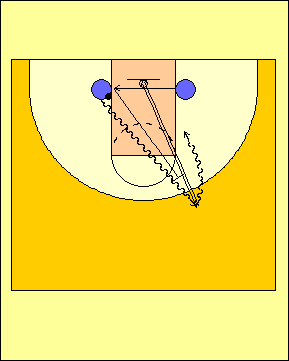
Diagram 7 |
|
The last type of box drill has the offensive player
dribbling to the opposite slot from the low block. The
defensive player will go to the opposite low block then come to the
middle of the lane and prepare to play defense (Diagram 8).
The offensive player will attack and try to avoid drawing the charge
and score. The defensive player will look to defend the basket
and possibly draw a charge.
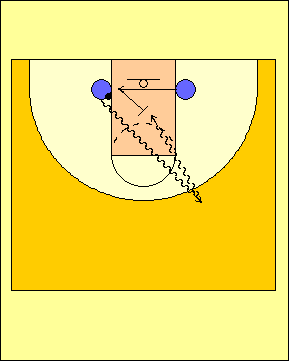
Diagram 8 |
|
Low Post Moves
Every player should have the ability to play in the
low post and make moves. This includes perimeter players who
can drag guards not used to playing post defense into situations
that are favorable for the offense and a huge disadvantage for the
defense.
This drill is done by the post player starting at
the lane line on the sideline and throwing the ball to himself at
the opposite low block, catching the basketball, and making the post
move (Diagram 9). There should be a move to the baseline, a
move to the middle and a spin-out move with counters for each.
On each block, each player should take five shots from each side and
count their makes.

Diagram 9 |
|
Position-Specific Drills
The next part of the workout are position-specific drills. Here, there is
one drill presented for the perimeter players and another for the post players.
If you are a combination player, you can work on both drills either by rotating
them each day or by doing them both each day.
For the perimeter players, the drill is called two-player/one-ball which is
illustrated in Diagram 10. The two players start on the perimeter with one
of them with the basketball. The drill starts when the player with the
basketball shoots a three-point shot. He will then rebound the basketball
and pass to his partner for the drill. He will then shoot, rebound the
basketball and pass to his partner. This will go on for one minute.
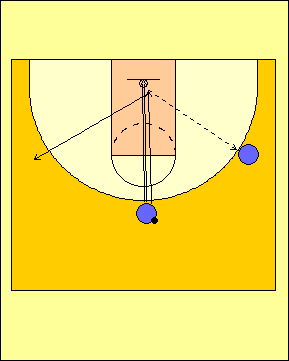
Diagram 10 |
|
After a 30-second rest period following the first round is the followed up by a
second round of one minute. In both rounds, the players need to keep track
as to how many three-point shots are made.
With our post players, we like to use the Mikan
Drill. This drill has the big man starting under the basket
and facing the baseline. He will make 10 lay-ups with each
hand from this starting point. Next, he will make 10 hook
shots from each low block. He will then finish the drill by
facing half court and making 10 lay-ups with each outside hand and
each inside hand. The Mikan Drill only needs to be completed
once per workout session.
One-on-One
The last drill is to play one-on-one. When
done correctly, this can be the best way to develop players because
it requires each player to learn how to take what they have worked
on in the previous drills and use them in a game-type and
competitive situation.
The way in which we set up one-on-one is to put a
coach at each wing as an outlet receiver (Diagram 11). They
can receive up to one pass from the offensive player and they will
also receive the outlet pass from the defensive player when he gets
the rebound. The coaches are also there to call all fouls.
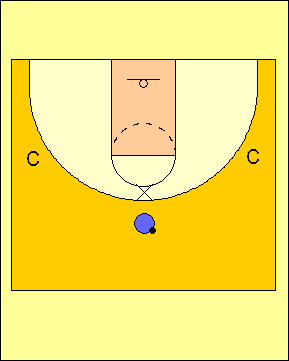
Diagram 11 |
|
The offensive player is limited to three dribbles
and one outlet pass per possession. If the defensive player is
able to get the rebound, they are to outlet the ball to a coach and
get in position to start on offense. If the offensive player
scores, he will get to play offense again.
We will play one-on-one for five minutes and keep
score. It is important that the drill is done at game speed so
as to effectively simulate one-on-one match-ups and situations in
basketball games.
Conclusions
The purpose of these drills is to develop repetition
and to improve the skill sets of the players. They are also
position specific to a degree and require game-type effort daily.
If your players are going to improve, they must be disciplined
enough to work harder each day and to work to be better than the
previous day.
It is also important that the players keep track of
their workouts. They need to keep track of what they do and
how well they do it. Unless you do this, you and your players
will not have the ability to track progress. Doing this will
get your players to improve their skills and, ultimately, your
basketball team.