|
PERIMETER PLAYER DEVELOPMENT DRILLS
Introduction
During my time as an assistant coach at William Jewell College, we were
fortunate to have great players, especially those who could hit shots from the
perimeter. Players such as Kyle Fisher, Jonathan Benson, and Craig Mattson
were critical to our success in that they could hit either three-point shots or
mid-range jump shots, considered by many coaches as a lost art.
We were able to get players to hit mid-range jumpers and three-point shots
thanks to our outstanding perimeter player development drills we used during
practice. We had an outstanding perimeter player coach in our assistant
coach John Davenport and a former guard in our head coach Larry Holley who had
taken the time to develop drills designed to develop better perimeter players.
Using some of the drills that I have learned from both Coaches Davenport and
Holley, I have designed some drills that will improve perimeter players in their
basic fundamentals that will only take ten minutes per practice session daily to
improve perimeter play as well as some variations on basic drills that can be
used to make your guards and forwards playing on the perimeter better perimeter
players.
Fundamentals to Develop
From Bob Knight's book on basketball coaching he wrote with Pete Newell, Coach
Knight explains that there are several basic offensive fundamentals that are
worked on every day in practice. For our perimeter players, we want to
focus on ball handling (including passing, catching, and dribbling the
basketball) and shooting. We will focus on other fundamentals including
spacing, cutting, and screening when we get to our offensive breakdowns and team
offense. If needed, we will include post play if we are running an offense
that requires certain or all of our perimeter players to play in the post.
We also incorporate footwork into our drills by teaching our perimeter players
to have their shooting-hand foot forward in a heel-toe relationship. We
also work on keeping the balls of the feet and the toes on the ground when
executing a shot fake as well as using the jump stop.
I am of the belief that you can only become successful when you do the ordinary
things to the maximum of your abilities. We aren't working on street moves
with our perimeter players that would be better suited to pick-up games.
We are working on basic basketball fundamental skills so that our players can
execute them without having to think about what to do or how to do it.
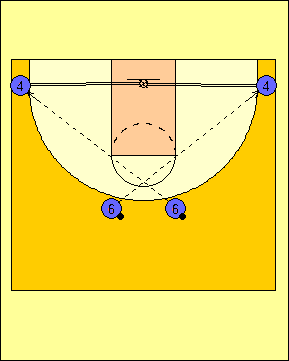
Spot Shooting Drill
The first drill that we do is the Spot Shooting Drill. We use this to
teach shooting both mid-range and three-point jump shots from six different
spots on the floor.
Diagram 1 shows the groupings of the spots for our Spot Shooting Drill.
They are as follows:
-
Spot 1 - Elbow jumpers.
-
Spot 2 - Wing three-point shots.
-
Spot 3 - Bank shot jumpers.
-
Spot 4 - Deep corner three-point shots.
-
Spot 5 - Short corner jumpers.
-
Spot 6 - Lane-line extended three-point shots.
We will move in order from Spot 1 to Spot 2 to Spot 3 to
Spot 4 to Spot 5 to Spot 6 in that order. The purpose of this
drill is to develop the shooting capabilities from three groups of spots
behind the three-point line and three groups of mid-range spots.
By the way the drill is conducted, our players also work on following
their shots as well as catching and passing the basketball.
|
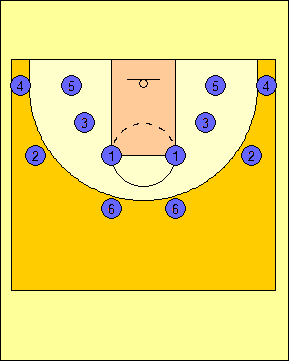
Diagram 1 |
For the remainder of this article, the numbered
players and the spots I will reference will be similar to those
illustrated in Diagram 1 in an effort to remove any confusion.
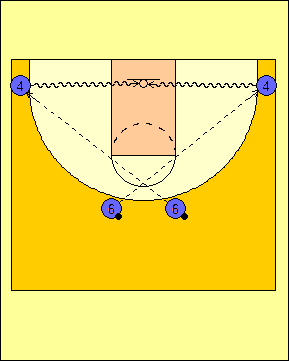
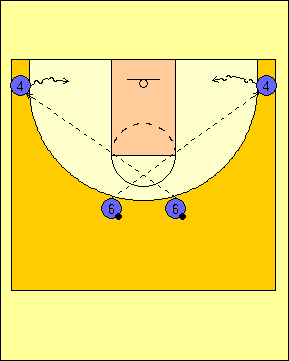
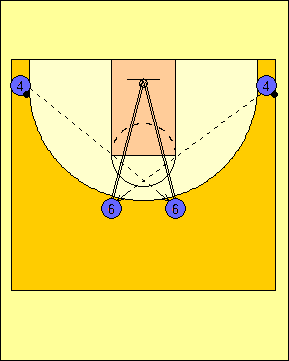
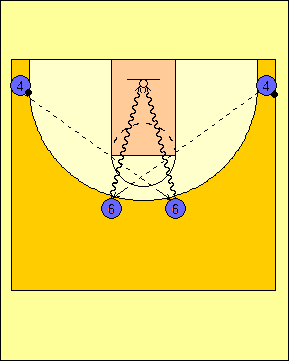
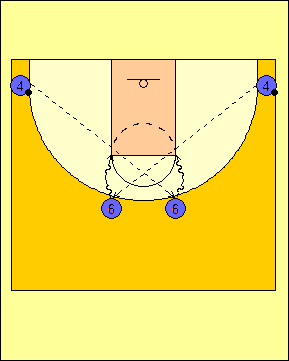
Four Ball Drills
These drills is designed to do three things: develop the ability to shoot the
three-point shot from Spots 2, 4, and 6 (Diagram 2), to make a shot fake and
attack the rim from Spots 2, 4, and 6 (Diagram 3), and to make a shot fake and
hit a mid-range jump shot starting from Spots 2, 4, and 6 (Diagram 4). As
we go through this sequence, we will be working on the same fundamentals as in
the Spot Shooting Drill, but we will be adding to it the use of the dribble as
well as our perimeter players working on making the skip pass.
It is important to note that we do these drills after the spot shooting drill
because we want our players to progress through the drills and add to the
progression of skills taught instead of trying to do more initially then
subtract from the skills taught.
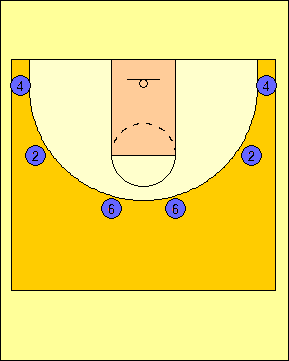
Diagram 2 |
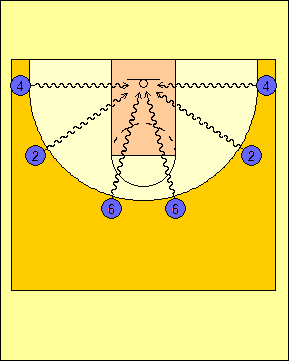
Diagram 3 |
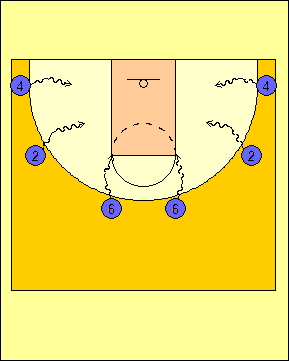
Diagram 4 |
We start with the wings in our Four Ball Drills. We will go with two
lines, one at each wing with the second and third players in each line with the
balls. The first people in the lines will catch the skip passes from the
opposite side and will look to either shoot (Diagram 5), shot fake and attack
the rim (Diagram 6) or shot fake and take one dribble for the mid-range jumper
(Diagram 7). We will progress from the three-point shot to the dribble
drive to the rim to the mid-range jump shot. You must get your players to
not take off at the same time when attacking the rim.

Diagram 5 |
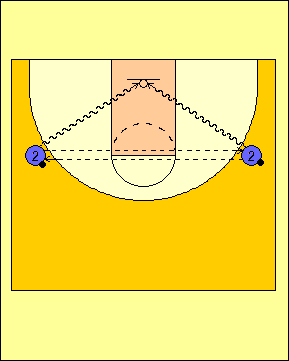
Diagram 6 |

Diagram 7 |
Variations of Perimeter Player Development Drills
To add some variety to the drills, we can have
variations added to make the drill more competitive. The first
variation is what we call "Beat the Clock". Here, we will put four
minutes on the clock and we will make our players complete the drill
inside of that time limit. We will require that our players finish
the drill regardless of whether or not they beat the clock. If
they succeed in meeting the challenge, we will move on to the next
drill. If they are unsuccessful in meeting the challenge, we can
have the players run penalty sprints.
The other variation is to break our groups of perimeter
players into two groups and make them compete against each other.
We will put the players on side baskets and have go through the drill
and attempt to get it done before the other group does. The group
that completes the drill first will not run any sprints. However,
the group that loses the competition will run. Again, we want to
finish drill before we enforce any penalty runs.
One-on-One Stations/Three-on-Three
There are two ways that we can finish our perimeter
player drills. The first of these is to play games of one-on-one
for the remainder of the period. Here, we have six ways that we
play one-on-one. The length of time that we use to play one-on-one
is based on the amount of time remaining divided into three stations
that we will use daily. The offensive player will have a limit on
the number of dribbles that can be used and cannot pass the ball back to
the coach. The defensive player will play defense according to our
man-to-man defense principles.
Station #1: Low Post Play. Every
player regardless of their primary playing position should be capable of
playing in the post area. When I was at William Jewell College, we
had a shooting guard named Kyle Fisher who was a capable interior
player. Depending on the match-up we would post up Kyle against a
player who we felt we could take advantage of and get into foul trouble.
Here, we have the coach in the corner throw the ball into the low post
and the guard can make a move. The offensive player can use one or
two dribbles to score (Diagram 14).
Station #2: Cut from Block to Wing.
From the block, the offensive player will work to get open by making a
cut to the wing. The coach will have the ball at the point and will look
to pass either at the wing or to the offensive player cutting backdoor
against defensive overplay. We will limit the offensive player to two or
three dribbles (Diagram 15).
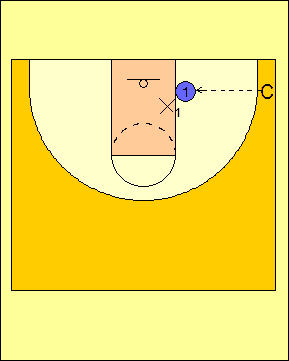
Diagram 14 |
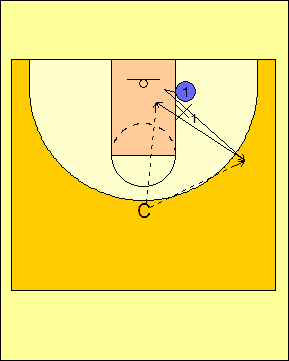
Diagram 15 |
Station #3: Wing in Transition. To
develop our perimeter players transition offense skill set, we will have
our perimeter players work on one-on-one in transition. The
offensive player will pass to the coach and sprint to the wing.
The coach will then make a pass and the offensive player will look to
receive the ball at the wing. The defensive player will look to
contest from the moment the ball is passed to the coach. We will
limit our offensive players to two or three dribbles (Diagram 16).
Station #4: Flare Cut to the Wing. In
this drill, we have the offensive player start with the ball and make a
pass to the coach who is situated inside the free throw circle.
Once the pass is made, the offensive player will cut to one wing or the
other on a flare cut. The defensive player will allow the pass to
the coach then contest. We will limit our offensive players to two
or three dribbles (Diagram 17).
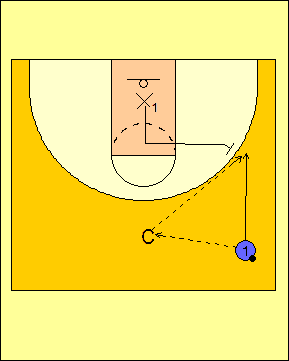
Diagram 16 |
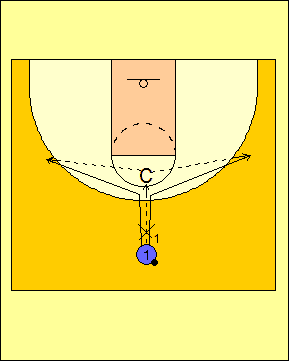
Diagram 17 |
Station #5: Checkmark from Wing to Point.
The offensive player will make a checkmark cut and will either pop back
to the point or cut backdoor against the defensive player. The
coach will then pass according to what the offensive player decides to
do. If the offensive player gets the ball, he has a limit of two
or three dribbles (Diagram 18).
Station #6: Cut from Help-Side Block to Point.
The offensive player will start on the help-side block and look to flash
cut to the top of the three point line. The coach will pass him
the ball to start the action. The defensive player may make a play
on the ball if he is able to do so. The limit here is two or three
dribbles (Diagram 19).
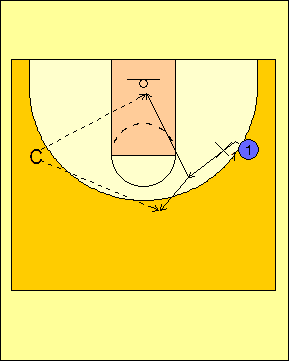
Diagram 18 |
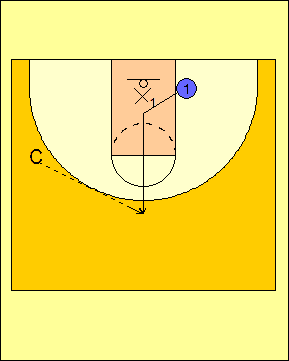
Diagram 19 |
I would also like to note that the perimeter players
will also get better defensively as well as offensively. By being
able to see these situations that have to be guarded, the perimeter
player can determine how to play defense based on the maneuvers of the
offensive player they are guarding and the match-up they draw.
Again, we will do three of these drills one day and the
other three the next day. If we have a week where we have an
odd-number of practice days, we will just play three-on-three on the
last practice day of the week. The three-on-three games will
include playing three-on-three and three-on-three with a coach or a
student manager in the post. Should we go to three-on-three with a
coach or a student manager in the post, we will not permit the coach or
manager to shoot the ball.
RETURN TO MEMBERSHIP AREA
© 2010-2017 Alan Peel Enterprises
|