|
POINT ZONE DEFENSE
Coaches such as Roy Williams, Dean Smith, and Clarence "Big House" Gaines have
been known for a defense called the point zone defense. This defense was
designed to run like a zone, but to adjust to the alignment of the offense.
In a sense, it could be considered to be a defense that would fall into the
family of match-up zone defenses.
Because of the complexity of the defense, it has been proven to be very
effective to give offenses fits as to how they can best attack the defense.
Coaches Williams, Smith, and Gaines as well as many other coaches who have run
the point zone defense have found themselves winning games against teams who
have found themselves befuddled by the flexibility of this defense.
Advantages of the Point Zone Defense
The point zone defense has many advantages that should be considered by coaches
who wish the utilize this defense for their teams. They include, but are
not limited to the following:
Because the point zone is a type of match-up zone defense, teams have a
difficult time running a particular type of zone offense. Most zone
offenses are designed to be run against straight zones that present gaps.
The problem with the point zone for offenses is that they will eliminate the
gaps by pointing the ball with one defender and the remaining four defenders
rotating to adjust.
Second, the point zone defense will keep the center in a position to rebound the
basketball. Because the point zone keeps the center in the middle of the
zone, he will not have to guard on the perimeter and, as a result, he will
always be close to get rebounds.
Finally, the point zone does a good job of taking away the interior from an
offense. Because of this, teams are not able to play inside-out which
leads to teams shooting from over the top of the zone. Offenses do better
when they are able to penetrate the defense and attack the middle before
shooting. The point zone's design takes that option away from the offense
and makes teams play more on the perimeter.
Disadvantages of the Point Zone Defense
Many of the disadvantages that one would find with a traditional zone defense
can also be found with the point zone defense. These include, but are not
limited to the following:
Like all traditional zones, the offense has the advantage of dictating the
match-ups. While the point zone may make this more difficult, it is still
a very real possibility. With all zone defenses, the defense can dictate
where the defenders play, but the offense can dictate who the defensive players
have to guard.
The other big disadvantage is with defensive rebounding. The point zone is
effective in taking an offense out of its rhythm, but with long shots come long
rebounds. Also, it should be noted that help-side rebounding is hurt by
the point zone because the defense will be on one side of the floor and 70
percent of all misses will be rebounded on the other side of the floor.
Initial Alignments of the Point Zone Defense
There are three ways that the point zone can be aligned initially. The
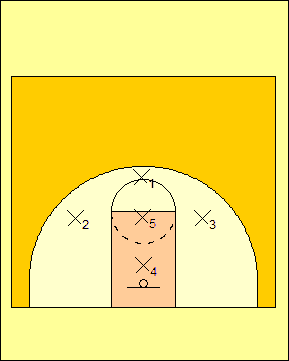
first of these is from a 1-3-1 alignment shown in Diagram 1. X1 will be at
the top of the zone with X2 and X3 at the wings just inside the three-point
line. X4 will be positioned just in front of the basket with X5 in the
middle of the other four defenders.
The second alignment shown in Diagram 2 is from a 2-1-2 look.
Here, X1 and X2 will be on opposite side and X3 and X4 will be on
opposite sides with X5 in the middle. X1 and X2 will start on the
lane line-extended just inside the three-point line. X3 and X4
will start on the low blocks.
Diagram
1 |
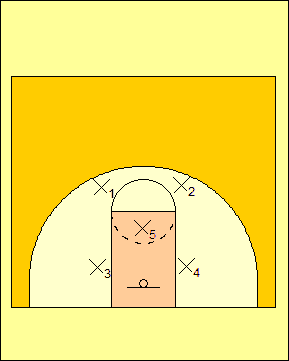
Diagram 2 |
The last possible alignment is the 1-1-2-1 alignment in Diagram 3. For the
remainder of this article, we will start the point zone defense from this
alignment to give an idea as to how the slides of the point zone work.
Here, X1 will position himself just inside the top of the three-point line with
X2 behind him at the middle of the free throw line. X3 and X4 position
themselves just above the first marker above the low block while X5 will start
just in front of the basket.
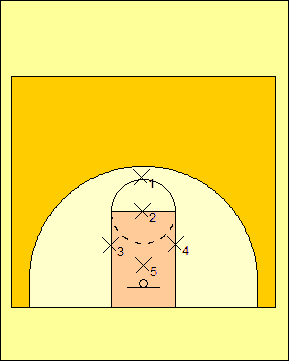
Diagram 3 |
Zone Slides vs. an Even-Guard Front Offense
To initiate the point zone defense, there are two
types of passes that cause such an event: guard-to-guard passes or
point-to-wing passes. Diagram 4 shows the defense being
initiated by a guard-to-guard pass from an even-guard front.
When this happens, we will have #2 close out on the ball. X5
will position himself between the ball and the basket with X3 being
between the basket and the middle marker of the free throw lane on
help side. X4 sets up just above the low post area.
Diagram 5 shows the slides of an even-guard front
offense passing the ball to the corner. X4 will have the
closeout and X5 will front the low post. We will drop X3 to a
spot just to the help-side of the basket while X2 will try to
prevent the return pass and X1 will cover the high post area.
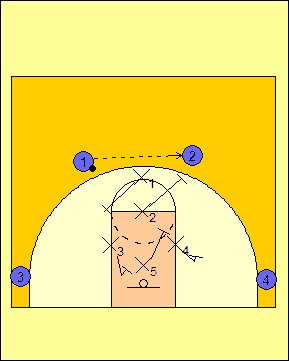
Diagram 4 |
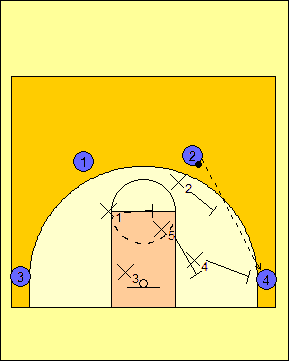
Diagram 5 |
Should the offense decide to throw the ball out of
the corner and skip it to the opposite side of the floor and above
the free throw line-extended, we want X1 to cover the receiver and
to get into a 2-1-2 alignment (Diagram 6). When the ball is
passed to the point, X1 covers the ball with X2 and X3 close and
ready to closeout on the nearest possible offensive receivers.
X4 will cover the help-side low block and X5 will set up in the
middle of the other four defenders.
If the offense makes a guard-to-guard pass after the
offense has instigated the defense, we will cover it as if we were
in a 2-1-2 zone defense. The opposite guard will point the
ball and the other will drop into the high post area. X5 will
just change sides of the floor while X3 and X4 will slide along the
baseline to get into the proper position. This is all
diagrammed in Diagram 7.
|
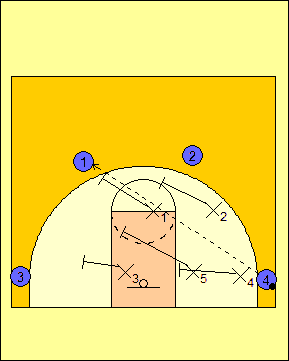
Diagram 6 |
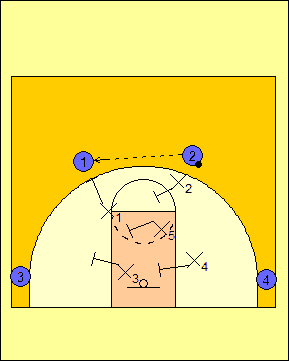
Diagram 7 |
Zone Slides vs. an Odd-Guard Front Offense
Once again, we wait for the ball to be passed either
from guard-to-guard to from the point to the wing. In Diagram
8, the defense is initiated by a pass from the point to the wing.
If the ball is passed to the wing from the point, X3 or X4 will
point the ball depending on the side. X5 must get to a spot
halfway between the ball and the basket and must move first.
Depending on who is help-side, X3 or X4 (X4 in the diagram) will go
after X5 goes and cover the short corner.
Understand that the assignments of the defensive
player can have some interchange with the interchange being between
X3 and X4. In Diagram 8, X1 and X4 will pair off and X2 and X3
will do the same. If the ball were passed in the other
direction, X1 would pair off with X3 and X2 would partner with X4.
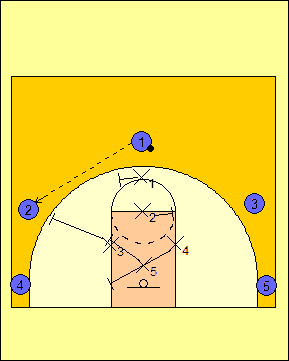
Diagram 8 |
If the ball is passed from the wing to the corner as
it is in Diagram 9, X4 will come out and point the ball and X5 will
replace him. X2 drops to a spot in the lane between the basket
and the low block. X1 will cover the high post area.
If the offense attempts a skip pass out of the
corner to the point, we want X1 to cover the receiver and to get
into a 1-3-1 alignment (Diagram 10). When the ball is passed
to the point, X1 covers the ball with X2 and X3 at the wings, X4
covering the basket and X5 in the middle of the other four
defenders.
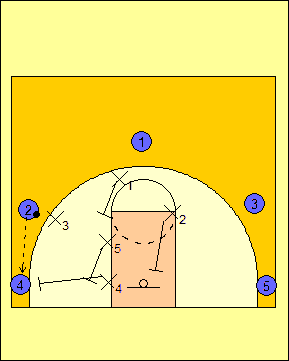
Diagram 9 |
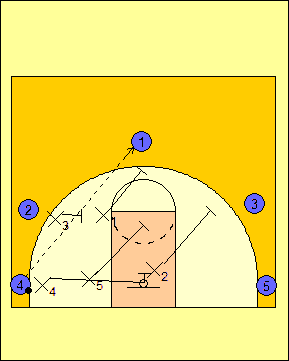
Diagram 10 |
Teaching the Point Zone Defense
When we start teaching the defense, we will teach
the zone as a 2-1-2 point zone against an even-guard front and the
1-3-1 point zone against an odd-guard front. We start this way
because we want our players to know how to play the zone based on
the corresponding fronts (1-3-1 vs. odd-guard fronts and 2-1-2 vs.
even-guard fronts).
We will finish off teaching the point zone defense
with starting from the 1-1-2-1 alignment and working on adjusting to
odd- and even-guard fronts. Running possessions against each
will be important to get the defense to work properly.
RETURN TO MEMBERSHIP AREA
© 2010-2017 Alan Peel Enterprises
|