|
POST PLAY
On offense, there is no more important aspect to playing
basketball than playing in the post. Getting the basketball into
the post is the most essential part of any offense in that the offense
can score more points per possession and have a lower turnover
percentage. However, many coaches still do not realize the
importance of great post play.
Post play involves several fundamental aspects that can
be taught and incorporated into any offense. This article will
present moves for your big men as to how they can get open and moves
they can use to score the basketball or get other teammates involved.
The article will also present different ways bigs need to play in
offenses that involve dribble penetration by perimeter players and how
post play works in four around one and three around two offenses.
Moves for Getting Open
There are six basic moves that can be used to get open
in the low post. Namely, these moves will work when the post is
isolated inside by himself. Three of the moves will help him get
the ball when he is a help-side post and three others when he starts out
as a ball-side post.
The first of these moves is to call for the lob pass
from help side (Diagram 1). This happens when the defensive man
guarding the post has overcompensated on help defense and is on the
ball-side side of the basket. When this happens, the big man, who
is help side puts up his outside hand and calls for the lob pass.

Diagram 1 |
The next two moves deal with a help-side defender
who requires contact to get open. When playing help-side
defense, the help defender will either play the man below the
passing lane or will be above or at the passing lane. When
either of these happens, we will be prepared to get our big man open
so that he can catch the basketball. These moves are only be
used when the ball-side post is vacated and we need to get a player
to the ball-side post.
Diagram 2 shows what happens when the help-side
defender is playing below the passing lane. Here, we want the
big man to make contact with the defender using his chest and
spinning over the top to post. The reason is twofold: we do
not want to use our hands because that will attract the attention of
officials who are looking to call fouls and we want to seal
defenders whenever possible.
Meanwhile, Diagram 3 shows what happens when the
defender plays on or above the passing lane from the ball to the
help-side post player. This time, the same maneuver is used as
in Diagram 2 except that we are going to spin low and post.

Diagram 2 |

Diagram 3 |
Next, this article explains the three ball-side moves that must be made by the
low post if he is going to get open to receive the basketball. The post
player will have to work even harder to get the ball on the ball side than on
the help side. The resistance will be greater because of the post player
being on the same side as the ball.
The first maneuver to get open is called "working the
'C'". This is a move that I got from Danny Manning and it is
designed to help the big man set up his man for either a post entry pass
from another perimeter player or for a post entry. The big man
works up the floor in a semi-circular motion as shown in Diagram 4.
If the defender is not careful, we can get the entry pass. If not,
we can pass the basketball to another perimeter player and use a
different move to get open in the post.
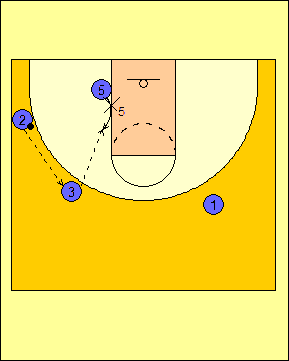
Diagram 4 |
In Diagram 5, the move shown is the step-over move.
When the ball is reversed from one side to the other, the big man will
step across defender and change sides of the floor. If the
defender is not hugging the big man tight and is up the line, we will
use the same move as was shown in Diagram 3 and go underneath.
The last move shown in Diagram 6 is the seal move. The ball is swung from
above the free throw line-extended to below the free throw line-extended.
The post man seals off his defender and works to get the basketball. In
many cases, we can get a bounce pass to the baseline side of the post player for
an easy lay-up.

Diagram 5 |

Diagram 6 |
On all post catches, we want our big men to catch
the basketball with two hands and to have their arms extended as
long as possible. The reason we want this is because we want
to prevent the defensive man from having a chance to poke the ball
out from behind. We teach the post players that it is better
to catch and bring the ball into your body before making a post move
than it is to catch with short arms then realize you have to have
your arms extended to prevent the ball from being knocked out of
your hands.
Post Moves
Once the big men get the ball in the post, the big man needs to make a move to
the basket based on what the defense give them. There are two things that
every post player should keep in mind when making a post move: simplicity and
having the ability to finish with both hands.
When using a post move going in either direction, we want the big man to have
one move in a given situation and one counter off of that move. We also
want our post players to finish with both his left and right hands so that the
defensive players cannot take away either hand due to the scouting report.
If the defender is playing top-side on defense, we want the offensive player to
turn baseline (Diagram 7). We want the foot nearest the baseline to be the
foot used to make the step if we turn baseline. The offensive player can
use it to seal the defender from the baseline so that the big man can power to
the basket on a drop step or to create separation for a hook shot. If the
big man goes to the baseline, we want him to score only.
If the defender is playing low-side on defense, we want the offensive player to
turn middle (Diagram 8). Here, we want the foot furthest from the baseline to be
used to make the step to the middle of the floor. Similar to turning
baseline, the offensive player can seal the defender from the middle using the
middle step or can use the foot to create separation and shoot the hook shot.
It is also important that you teach the moves to be made with feet only.
If your post players use their hands to make a post move, they will get called
for fouls. Also, when making a post move, we want two hands on the
basketball so that it does not get knocked out by a defender.
When it comes to counter moves, there are two types of moves that can be used.
The first of these is the shot fake and rip through. Here, the big man
will attempt a shot on the drop step or the middle step before ripping the ball
through and attacking the basket.
The other is the up-and-under move. Here, the big man will use a shot fake
to get his man in the air. Once his man is in the air, he will attempt to
duck under the defender for the basket. The post player, if necessary, can
use the dribble to get past his man and get a better shot.

Diagram 7 |

Diagram 8 |
If the catch is made off the block, we want a spin-out
move made by the big man. The move is always made with the foot
nearest the baseline as shown in Diagram 9. From here, the post
player faces the basket and assumes a triple-threat position with the
intent to shoot, attack the basket, or pass the basketball.

Diagram 9 |
We also have to teach moves in the high post area.
All of the illustrations that are shown for high post moves will show a
flash to the ball-side high post from the help-side low post.
Diagram 10 shows the first move which is a drop step
drive. The post player flashes to the high post and uses the
outside leg to seal the defender and drive down the lane line before
turning to the basket.

Diagram 10 |
If we do not have a drive for the big man, we can use
separation with footwork to create space for shots, high/low feeds, or a
ball reversal. The first of these is to use the spin out as shown
in Diagram 11. The other is that we can use the jab step to create
space between the offensive player and the defensive player that is
shown in Diagram 12. We will always use the outside foot (foot
nearest the sideline) to create space.
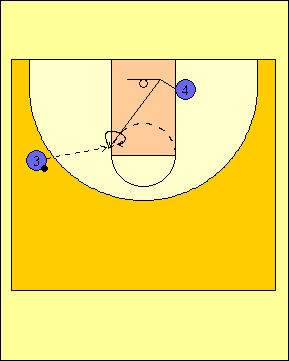
Diagram 11 |

Diagram 12 |
Playing with Dribble Penetration
Within the framework of any offense, the perimeter
players must have the ability to attack using the dribble. When
this happens, our post players have to know how to play. When a
perimeter player drives, we want to the big man to drift opposite the
penetration.
There are two types of drives: baseline and middle.
As a result, there are two types of drifts by the big men: baseline and
middle. When a perimeter player drives baseline, we want a middle
drift (Diagram 13). The big man will take two steps up the lane
line and turn and face the ball on a baseline drive.
Meanwhile, we want a baseline drift on a middle drive
(Diagram 14). Here, the big man will take two steps away from the
basket along the baseline and turn to the ball.
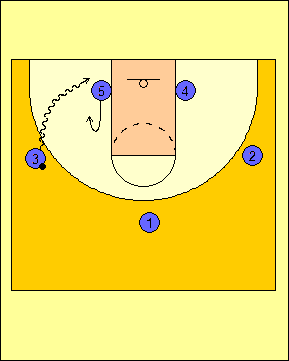
Diagram 13 |
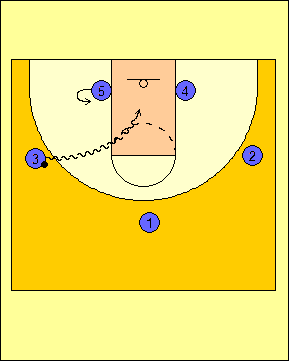
Diagram 14 |
Whenever we have dribble penetration from a three around
two alignment from the top, we want both of our big men to drift along
the baseline on their sides (Diagram 15). This way, when we attack
the rim off of the dribble, we provide more space along the baseline and
we also force the players defending the big men the choice to stop the
drive or deny the pass to the big men.
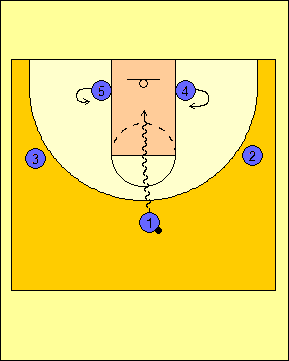
Diagram 15 |
When we go to a four around one alignment, things do not
change. We still drift along the baseline on the middle drive from
the baseline (Diagram 16), drift to the elbow on a baseline drive from
the baseline (Diagram 17), and drift baseline on a middle drive from the
top (Diagram 18).
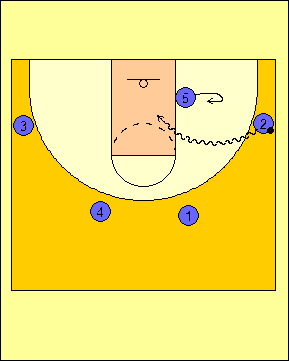
Diagram 16 |

Diagram 17 |
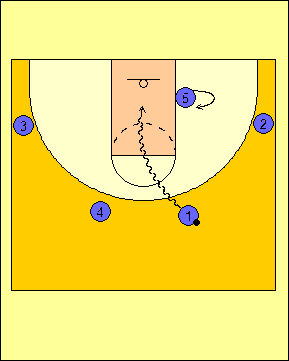
Diagram 18 |
Post Relocation
Another aspect of post play that has to be taught
effectively is post relocation. Depending on the offense, there
are different ways to make post relocation happen. The first
section will deal with the post relocation as it relates to four around
one offense while the second will deal with post relocation from three
around two offense.
In four around one offense, there is a primary rule for
#'s 4 and 5. The post player who is not posted, is the one who
will dive to the post. The dive man is the first pass option for
any post player who receives a pass in the post. If the dive man
is not open, we will look to pass the ball back to the perimeter.
We will look to fill three perimeter spots: the
ball-side wing, the point, and the help-side wing. The passer in a
four around one offense will always look to cut through the elbows to
the help-side wing. The perimeter player nearest the passer will
move to fill the ball-side wing while the remaining perimeter player
will fill the
Diagrams 19 and 20 illustrate the post dive from the top
with the perimeter movements on a post entry. Diagram 19 shows a
pass to the low block while Diagram 20 shows a pass to the short corner.
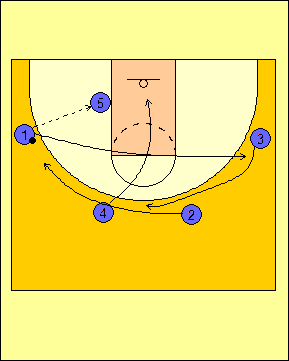
Diagram 19 |
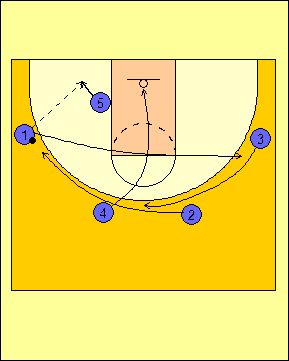
Diagram 20 |
In Diagrams 21 and 22, the dive from the help side below
the free throw line extended is illustrated with Diagram 21 being an
entry to the low block while Diagram 22 shows a short corner entry.
The dive is never a straight shot. The movement to the
basket will not occur until #4 gets to the lane line. At this
point, he will go to the front of the rim.

Diagram 21 |
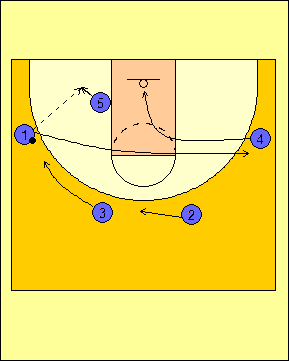
Diagram 22 |
There are times when either #4 or #5 will enter the ball
into the low post. When this happens, we will modify things.
The passer will become the dive man and come over the top with an inside
cut. Meanwhile, the remaining three perimeter players will fill
the wings and the point as in the other scenarios presented.

Diagram 23 |

Diagram 24 |
The other situation is when we are running a three
around two offense. When the ball is entered into the low post,
the passer will make the cut and the other post player will clear to the
elbow on his side before cutting to the basket. If the pass is
made to the low post, we want the passer to make a solo cut between the
big man and the backboard (Diagram 25). Should the pass be made to
the short corner, we want the passer to make an inside cut instead
(Diagram 26).
When we are running a three around two offense, we want
to fill by rotating to the origin of the passer to fill the ball-side
wing and the point. The passer-turned-cutter will fill the
help-side wing.
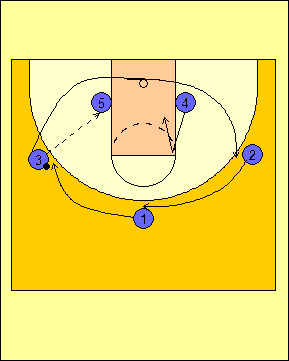
Diagram 25 |

Diagram 26 |
Tandem Post Play
While it seems simple to get the ball into the low post
in a three-around-two offense, it requires work from both post players.
There are a number of ways to get the ball inside using the help-side
post depending on how the defense plays the ball-side low post.
The first situation has the ball-side post being fronted
by the defender. Here, we want a flash cut to be made by the
help-side post (Diagram 27). The help-side post will set up his
man by starting low to make the defender drop to the baseline.
Once this movement has been set in motion, the help-side post will flash
to the ball-side high post to catch the ball. From here, we want
the high post player to either score, make a high/low pass, or pass the
basketball to the perimeter players other than the one who passed him
the basketball.
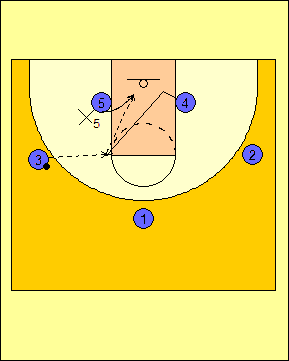
Diagram 27 |
If we are not able to get the ball into the low post
because of a frontal on defense or we are unable to enter the ball
within a two-count, we will look to set a cross screen and bring the
help-side post to the ball. When setting the cross screen, we want
the ball-side post to turn and look for the defender he is supposed to
screen before setting the screen.
In Diagram 28, the defender of the help-side post player
is sagging low. Here, the screen is set from the top side by the
ball-side low post. Meanwhile, the help-side low post sets his man
up by starting low then going over the top of the screen to catch the
basketball on the post feed.
In Diagram 29, the defender is guarding the passing lane
between the player with the ball and the help-side post. In this
situation, we want the screen to come low from the ball-side low post.
The cutter will set his man up by starting high then going under the
screen to receive the basketball.
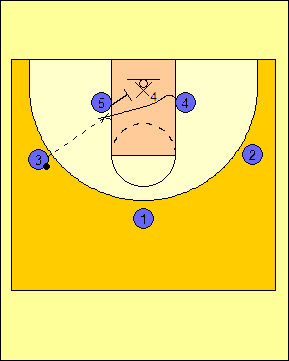
Diagram 28 |

Diagram 29 |
Conclusions
Post play may be the most important aspect of any
basketball team. Getting the ball into the post and scoring in
the post more than your opponent will result in wins more frequently
than not. It is not so much getting the ball into the post, it
is taking care of business and scoring when an offensive possession
results in the ball getting into the post.
RETURN TO MEMBERSHIP AREA
© 2010-2017 Alan Peel Enterprises
|