 |
SHUFFLE OFFENSE
Coaches ranging from Bruce Drake to Bob Speer have found extensive success
thanks to the Shuffle Offense. These coaches were capable of winning a
good number of games against teams with more talent and more size. Thanks
to the Shuffle Offense, teams that were coached by the two had amazing success
despite all of their shortcomings.
Advantages of the Shuffle Offense
There are a number of advantages that the Shuffle Offense presents to coaches
when they use it. The first of these is that the Shuffle Offense sets up
high percentage shots thanks to the movement of the offense. The offense
allows for a feed to a cutter off of a down screen for a lay-up or a flash from
the help side for a post-up.
Second, the Shuffle Offense's basic movement can be used as an entry into other
offenses. Teams have used the Shuffle Offense's movements to set up
offenses such as motion and pinch post offenses. Running just the basic
cut allows for a quick scoring option or a great way to set up the offense that
can be run off of the basic cut.
Finally, the Shuffle Offense forces the defense to guard several maneuvers that
provide the offense with several options. Because the movements are made
quickly, the defense has to react to them at the tempo of the offense which
gives the offense an advantage. Whenever a team has the basketball, if
they can control the tempo, they will have the opportunity to get good shots and
great movement.
Disadvantages of the Shuffle Offense
There are two main disadvantages of the Shuffle Offense.
The first of these is that since the Shuffle Offense is a patterned
offense, it can be easily scouted. It can also be countered by the
defense. To prepare for this, you will need to have a series of
counters ready for anything the defense throws at your team. Those
counters will be presented later in the article.
The second of these is that since the Shuffle Offense
requires all five players to play all five positions, all five players
must be capable of making cuts off of screens, shooting from the
perimeter, and posting up in the mid post. If you have one player
who cannot handle the ball on the perimeter, you can hide him by running
a four-man version of the offense which will be presented later on in
this article. However, if you intend to run the full five-man
version of the Shuffle Offense, you must have five players who can play
all five positions.
Basic Movement
In the Shuffle Offense, there are five basic positions: the cutter, the corner,
the post, the point, and the feeder. All five of these positions run in a
particular continuity so that all five players play all five of the positions.
Here is a table describing the flow assuming that the offense is run without any
interruptions in the Shuffle Offense continuality.
| Starting Position |
Offensive Continuity |
| Cutter |
Cutter→Corner→Post→Point→Feeder |
| Corner |
Corner→Post→Point→Feeder→Cutter |
| Post |
Post→Point→Feeder→Cutter→Corner |
| Point |
Point→Feeder→Cutter→Corner→Post |
| Feeder |
Feeder→Cutter→Corner→Post→Point |
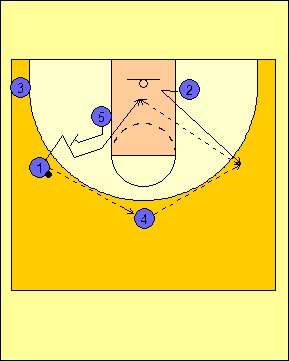
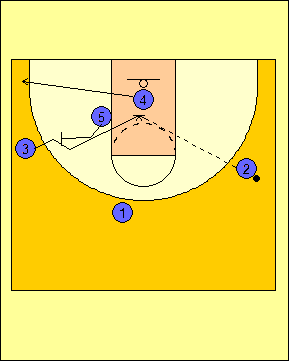
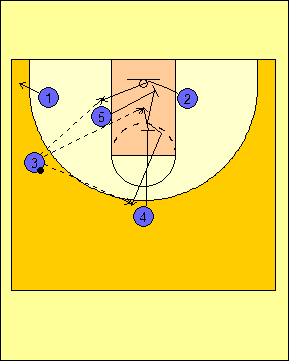
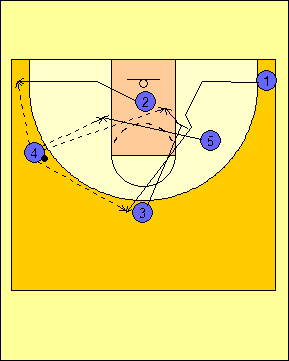
In Diagram 1, the Shuffle Offense starts with #1 as the cutter, #2 as the
feeder, #3 as the corner, #4 as the point, and #5 as the post. The action
begins with the cutter passing to the point who then passes to the feeder as he
pops out from the short corner opposite the cutter to the wing on his side.
When the feeder receives the ball, he will pass to the cutter coming off of a
back screen set by the
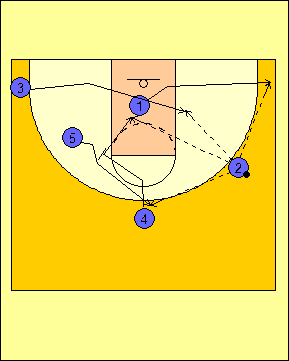
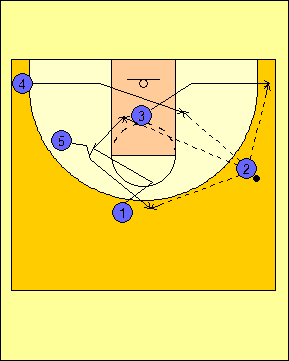
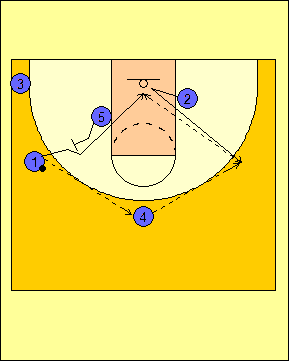
The action continues in Diagram 2 with the cutter clearing to the ball-side
corner. Once the cutter clears, the corner will flash to the ball-side mid
post and the point sets a down screen for the post.
Diagram
1 |
Diagram
2 |
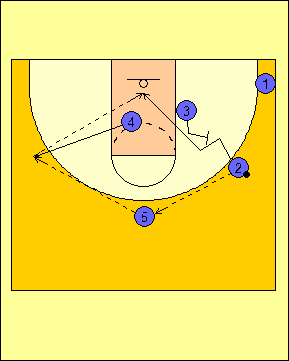
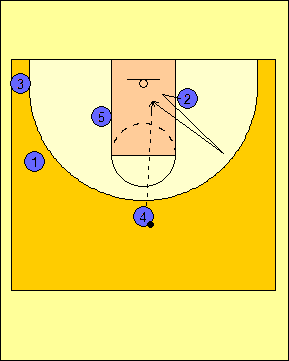
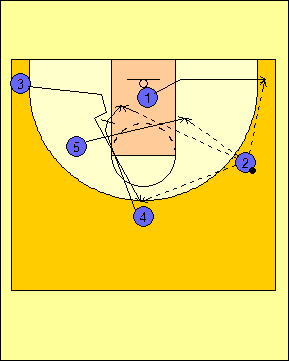
If the ball is reversed and the it cannot be entered to
either the cutter or to the post, we will look to swing the ball again.
In Diagram 3, the cutter (#2) will pass to the point (#5) who will then
pass to the feeder (#4). The cutter (#2) will come off of the back
screen set by the post (#3).
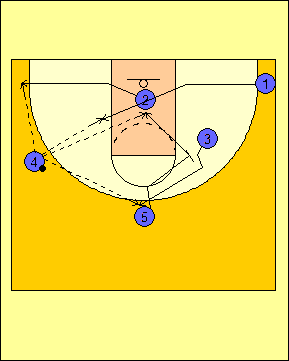
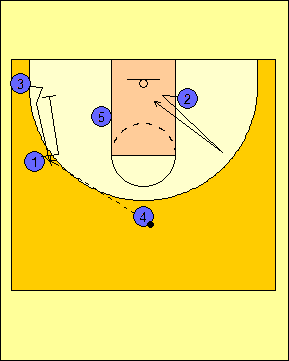
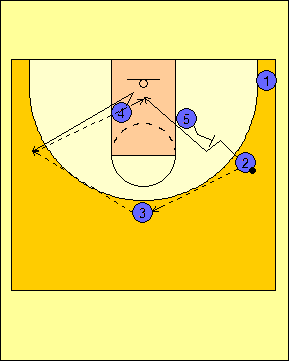
The action then leads into Diagram 4 with the corner
(#1) flashing to the ball-side mid post once the cutter clears.
Once again, the point will set a down screen for the post with the
possibility of the continuality action starting all over again.
Diagram
3 |
Diagram
4 |
Shuffle Offense Counters
When running the Shuffle Offense, we will be denied
the opportunity to run the continuity because the patterns can be
scouted fairly easily. However, there are counters that can be
run to take advantage of the defense taking away our continuity
patterns.
The first of these is when we can throw the ball
into the post. This will mostly happen when the corner flashes
to the ball-side mid post and looks to post up and call for the
ball. When the pass is made, the cutter will set a down screen
for the corner while the point and the feeder switch positions
(Diagram 5). In the Shuffle Offense, this is called the post
split.

Diagram
5 |
Another way to get the ball inside is to pass the
ball to the corner. Diagram 6 shows the way in which the
corner can feed the post for an easy basket. If the pass to
the post is not available, the post will set a back screen for the
cutter and go through looking for the basketball (Diagram 7).
The point will become the new cutter by cutting to the spot by
breaking the three-point line twice and the feeder will replace the
point.

Diagram
6 |

Diagram
7 |
Another counter that we have when the point is being
denied the ball is to run the dive play. In Diagram 8, #1 will
dribble at the point and force him backdoor. This then will
prompt the corner to replace the cutter's spot and the feeder to pop
to the wing on his side.

Diagram
8 |
Once the ball is passed to the feeder, #4, who started as the point, will become
the new corner man while #3 comes off of the back screen set by the post
(Diagram 9). The pattern concludes with a flash by the corner to the
ball-side mid post and a down screen by the point for the post as shown in
Diagram 10.
Diagram
9 |
Diagram
10 |
Another counter that we have to have ready is when
the defense successfully overplays the pass from the point to the
feeder. When this happens, we will have the feeder fake high
and cut backdoor (Diagram 11). The fake will be carried out
when the point makes a ball fake for the pass to the feeder at the
wing.
Diagram
11 |
If the back cut is not open, the point man will make
a ball fake to trigger a down screen by the cutter for the corner
(Diagram 12). We will pass the ball back and run a
screen-the-screener option shown in Diagram 13. If the ball is
passed back to the top of the circle, we can then go back into the
continuity action of the offense.
Diagram
12 |
Diagram
13 |
Four-Man Shuffle Offense
Another version of the Shuffle Offense is the
Four-Man Shuffle Offense. This offense uses many of the same
pressure releases and movements, but there are a couple of
adjustments that are made so that we can isolate one player in the
post on a permanent basis.
In Diagram 14, The basic movements of the Shuffle
Offense take place with a ball reversal from #1 to #4 before being
passed to #2. #5 sets the back screen for #1 who looks to
catch the pass from #2 for the lay-up.
If unsuccessful in getting #1 the ball on the
shuffle cut, he clears and #5 flashes to the ball-side mid post
(Diagram 15). The man in the corner (#3) will move to the
help-side short corner before coming off of the down screen set by
#4. From here, we run the same movement to the other side.
Diagram
14 |
Diagram
15 |
The same pattern continues with the reversal and
back screen by #5 in Diagram 16. Off of that, #5 flashes to
the ball-side mid post after the cutter clears and the point down
screens for the corner (Diagram 17).
Diagram
16 |
Diagram
17 |
Similarly to the table that was presented earlier in
this article, here is what the continuity looks like with the
Four-Man Shuffle Offense when run with a permanent post:
| Starting Position |
Offensive Continuity |
| Cutter |
Cutter
→
Corner
→
Point
→
Feeder |
| Corner |
Corner
→ Point
→ Feeder
→ Cutter |
| Point |
Point
→ Feeder
→ Cutter
→ Corner |
| Feeder |
Feeder
→ Cutter
→ Corner
→ Point |
Teaching the Shuffle Offense
The best way to introduce the offense is by having the
players go through the movements the first time around. This can
be done in a five-on-zero setting with the players going through the
movements so that they know what they are supposed to do. This
will ultimately get sped up and the counters can then be added.
In breakdown drills, you will want to work on the back
screen, the screen-the-screener action, and back cut counter.
There are other aspects that can be added as you go, but these three
actions are the ones that will be best to work on first.
RETURN TO MEMBERSHIP AREA
© 2010-2017 Alan Peel Enterprises
|
|