|
TRIANGLE OFFENSE
Since the 1990's no offense in basketball has proven its
worth as a championship offense like the triangle offense. This
offense, devised by the likes of Sam Barry and Tex Winter, found new
life in the 1990's and the 2000's with the championship runs by the
Chicago Bulls and the Los Angeles Lakers. The offensive concepts
that are in this offense have stood the test of time and are continuing
to be used at all levels of basketball with great success.
Advantages of the Triangle Offense
As mentioned earlier, the triangle offense is a great way to play a more
free-flowing style of offense that many set offenses lack while retaining a
degree of structure that free-lance offenses tend to lack. However, there
are more advantages that should be taken into consideration before running this
offense:
First, the triangle offense allows for multiple players to be posted up at
various times throughout the course of the offense. This puts perimeter
players on defense in a difficult situation if they have to play post defense
and have not worked on it in practice. The end result of a offensive
player in the post who knows how to play in the post versus a defensive player
in the post who has not worked on post defense a no contest.
Second, the spacing in the triangle offense is outstanding. Players are
spaced anywhere from 15 to 20 feet at any given time. This excellent
spacing makes the defense play far enough away from the other players to where
they are not in a position to help while also giving the offense the ability to
quickly snap passes between each other.
Finally, the triangle offense has multiple options and reads that lend it to
being a free-flowing style of offense. Since the offense has multiple
options in it, it becomes more difficult to scout. Also, the reads in the
offense allow the offense to take advantage of the defense whenever and wherever
necessary.
Disadvantages of the Triangle Offense
One of the main disadvantages of the triangle offense is that it requires quick
decision-making based on reading the defense. In the NBA, the triangle
offense worked well because of the abilities of the players running it to make
decisions in a timely manner. This was because of the 24-second shot clock
in part, but it also had to do with the need to beat the defense with an
excellent sense of timing and to run the offense quicker than the defense can
react to it.
The second big disadvantage of the triangle offense is that the offense is
perimeter oriented. That is to say that the offense can put players in the
position of having to shoot jump shots from the perimeter if they cannot
penetrate the defense with an entry pass to the post. If penetration does
not occur, players must be capable of scoring from the outside (i.e. Michael
Jordan and Kobe Bryant).
Finally, the triangle offense also has the disadvantage when it comes to
help-side rebounding. In many cases, the offense is focused so much on one
side of the floor that when a shot is taken, it becomes difficult to rebound on
the other side. Seventy percent of shots taken on one side of the floor
are rebounded on the other so it will become important to your team to work on
weak-side rebounding on all shots and to get everyone into a position where they
can rebound on the ball side as well as the help side.
Entries into the Triangle Offense
Many teams that like to run the triangle offense will use a two-guard front.
This front is very beneficial to a team if they do not have a point guard.
It also allows for an offense to post up any one of the five players on the
floor. That front will be illustrated later when discussing a pressure
release and the "blind pig" that that can be used against pressure defenses.
However, I am partial to the 1-4 high alignment because it allows an offense to
better handle defensive pressure and, unlike the two-guard front alignment, has
a safety in the event a pass is intercepted. For all of these entries that
are presented, I will use the 1-4 high alignment.
The 1-4 high alignment also gives us the opportunity to run the offense on
either side of the floor immediately. In essence, there are 12 wing
entries into the triangle offense if you count both sides. We also can run
the solo cut options that will be illustrated and explained later in this
article on either side of the floor.
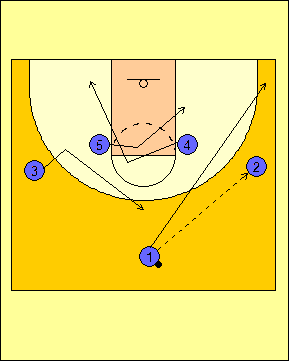
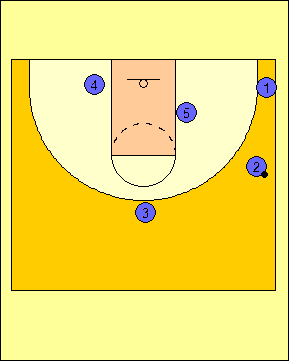
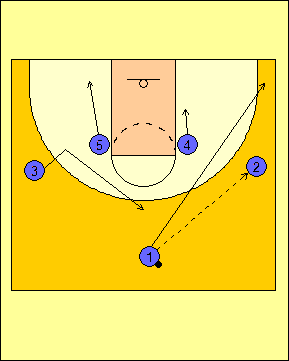
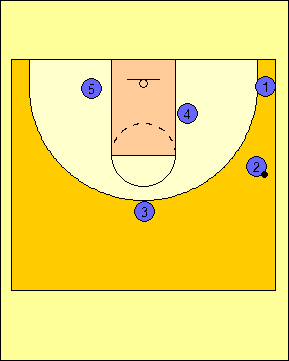
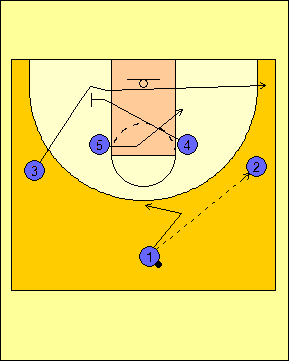
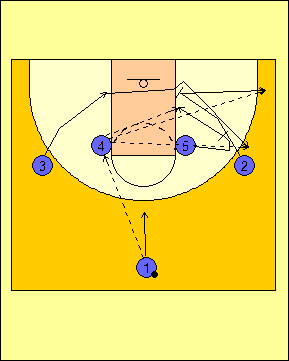
The first entry presented is a pass from the point guard to the wing as is
illustrated in Diagrams 1 and 3. In Diagram 1, the point guard speed cuts
to the ball-side corner while #3 fills the point with a cut that breaks the
three-point line twice and influences his defender toward the basket before
cutting to the point. In Diagram 1, #5 flashes to the ball side post while
#4 cuts away to the help-side short corner. In Diagram 3, #4 rolls down to
the ball-side post while #5 goes to the help-side short corner. Diagrams 2
and 4 show the aftermath of the entries illustrated in Diagrams 1 and 3
respectively.
As a point of emphasis, it is important that whichever post is posting up in the
ball-side post must be on the line of deployment. The line of deployment
is the line that connects the ball at the wing to the center of the basket.
This way, the post man's defender has to make the decision as to how he will
guard him and, no matter what the decision is, the defensive player will be
wrong.

Diagram 5 |
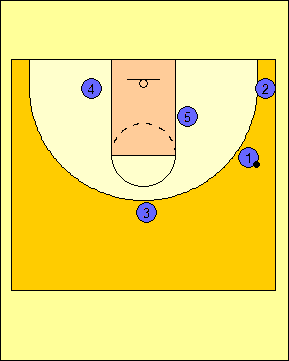
Diagram 6 |
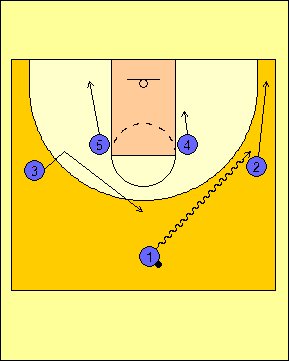
Diagram 7 |
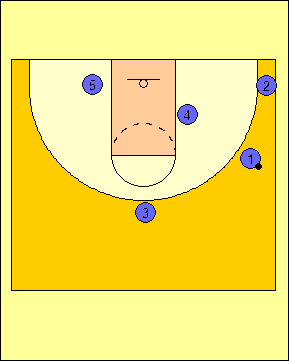
Diagram 8 |
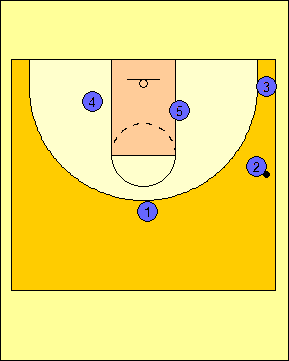
We can also set up the offense by getting the
opposite wing to fill the ball-side corner and the point guard to
fill the point. Diagrams 9 and 10 show #4 posting up and the
opposite wing (in this instance, #3) filling the corner thanks to a
rear screen from #5. Diagrams 11 and 12 show #5 posting up and
#4 setting the rear screen.
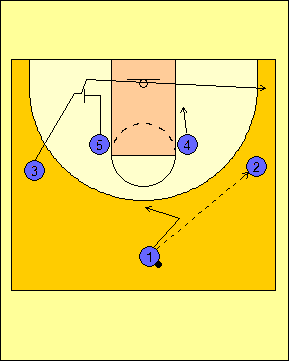
Diagram 9 |
Diagram 10 |
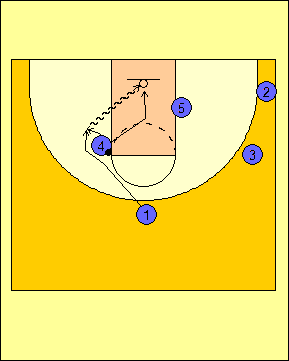
Option #1: Post Entry
The first look that we have once the ball is entered to the wing and the offense
is set, we will look to enter the ball into the post. Off of post entry,
we have several options that are initiated by the passer. One option is to
split the post after the ball has been entered as shown in Diagram 14.
We can also give the passer the option to screen any of the players on the
perimeter. He can screen the corner as shown in Diagram 15 or the point as
shown in Diagram 16. The cutter in Diagram 15 will come over the top and
look for a feed from the post. If the screen is to the point as in Diagram
16, the player in the corner will speed cut low and look for the ball.

Diagram 14 |
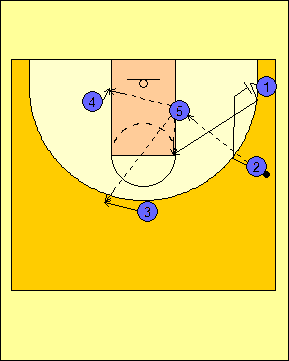
Diagram 15 |

Diagram 16 |
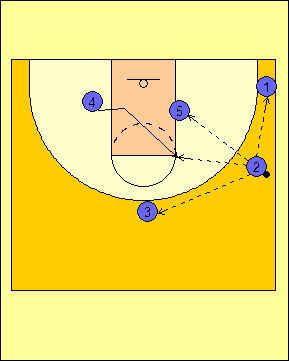
We can also use a speed cut by the passer and the
player in the corner as we show in the sequence illustrated in
Diagrams 17-21. The post can give the ball to either speed
cutter as shown in Diagram 17. If the ball does not get handed
off to either cutter, the point fills the ball-side wing, the passer
screens for the help-side post and the player who made a speed cut
from the corner goes to the help-side wing (Diagram 18).
The help-side post will come to the nail and look for the ball off
of the screen set by the passer and the player who started the set
at the point will look to get a pass at the ball-side wing.
Once the screen is set by the passer, he will go through to the
help-side corner as shown in Diagram 19. Should the ball get
passed back to the ball-side wing, the ball can be entered to the
high post or shot immediately. If the ball is passed
to the nail, we reset the triangle on the side opposite from where
we started. If the player at the nail passes from one side to
the other, he will post up in the ball side post and we will reset
the triangle (Diagrams 20-21).

Diagram 17 |

Diagram 18 |
Diagram 19 |
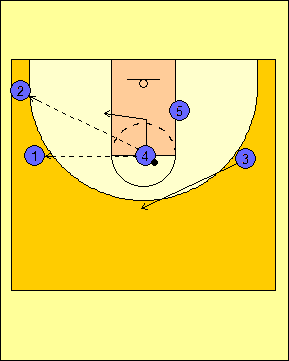
Diagram 20 |

Diagram 21 |
Option #2: Point Entry
If the pass to the post cannot be made, the second
choice is to pass the ball to the point. When the ball is passed
to the point, there are four main options that involve the point man: he
can shoot (Diagram 22), pump fake a post entry and hit the man cutting
from the corner off of a down screen with a pass (Diagram 23), work a
dribble handoff with the cutter off of the down screen from Diagram 23
(Diagram 24), or trade places with the cutter from Diagram 23 and get
the ball back to the wing (Diagram 25).
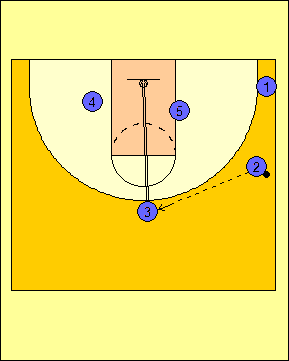
Diagram 22 |
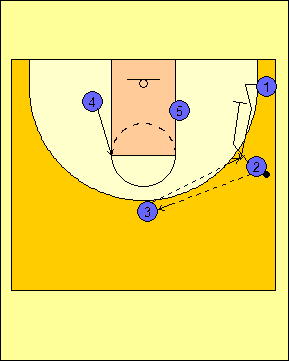
Diagram 23 |
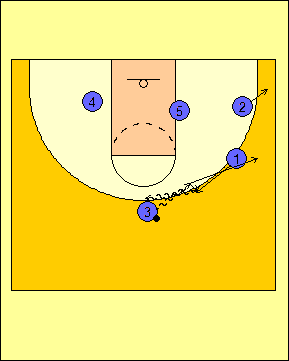
Diagram 24 |

Diagram 25 |
Passing the ball to the point also allows for us to
use the pinch post game. This is when the weak-side post
player flashes to the elbow on his side. Here we have two ways
that the pinch post can be set up and used:
1) The post is being denied so he cuts backdoor and
looks for the pass from the point man (Diagram 26).
2) The post is able to catch the ball at the elbow and
it sets up the remainder of the pinch post game with the point man
(Diagram 27).
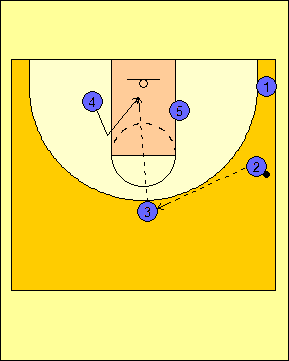
Diagram 26 |
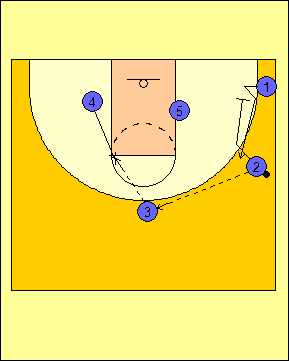
Diagram 27 |
Once the ball is entered to the pinch post, we look
to work a two-man game between the point man and the pinch post.
The post can hand the ball off to the point man (Diagram 28) or the
point man, if he is unable to get the ball back on the handoff, can
pop back to the ball-side wing and get a pass from the pinch post
(Diagram 29). If the ball is thrown back to the point man from
the pinch post at the wing, we want to work a side pick-and-roll
with the pinch post as the ball screener and to keep the other three
players right where they are.
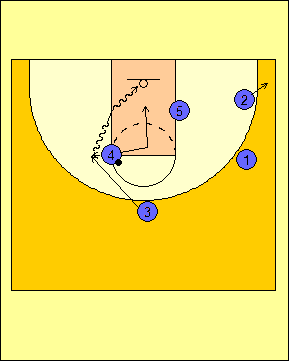
Diagram 28 |

Diagram 29 |
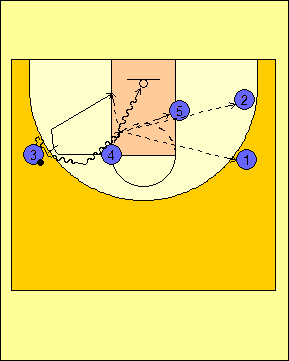
Diagram 30 |
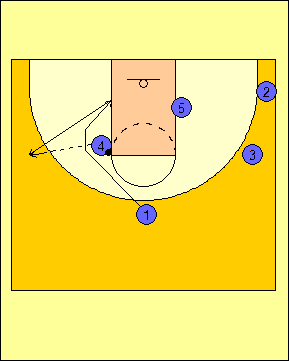
Option #3: High Post Entry
The third option is the pass entry to the high post on
the ball-side with the flash entry. From here, we have a myriad of
options from which to execute the offense.
The first of these is the backdoor for the point man
(Diagram 31). When the ball is passed to the high post, this can
set up the backdoor and the high post will make the pass for the lay-up.
The other option is to either hit #5 on the high-low
entry or to pass the ball back to the man at the wing (Diagram 32).
The player who started the sequence at the wing will float to the lane
line-extended and catch the ball behind the three-point line.
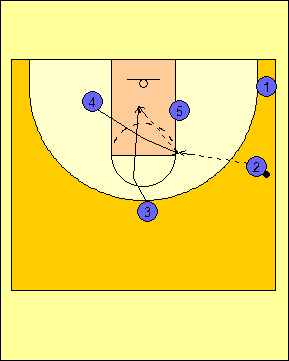
Diagram 31 |

Diagram 32 |
If the ball is thrown right back to the perimeter
and the backdoor or high low are not available, the high post will
then set a down screen for the cutter to bring him back to the point
and the options from the point are initiated (Diagram 33).
If the ball is not thrown to any of the players, the
point man will fill the help-side wing and look for the ball
(Diagram 34). This will then set up the side pick-and-roll.
Diagram 33 |
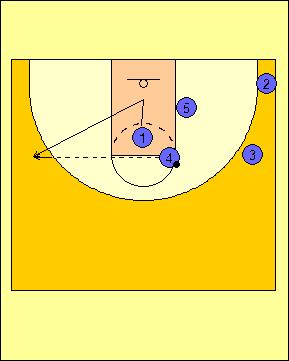
Diagram 34 |
Option #4: Corner Entry
The last place where we would want the ball to go is
into the corner from the wing (Diagram 35). If this happens, we
want to see about throwing the ball into the post from the corner.
If this is not possible, we will then work action to get the penetration
we want.
Diagram 36 shows a back screen by the post on the wing
off of a possible shuffle cut. If we are not able to enter the
ball to the low post by the count of two, the post will step out and set
the back screen.
If we are not able to enter the ball on the back screen,
we will then look to run a pick-and-roll from the corner with the man
who started at the wing going through to the help-side corner. The
post, who comes off of the back screen set for the wing, will set the
ball screen and then roll to the basket (Diagram 37).
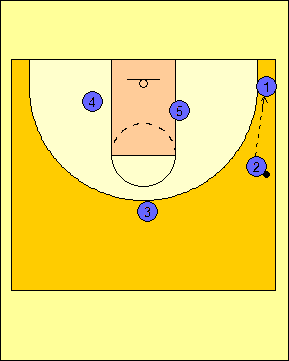
Diagram 35 |

Diagram 36 |
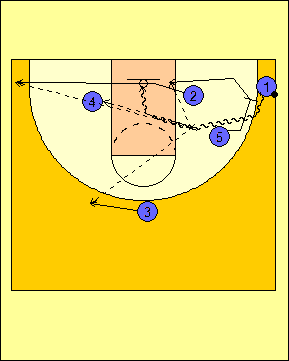
Diagram 37 |
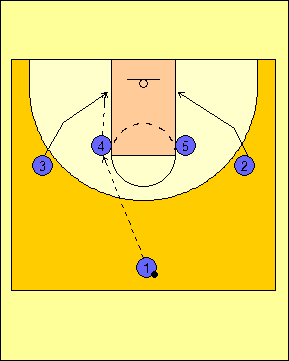
Solo Cut Game
In running the triangle offense from a 1-4 high
alignment, we can set up a solo cut game for our team as a means of
entering the ball into the high post out of the set. Whenever we
enter the ball to the post, both wings will cut to the low blocks on
their respective sides (Diagram 38). If we are not able to hit the
back cut on the ball side, the help-side post will help set a stagger
double and will be the last screener in the action on the help side
(Diagram 39). We are doing this to get the throw over if we cannot
get the backdoor so that we can get into a triangle offense alignment
with the ball in the pinch post.

Diagram 42 |
Two-Guard Front Counters
In running a two-guard front alignment to get into
the triangle offense, the point guard has to make a decision before
the moment of truth arrives. The moment of truth arrives when
his defender is within three feet of him when he has the ball.
He must make the decision to either pass to #3 at the wing, dribble
#3 out, or exercise a counter.
The first counter is the pass from guard to guard.
In Diagram 43, #1 passes to #2 when he sees #3 being overplayed.
In this instance, #4 will pop to the wing on the same side as #2 to
receive the entry pass. From here, the offense gets set up
with the ball-side corner, ball-side post, point, and help-side
short corner being filled.
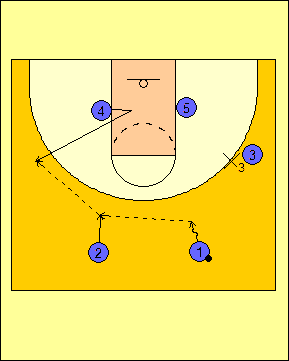
Diagram 43 |
If the guard-to-guard pass and the pass to #3 are unavailable to #1, the offense
can execute the "blind pig" counter featured in Diagrams 44-48. The first
option off of the "blind pig" is the backdoor to the weak-side guard (#2) as
illustrated in Diagram 44. The second option is the handoff to #1 as he
follows #2, who heads to the ball-side corner (Diagram 45).
Should the backdoor and the dribble handoff not be available as options to the
high post, there are two ways the offense can be run from this point. The
first is for #4 to pass to either #2 in the corner or #3 at the wing to set up
the triangle as featured in Diagram 46. After the pass is made, #4 down
screens for #1 so that he can fill the point.
The second option is featured in Diagram 47 and is the pass to the point guard
if #2 and #3 are not open. #1 will finish his cut just short of the front
of the rim and will pop out to the help-side wing. #4 will throw him the
pass and will initiate the wing pick-and-roll as illustrated in Diagram 48.
The pick-and-roll features the drive to the basket, the dump off to the ball
screener, the immediate passes to #3 at the wing and #5 in the post, and the
throw over option to #2 in the corner.
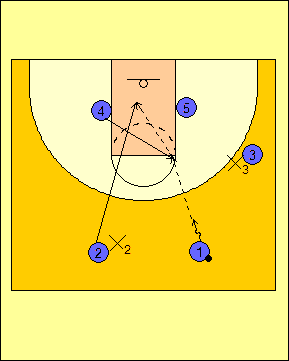
Diagram 44 |

Diagram 45 |
Diagram 46 |
Diagram 47 |
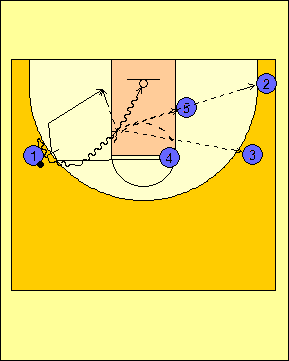
Diagram 48 |
Secondary Break into Triangle Offense
In running the fast break offense into the triangle offense, we give the point
guard three options: pass ahead to the ball-side wing, dribble entry to the
wing, or the middle screen and roll with the trailer. This allows us to
get into the triangle offense or score quickly based on options in the offense.
When the point guard passes to the ball-side wing on the break, he has two
options: the first is to cut to the ball-side corner as illustrated in Diagram
49. This will necessitate the trailer to set a down screen for the
help-side wing so that we can get into the offense. From here, we can run
any of the four options from the wing.
In Diagram 50, we give the point guard the option of cutting away to the
help-side corner. When this happens, the trailer moves to the help-side
low post and the help-side wing spots up at the free-throw line extended.
The post will then set a ball screen for the wing with the ball and initiate the
side pick-and-roll.
If the point guard is not able to pass the ball ahead, he can dribble out the
wing to the ball-side corner as shown in Diagram 51. From here, the point
guard can set up the offense once the trailer has set his down screen for the
weak-side wing. If there is a switch on the down screen by the trailer in
either Diagrams 49 or 51, we will look to hit the trailer slipping to the basket
on the down screen.
Finally, the point guard can also use the trailer to set up a middle
screen-and-roll situation illustrated in Diagram 52. The weak-side wing
goes to the corner, the post rolls from one side to the other, the screener
dives to the front of the rim, and the ball-side wing fills the point once the
point guard utilizes the screen. We want the point guard to penetrate the
defense and attack the rim. However, if he is unable to do so, the point
guard should go to the wing.
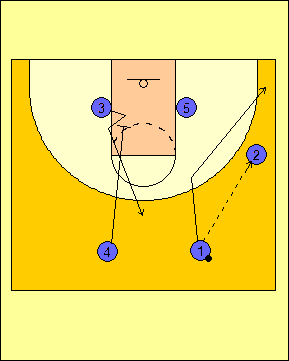
Diagram 49 |
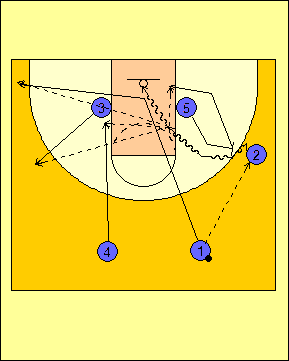
Diagram 50 |
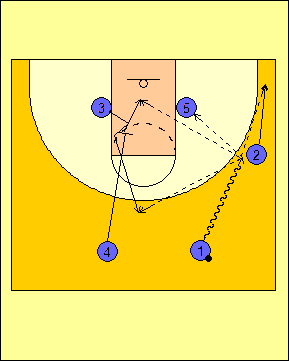
Diagram 51 |
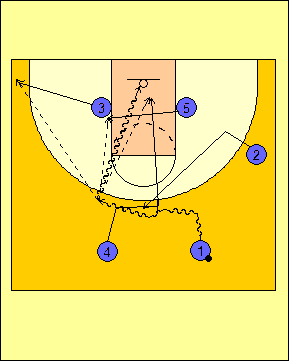
Diagram 52 |
Teaching the Triangle Offense
When first introducing the triangle offense, the best way is to start by
teaching it five-against-zero. The reason for this is so that the offense
can be properly introduced with the whole part of the offense and the whole team
concept presented to the team. Once this has been mastered, the next move
is to work on the breakdowns in the two-man and three-man games.
After the introduction has been made five-on-zero, the breakdown drills can be
implemented before starting five-on-five action. One way is to work on
two-man drills involving the pinch post. Since the pinch post will be
incorporated most of the time in the triangle offense, it would be to your
advantage to work on as many options as possible from it. Work on the
options against no defense before working on it live against an actual defense.
The other set of breakdown drills are from the three-man game in the triangle
offense. This incorporates the wing, corner, and ball-side post.
Everything from the corner option to the post entry from the wing can be worked
on in these drills. Again, work on it against no defense before running it
against a defense. Once dummy introduction and the breakdown drills have
been completed successfully, you can then work on the offense against a live
defense.
RETURN TO MEMBERSHIP AREA
© 2010-2017 Alan Peel Enterprises
|