 |
ZONE OFFENSE
Thanks to Syracuse, West Virginia, Baylor and others, the prevalence of zone
defenses have taken shape in college basketball. Moreover, there are teams
on the high school levels and even some professional teams that feature some
sort of zone defense as a part of their defensive schemes. Because of
this, offenses need to find ways to run a solid and consistent offense against
zone defenses. This article will provide you with three types of zone
offenses and ways that you can teach them to your team so that you can be
prepared when you face a zone defense team.
The Need for Zone Offense
With the increasing popularity in playing multiple defenses, several teams have
decided to start playing zone defenses. In being a team prepared for a
zone (either by surprise or knowing in advance thanks to scouting), you will
need to have some sort of zone offense for these situations. If not, your
players will become confused at this defense that you have not prepared them for
in advance of the game.
Concepts Designed to Defeat Zone Offenses
When putting together a zone offense, there are a number of concepts that can be
used. These concepts are:
-
Filling the natural gaps of the zone.
Zone defenses rely on players guarding area, not specific players.
By getting into the right alignment against a given zone, we can get
certain players to be guarded by two players or to be left wide open
if they are aligned in the natural gaps of the zone.
-
Post penetration. Even though the zone
defense is designed to take away the middle of the floor, this does
not mean that the zone completely eliminates post penetration by the
offense. We can find ways to get the ball inside and continue
to honor the post even against a zone defense.
-
Ball and player movement to attack the zone.
When we use the pass and cutters, we are never using passing and
cutting for the sake of passing and cutting. All of our
offensive actions must be done with a purpose. When we pass,
we want to always honor the post area or skip the ball if at all
possible. Also, players cannot stay stationary against a zone
because that affords the zone defense the luxury of not having to
expend itself as much as we would like.
-
Proper use of screens. When we run our
zone offense, we need to know which defensive players to screen
based on the slides of the zone. We also want our players to
learn how to cut off of screens properly if they are using the help
with cuts.
-
Use of the dribble. One way that we can
attack a zone is by using the dribble wisely. Many teams that
play zone are accustomed to passing as a way to move the ball.
By having this extra added weapon at our disposal, we create a new
situation that the zone has to defend.
-
Utilization of personnel. Our players
have to be put in positions in the zone offense to be successful.
Not every player who plays basketball can shoot the three-point shot
or score from the low post. Against zone defenses, we can put
players in specific spots and allow them to be successful doing what
they do best.
-
Ball and shot fakes. This is an
underrated part of zone offense because the zone is so predicated on
ball movement. Players are anticipating what the ball does
more than what the actual offense does. Shot fakes by
offensive players can force the defensive players in the zone to
raise their hands above their head, allowing for some advantageous
passing angles. Pass fakes can get the zone to move allowing
passing angles that were once thought to be impossible.
If I had to sum it all up in a sentence, I would say that our zone offense
concepts would be to get in the zone natural gaps and attack the zone with
purpose using basic basketball fundamentals of cutting, passing, dribbling,
screening and ball fakes. Using these concepts, I have designed a method
of attacking zone defenses by putting all of these offensive concepts into a
structure that is simple and players can enjoy running in a game.
Types of Zone Offense
When choosing a type of zone offense, the philosophy is simple: use a zone
offense alignment that allows your offense to attack the gaps of the zone.
For this, we have two types of zone offenses that we will use to attack the two
types of zone alignments.
The first type of zone offense is the odd-guard front zone offense. The
odd-guard front zone offense is designed to work against 2-3 and 2-1-2 zones
because of the even-guard front nature of both of these zone defenses.
The second type of zone offense is the even-guard front zone offense. The
even-guard front zone offense has been created to work against 1-3-1, 1-2-2 and
3-2 zones because all three of these types of zones employ odd-guard fronts.
When we talk to our players about zone offense, we remind them that we run our
even-guard front zone offense against odd-guard front zones and our odd-guard
front zone offense against even-guard front zones.
Odd-Guard Front Zone Offense
The first of these alignments is what we call "2-Down". In this zone
alignment, we will put #4 and #5 in the short corners and #2 and #3 just below
the free-throw line extended. #1 will assume the point position. The
basic concept of this offense is to get the ball to #2 and #3 and get into a
high-low look. We want to get the ball into the short corner with the
screen on the middle man of the zone or to get the ball to the elbow.
It is absolutely imperative that #2 and #3 are below the free-throw line
extended because if they are, they will draw the forwards (X3 and X4) in the
match-up. This is as opposed to drawing either X1 or X2. Doing this
will open up the middle with our action inside for #4 and #5 and it will allow
us to attack inside against the zone.
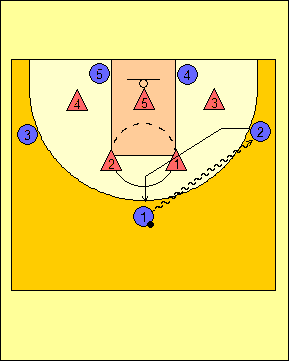
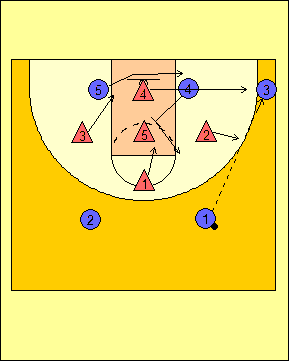
Diagrams of "2-Down" vs. 2-3 Zone
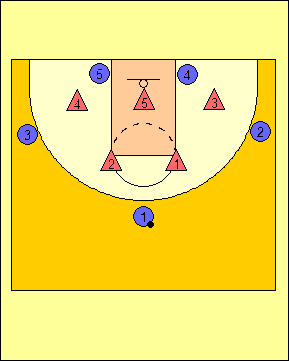
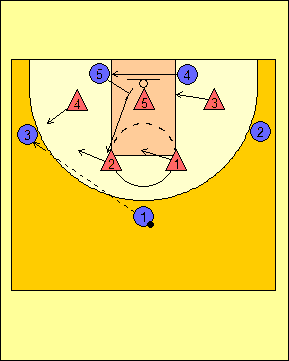
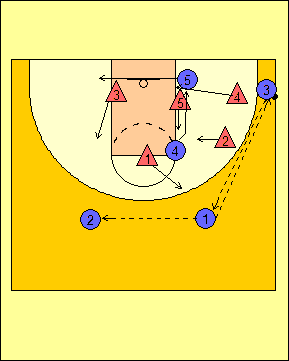
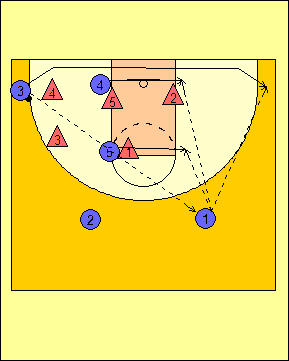
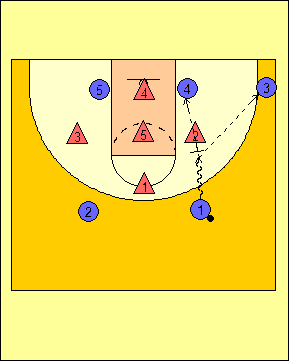
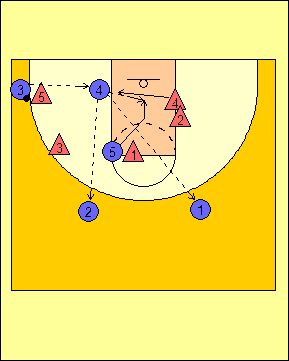
The initial alignment of "2-Down" shows #4 and #5 in the
short corners, #2 and #3 in the gaps just below the
free-throw line extended and #1 at the point with the ball. |
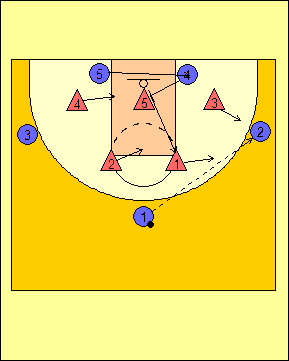
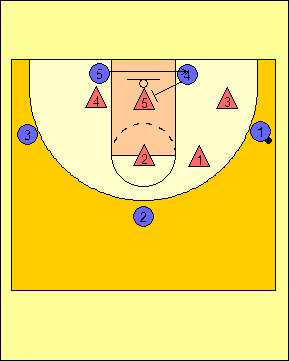
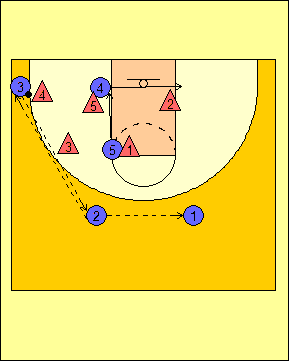
When the ball goes to #2 below the free-throw line extended,
#4 screens the middle man of the zone (X5) and #5 comes
under the screen. As soon as #5 clears on his cut, #4 will
slip the screen to the high post and look for a pass. |

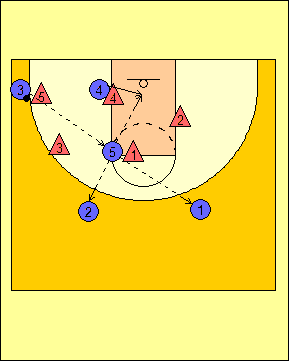
When #2 has the ball, his first pass look is to #5 in the
short corner. When #5 gets the ball, his first pass look is
to #4 as #4 dives to the front of the rim. His second and
third pass looks are to #3 and #1 respectively. |

The second pass look for #2 is to #4 in the high post area.
When #4 gets the ball, his first pass look is a high-low
look at #5 going to the basket. His second and third pass
looks are to #3 and #1 respectively. |
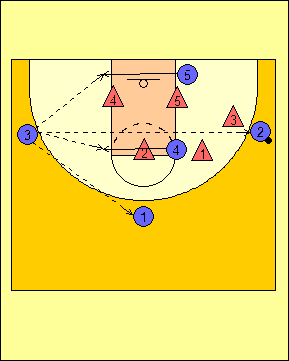
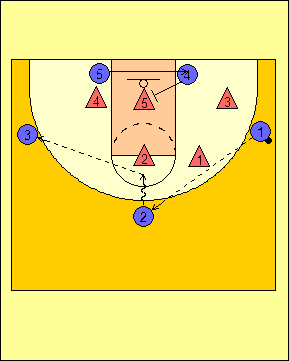
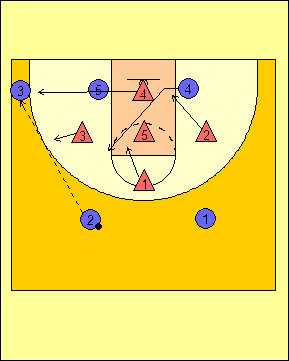
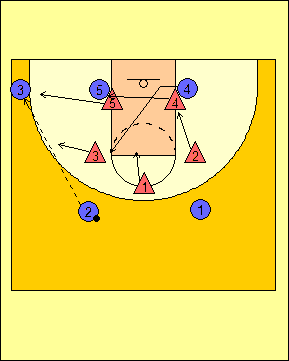
The third pass look for #2 is to make the skip pass to #3 on
the top of the zone. When this happens, #4 and #5 bleed
across. The pass looks, in order, for #3 are #5, #4, #2 and
#1. |
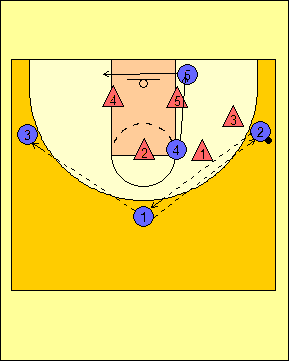
The fourth pass look for #2 is to make the pass back to #1.
When this happens, #4 drops down to the ball-side short
corner as #5 moves to the help-side short corner. From
here, #1's pass looks are the reversal to #3 or back to #2. |
When the ball goes to #2 below the free-throw line extended,
#4 screens the middle man of the zone (X5) and #5 comes
under the screen. As soon as #5 clears on his cut, #4 will
slip the screen to the high post and look for a pass. |
When #3 has the ball, his first pass look is to #4 in the
short corner. When #4 gets the ball, his first pass look is
to #5 as #5 dives to the front of the rim. His second and
third pass looks are to #2 and #1 respectively. |

The second pass look for #3 is to #5 in the high post area.
When #5 gets the ball, his first pass look is a high-low
look at #4 going to the basket. His second and third pass
looks are to #2 and #1 respectively. |

The third pass look for #3 is to make the skip pass to #2 on
the top of the zone. When this happens, #4 and #5 bleed
across. The pass looks, in order, for #2 are #4, #5, #3 and
#1. |
The fourth pass look for #3 is to make the pass back to #1.
When this happens, #5 drops down to the ball-side short
corner as #4 moves to the help-side short corner. From
here, #1's pass looks are the reversal to #2 or back to #3. |

Post Adjustment to "2-Down" vs. a 2-3 zone:
If #5 is a center and you want to keep him in the low post
area at all times, you can have #4 flash to the high post
instead of having #5 screen for #4. |
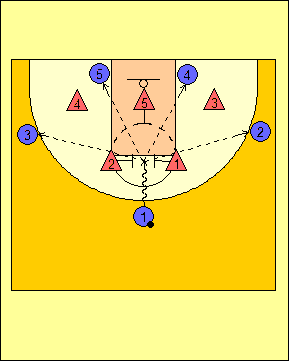
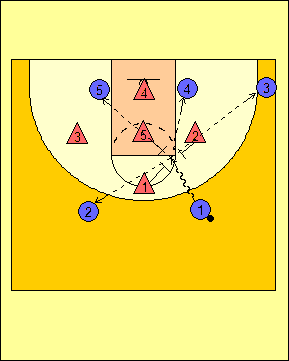
The first dribble that can be used against the zone is the
penetration dribble. In this illustration, #1 dribbles
between X1 and X2. He also draws X5 enabling him to
pass to either #2, #3, #4 or #5 |
Another thing we can do with the dribble is the shallow cut.
Here, #1 takes the ball off of the top of the zone and #2
cuts and replaces #1. |
When #1 dribbles the ball off of the top to initiate the
shallow cut, we want the ball-side low post to screen the
middle of the zone. We can still get the ball inside
with the pass. |
If the ball goes back to the point after the shallow cut, we
want to move right into dribbling at the defender.
Here, #2 dribbles at X2 and draws him. Once the
defender is drawn, we want a quick pass to the wing to
complete the ball reversal from one side to the other. |
Even-Guard Front Zone Offense
The other alignment is what we call "2-Up". This is a zone offense with an
even-guard front to match up against the odd-guard front of a zone defense.
The two guards on top of the zone fill the top gaps with the one post player in
each of the short corners. Our #3 will run from one corner to the other
and will always occupy the ball-side corner.
Like that of "2-Down", whenever the ball goes below the free-throw
line-extended, we will have a high-low look and we will get into it similar to
that of "2-Down". We will have to make some adjustments based on the zone
we face and we will make those accordingly. The only difference is that we
will have an even-guard front instead of an odd-guard front.
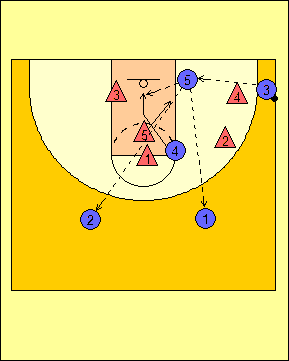
Diagrams of 2-Up vs. 1-3-1 Zone Defense
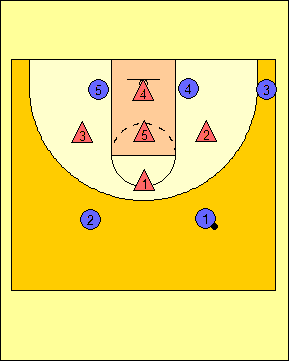
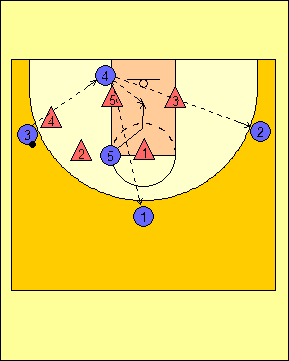
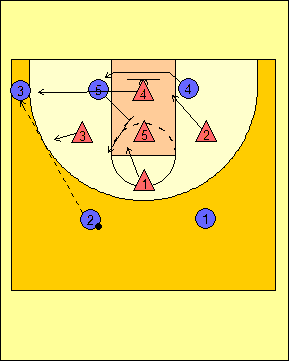
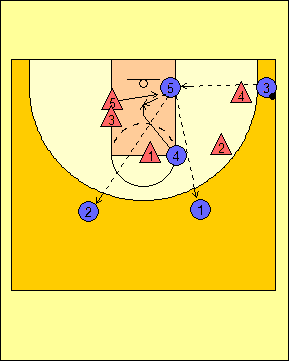
The initial alignment of "2-Up" against the 1-3-1 zone shows
#1 and #2 splitting the point man in the zone (X1) and #3 in
the ball-side corner. #4 is in the ball-side short
corner and #5 is in the help-side short corner. |
When the ball goes into the corner to #3, #4 screens the
middle man of the zone (X5) and #5 comes under the screen.
As soon as #5 clears on his cut, #4 will slip the screen to
the high post and look for a pass from #3. |
When #3 has the ball, his first pass look is to #5 in the
short corner. When #5 gets the ball, his first pass
look is to #4 as #4 dives to the front of the rim. His
second and third pass looks are to #2 and #1 respectively. |
The second pass look for #3 is to #4 in the high post area.
When #4 gets the ball, his first pass look is a high-low
look at #5 going to the basket. His second and third
pass looks are to #2 and #1 respectively. |
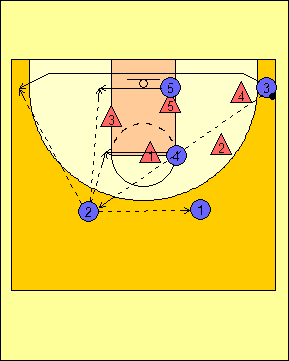
The third pass look for #3 is to make the skip pass to #2 on
the top of the zone. When this happens, #4 and #5
bleed across and #3 runs the baseline. The pass looks,
in order, for #2 are #4, #5, #3 and #1. |
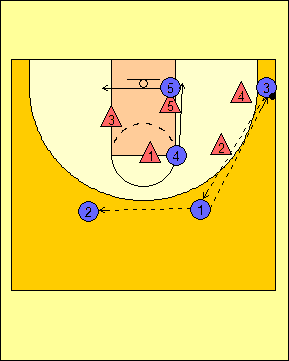
The fourth pass look for #3 is to make the pass back to #1.
When this happens, #4 drops down to the ball-side short
corner as #5 moves to the help-side short corner. From
here, #1's pass looks are the reversal to #2 or back to #3. |
When the ball is passed from #2 to #3, #5 sets the
screen on the middle man of the zone (X5) and #4 goes to
the ball-side short corner. After #4 clears, #5
will slip to the ball-side high post and look for the
ball. |
When #3 has the ball, his first pass look is to #4 in
the short corner. When #4 gets the ball, his first
pass look is to #5 as #5 dives to the front of the rim.
His second and third pass looks are to #1 and #2
respectively. |
The second pass look for #3 is to #5 in the high post
area. When #5 gets the ball, his first pass look
is a high-low look at #4 going to the basket. His
second and third pass looks are to #1 and #2
respectively. |
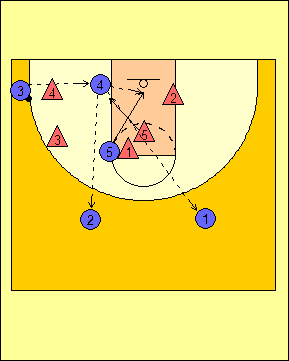
The third pass look for #3 is to make the skip pass to
#1 on the top of the zone. When this happens, #4
and #5 bleed across and #3 runs the baseline. The
pass looks, in order, for #1 are #5, #4, #3 and #2. |
The fourth pass look for #3 is to make the pass back to
#1. When this happens, #4 drops down to the
ball-side short corner as #5 moves to the help-side
short corner. From here, #1's pass looks are the
reversal to #2 or back to #3. |
Post Adjustment to "2-Up" vs. a 1-3-1 zone:
If #5 is a center and you want to keep him in the low
post area at all times, you can have #4 flash to the
high post instead of having #5 screen for #4. |
Either #1 (as illustrated) or #2 can attack the gaps
using the dribble. Here, #1 attacks the gap and
draws in the defenders (X1, X2 and X5) to open up
passing lanes for #2, #3, #4 and #5. |
Either #1 (as illustrated) or #2 can attack the wing
defenders using the dribble. Here, #1 dribbles at
and draws X2. Because of this, #3 and #4 become
available passing targets for #1 off the dribble. |
Whenever we face a team that likes to run a 1-2-2 or 3-2 zone defense, we have
to take into consideration the concept of no middle man in the zone. By
making a slight adjustment, we can still run our "2-Up" zone offense without any
trouble. The adjustment that is made is that we will screen the help-side
post defender.
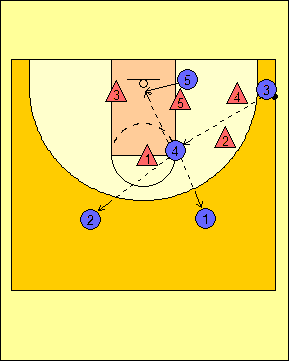
Diagrams of 2-Up vs. 1-2-2 Zone

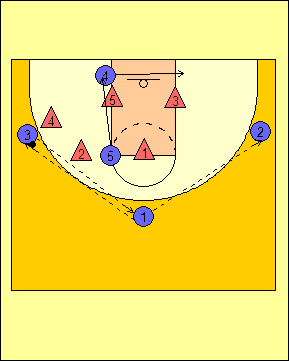
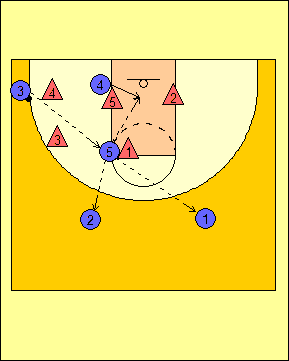
The initial alignment of "2-Up" against the 1-2-2 zone shows
#1 and #2 splitting the point man in the zone (X1) and #3 in
the ball-side corner. #4 is in the ball-side short
corner and #5 is in the help-side short corner. |

When the ball goes into the corner to #3, #4 screens the
help-side post man in the zone (X5) and #5 comes under the
screen. As soon as #5 clears on his cut, #4 will slip
the screen to the high post and look for a pass from #3. |
When #3 has the ball, his first pass look is to #5 in the
short corner. When #5 gets the ball, his first pass
look is to #4 as #4 dives to the front of the rim. His
second and third pass looks are to #2 and #1 respectively. |

The second pass look for #3 is to #4 in the high post area.
When #4 gets the ball, his first pass look is a high-low
look at #5 going to the basket. His second and third
pass looks are to #2 and #1 respectively. |
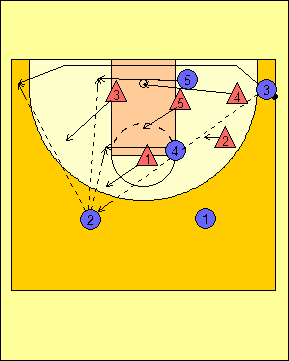
The third pass look for #3 is to make the skip pass to #2 on
the top of the zone. When this happens, #4 and #5
bleed across and #3 runs the baseline. The pass looks,
in order, for #2 are #4, #5, #3 and #1. |
The fourth pass look for #3 is to make the pass back to #1.
When this happens, #4 drops down to the ball-side short
corner as #5 moves to the help-side short corner. From
here, #1's pass looks are the reversal to #2 or back to #3. |

When the ball is passed from #2 to #3, #5 sets the
screen on the middle man of the zone (X5) and #4 goes to
the ball-side short corner. After #4 clears, #5
will slip to the ball-side high post and look for the
ball. |
When #3 has the ball, his first pass look is to #4 in
the short corner. When #4 gets the ball, his first
pass look is to #5 as #5 dives to the front of the rim.
His second and third pass looks are to #1 and #2
respectively. |
The second pass look for #3 is to #5 in the high post
area. When #5 gets the ball, his first pass look
is a high-low look at #4 going to the basket. His
second and third pass looks are to #1 and #2
respectively. |

The third pass look for #3 is to make the skip pass to
#1 on the top of the zone. When this happens, #4
and #5 bleed across and #3 runs the baseline. The
pass looks, in order, for #1 are #5, #4, #3 and #2. |

The fourth pass look for #3 is to make the pass back to #1.
When this happens, #4 drops down to the ball-side short
corner as #5 moves to the help-side short corner. From
here, #1's pass looks are the reversal to #2 or back to #3. |
Post Adjustment to "2-Up" vs. a 1-2-2 zone:
If #5 is a center and you want to keep him in the low post
area at all times, you can have #4 flash to the high post
instead of having #5 screen for #4. |
|

The penetration dribble is available to #1 and #2. In
this illustration, #1 dribbles into the gap and draws the
defenders. Because of this, he can pass to #2 or #3 on
the perimeter or #4 or #5 in the short corners. |

The dribble can also be used in "2-Up" against a 1-2-2 or
3-2 zone by dribbling at the wing defender. Here, #1
dribbles at X2 and draws him. This allows #3 to get
more spacing for a possible jump shot.
|
|
Teaching Zone Offense
When first teaching a team how to run a zone offense, the best way to do it is
to have them learn it without facing a defense first then to introduce it
against an actual zone defense even if that zone defense is an experimental one.
The first time my teams will run a zone offense is during the offensive script
period of practice. We teach the rules of the zone with ball movement and
player movement because they are the two most critical parts of the entire
offense. Then, once the ball and player movements have been mastered, I
then add the use of the dribble against the zone and the necessary adjustments
that have to be made.
After the players have a good understanding of the zone offense, I will then use
a series of experimental zone defenses against our zone offense. The only
zones I will show our players are the 1-2-2, 1-3-1, and 2-3 zone defenses
because they are the most common and the 1-2-2 and 2-3 zones can also substitute
for the 3-2 and 2-1-2 zone defenses respectively. The zone defense run by
our scout team is really more of a token zone, but I will allow the defense to
take advantage of the offense's miscues so that the simulation runs closer to a
real situation.
Finally, I would prefer to run some defensive recognition drills if my team runs
motion offense as its primary or exclusive offensive attack. My reasoning
is that I want my players to be able to determine whether or not the defense
they are facing is a man-to-man defense or a zone defense.
Before you do any of this, be sure you know what kind of personnel you have at
your disposal. You need to know what kind of personnel you have so that
you can determine what adjustments you need to make and where you need to
position your players. Keep it simple for your players and you will be
successful.
RETURN TO MEMBERSHIP AREA
© 2010-2017 Alan Peel Enterprises
|
|