|

Basketball Coaching DVD's at Championship Productions
MATCH-UP ZONE DEFENSE
One of the toughest defenses that I have even seen is the match-up zone defense
that was run briefly when I was a student at William Jewell College. I
learned about this defense from my mentors at William Jewell, Larry Holley and
the late Lee Kariker. Both of these coaches incorporated the match-up zone
with many of their successful William Jewell teams including those that appeared
in the NAIA National Tournament.
This article will discuss the match-up zone defense and the ways in which it can
be incorporated into your team's defensive arsenal.
Advantages of the Match-Up Zone Defense
The first advantage of the match-up zone defense is that it is a flexible
defense. We can adjust this defense to a number of alignments to where we
can either defend against an even-guard front zone offense or against an
odd-guard front zone defense.
Second, the match-up zone defense is extremely difficult to attack.
Because the match-up defense is not a straight zone defense, it becomes
difficult to prepare for because not many coaches know the movements of the
defensive players in the match-up defense.
Third, the match-up zone defense can be used to start the fast break.
Because the defense forces several bad shots and can force turnovers, the
defense lends itself well to the fast break. We want to get steals, block
shots and rebound the first missed shot so that we can run the break and the
match-up zone has the capabilities to get stops that lead to our transition
offense.
Disadvantages of the Match-Up Zone Defense
There are three major disadvantages with running the match-up zone defense.
The first is that the match-up zone does not handle cutters very well.
Because you are playing a hybrid of man-to-man, but playing it within a space.
Cutters cause disruption and confusion. As I mentioned in my piece on zone
offense, player movement against the zone is very important to running a
successful zone offense.
Second, the match-up zone has problems with skip passes. Because the
defense is designed to guard one side of the floor, a good skip pass can present
problems. Fortunately, consecutive skip passes are typically rare in zone
offense and we can control just about everything one pass away.
Finally, the match-up zone struggles with help-side rebounding. Because
all of our defensive manpower is on one side of the floor once the ball is below
the free-throw line extended, the offense has a positioning advantage against
the defense. However, later in the piece I will discuss what we do to get
into position to rebound the basketball.
Setting Up the Defense
When we position X1 and X2, we have two possible ways to do it and we will make
adjustments according to the type of team that we are playing. Regardless
of how the zone is set up, X3, X4 and X5 will have the same set-up when we begin
running the match-up zone defense.
The first is to stack them with X1 at the point and X2 behind him. This
defensive alignment allows us to force a team into an even-guard front offense
against the zone. Once this happens, X1 will take the ball and X2 will go
help side. We call this defense "13-Match" because of the alignment of all
of our players (Diagram 1).
The second, and one that we will use against a triple-post team, is to show the
defense from a 2-3 look with both guards at the elbows. We will position
X1 on the left elbow because we want him to point the ball and most offenses
will go to the defense's left to initiate the offense. Because of this, X2
will start on the right elbow. This defense is called "21-Match" because
of the alignment of all of our players (Diagram 2).
On our back line, we will position X3 outside the lower left block, X4 on the
lower right block and X5 underneath the basket. The three of them will be
working as a unit on the back line and will have rules based on the movement of
the players below the free-throw line extended and the ball.
Positioning in the Match-Up Zone
When we set-up the match-up zone defense, we have four positions for our guards
and three positions for our backline players. These positions are based on
where the players are on the floor and where the ball is. Each of these
positions must be communicated verbally by our defensive players so that
everyone knows where everyone is.
Positioning the Guards
If the ball is above the free-throw line extended, it will be guarded by one of
the two guards. The guard on the ball is in the "Ball" position and will
call out "Ball! Ball! Ball!" when he is guarding the basketball.
If the ball is above the free-throw line extended, the guard who is not guarding
the ball is in the "Widen" position. He will set up at the middle of the
free throw line and yell out "Widen! Widen! Widen!" when in this position.
This position is also assumed by the help-side guard
If the ball goes below the free-throw line extended, but not in the corner, the
ball-side guard will assume the "Half" position. His call is "Half! Half!
Half!" and he will be one step outside of the lane and on the free-throw line
extended.
The last guard position is the "Cut-Off" position. Whenever the ball goes
to the corner, the guard has the responsibility to deny the pass by stepping out
on the perimeter and getting into a denial position on the player who is on the
perimeter and is one pass away. This guard will yell out "Cut! Cut! Cut"
as long as he is denying the wing.
Positioning the Backline Players
When the ball is at or below the free-throw line extended, we have three
positions for our backline players. These positions can change based on
what the offense does in regards to ball movement and player movement.
The first position is the "Up" position. This backline player is guarding
the ball on the perimeter and he will yell out "Up! Up! Up!" for as long as he
is guarding the ball.
The second position is the "Middle" position. This player will dead front
the low post and ensure that the ball does not go inside to a post player.
When in this position, he will call out "Middle! Middle! Middle!" to alert the
rest of the defense that the low post is being fronted.
The third position is what we call "Hoop". This player sets up underneath
the basket and will guard against any kind of a lob pass into the low post.
As long as this player is in this position, his call is "Hoop! Hoop! Hoop!"
The first type of rotation is the long rotation. In this rotation, we will
switch all three positions no matter what. The players will rotate from
"Hoop" to "Middle" to "Up". We will use the long rotation on players who
catch the ball and do not step out from the perimeter.
If the ball is below the free-throw line extended and is passed to a player on
the perimeter who had previously been inside the three-point line, we will use
the short rotation. Here, we will merely switch the "Up" and "Middle"
positions. The player guarding the ball in the "Up" position will move to
the "Middle" position while the player who was in the "Middle" position will
move to the "Up" position. We will
only use the short rotation if the low post player steps out to receive a pass
in the corner.
When the ball is above the free-throw line extended, there is nothing being
called out because the players are in their natural positions on the back row of
the match-up defense.
Match-Up Zone Diagramed
The following diagrams illustrate the match-up zone defense in a number of
situations that we will typically face in running the match-up zone defense:
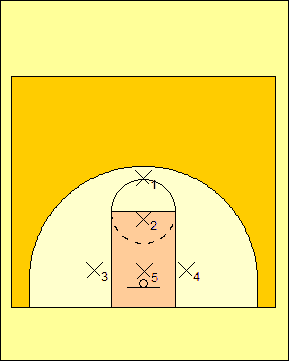
Diagram 1: Normally, we will run a 1-1-3 look to
start our match-up zone defense. This alignment is
what we call "13-Match" because it closely resembles a 1-3-1
look even though X3 and X4 are near the low blocks. |

Diagram 2: If we can dictate a favorable match-up, we
will call "21-Match" and align in a 2-3 zone look before we
get into our match-up zone defense. |
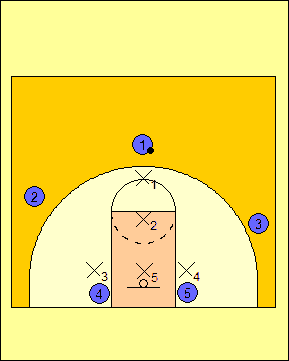
Diagram 3: The initial alignment here shows X1 on the
ball against an odd-guard front offense. X1 assumes
the "Ball" position and X2 assumes the "Widen" position and
guards the high post area. |
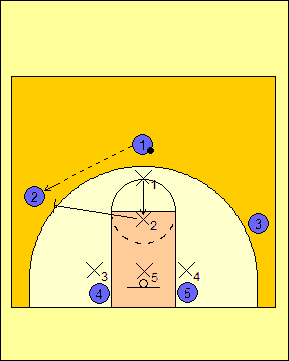
Diagram 4: When the ball is passed to a player from
one player above the free-throw line extended to another,
the guards switch assignments. Here, X1 drops to
"Widen" while X2 moves to "Ball". |
Read the full article and many others by signing up for a Coach Peel
Basketball membership today.
Membership Subscription with Monthly Payments: $6.00 per
month
Membership Subscription with Quarterly Payments:
$15.00 per quarter (save over 16.6%)
Membership Subscription with Annual Payments: $50.00 per
year (save over 30.5% & get your first 30 days free!)

© 2010-2017 Alan Peel Enterprises
|